Your first multisample
One simple path: record a plugin in Easy mode, check the loops, play a bit, then export. Numbers on each screenshot match the list underneath. Prefer a hardware synth or custom note picks? Those sit in the indented nice to know blocks — not required for the main path.
Tip: in the LoopSeek app, hover the mouse briefly over a button or control — most show a short tooltip with extra info (this does not apply to the PDF or this online guide).
1 Start screen
Open LoopSeek. For this guide you will create samples from a plugin.
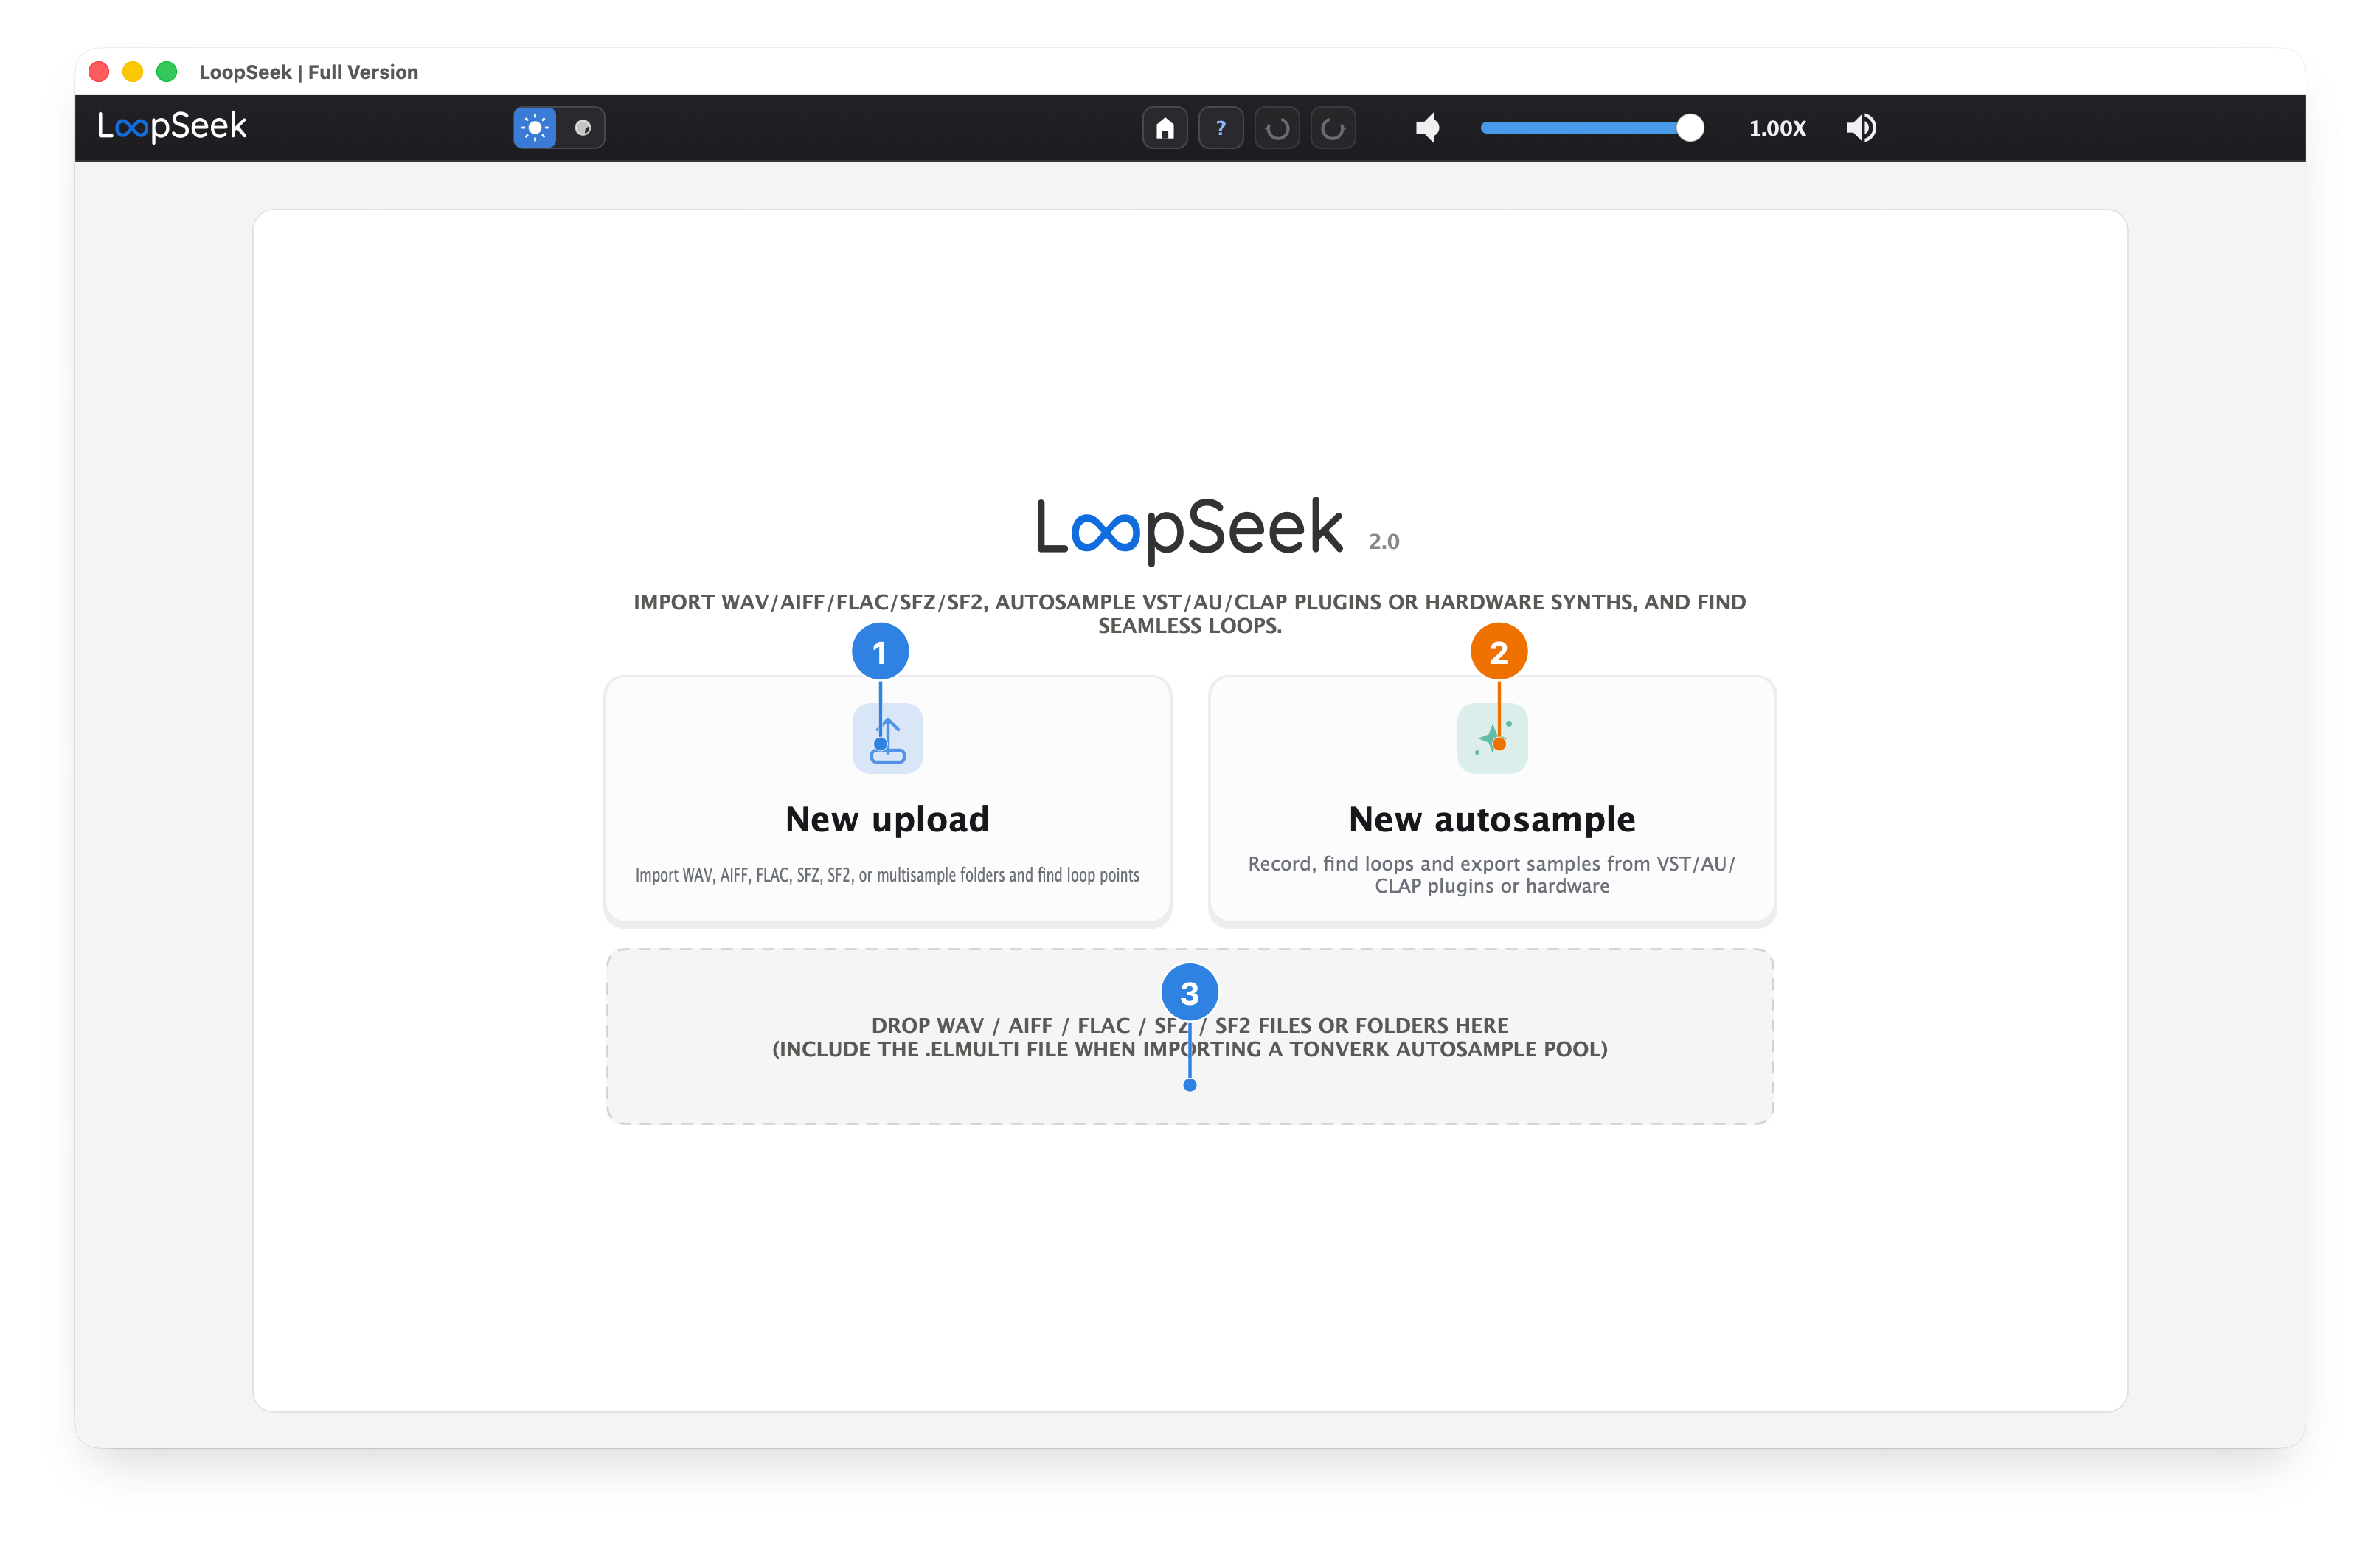
- 1New upload — import existing WAV/folders (not used in this guide).
- 2New autosample — click this to record from a plugin or hardware.
- 3Drop zone — optional: drag files here instead of using New upload.
2 Light / dark theme & Easy / Expert
After you open Autosample, the top bar always has the appearance toggle and the Easy / Expert switch. You can change both anytime.
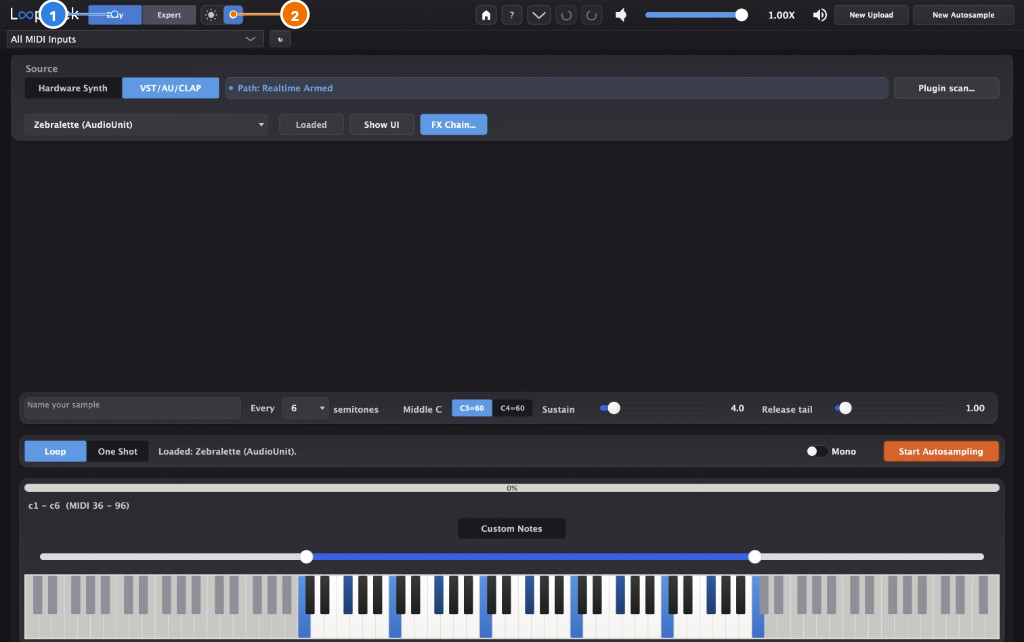
- 1Easy / Expert — switch whenever you like. This guide stays on Easy.
- 2Sun / moon — light or dark appearance. Pick what is easiest on your eyes.
This capture is a darker, lower-resolution frame that may already show a plugin from a later session — ignore the rest of the screen; only pins 1–2 (mode + theme) matter here. A clean empty Autosample follows in step 3.
Switching Easy ↔ Expert keeps most Expert toggles in memory (velocity layers, Round Robin mapping, dual layer), but Easy capture always records a simple note grid: one velocity, no Round Robin, no second layer. Switching to Easy also forces the loop algorithm to Helix (100% assist, crossfade 0) for the Easy path — going back to Expert does not auto-restore Flux/X-ray; pick the algorithm again if you need it.
3 Easy Autosample — what you see
Stay on Easy (blue). The screen is three parts from top to bottom.
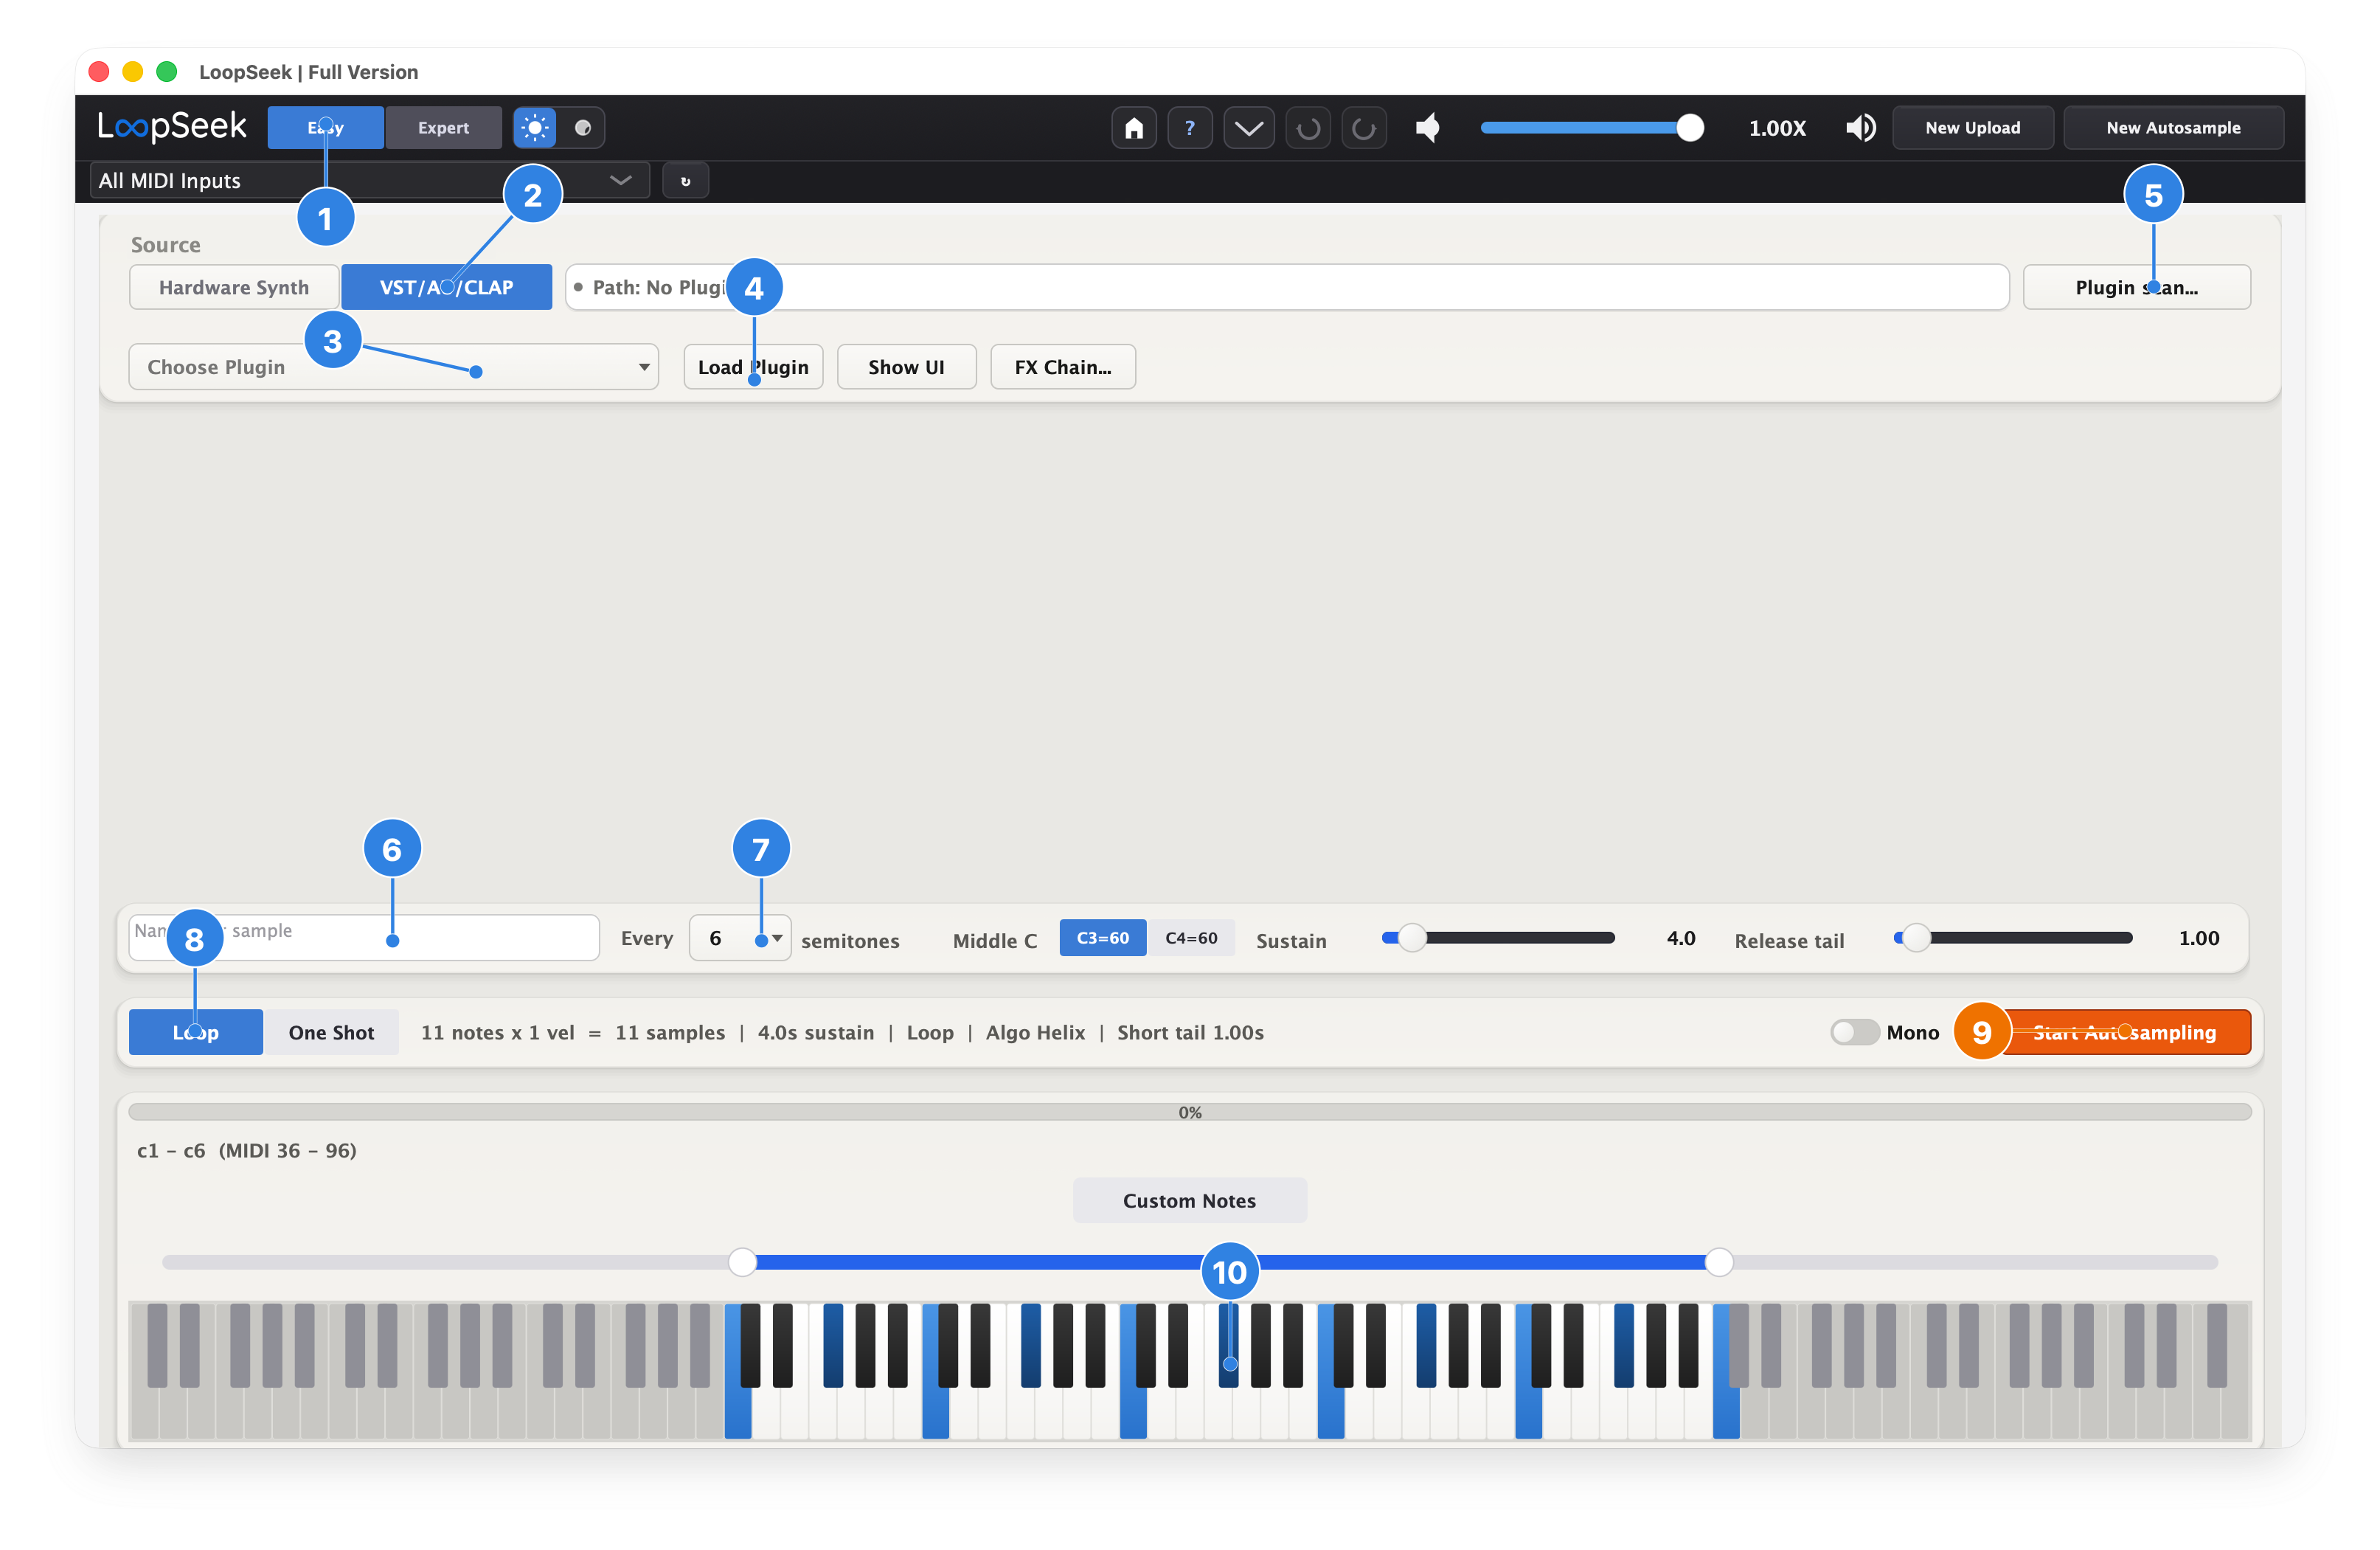
- 1Easy / Expert — keep Easy selected in the app (see also step 2).
- 2VST/AU/CLAP — choose plugin (not Hardware) for this guide.
- 3Choose Plugin — pick an instrument from the list.
- 4Load Plugin — load it into LoopSeek.
- 5Plugin scan… — if the list is empty, open this (detailed in the next step).
- 6Name your sample — type a name later (step 6).
- 7Every N semitones — how dense the note grid is.
- 8Loop vs One Shot — pads/strings usually Loop.
- 9Start Autosampling — the orange button (use after setup).
- 10Keyboard + blue keys — which notes will be recorded.
Pin 5 marks Plugin scan… at the top right of Source — use it once if nothing appears under Choose Plugin.
4 Scan plugins (first time)
If the list is empty, open Plugin scan… once so LoopSeek finds your instruments.
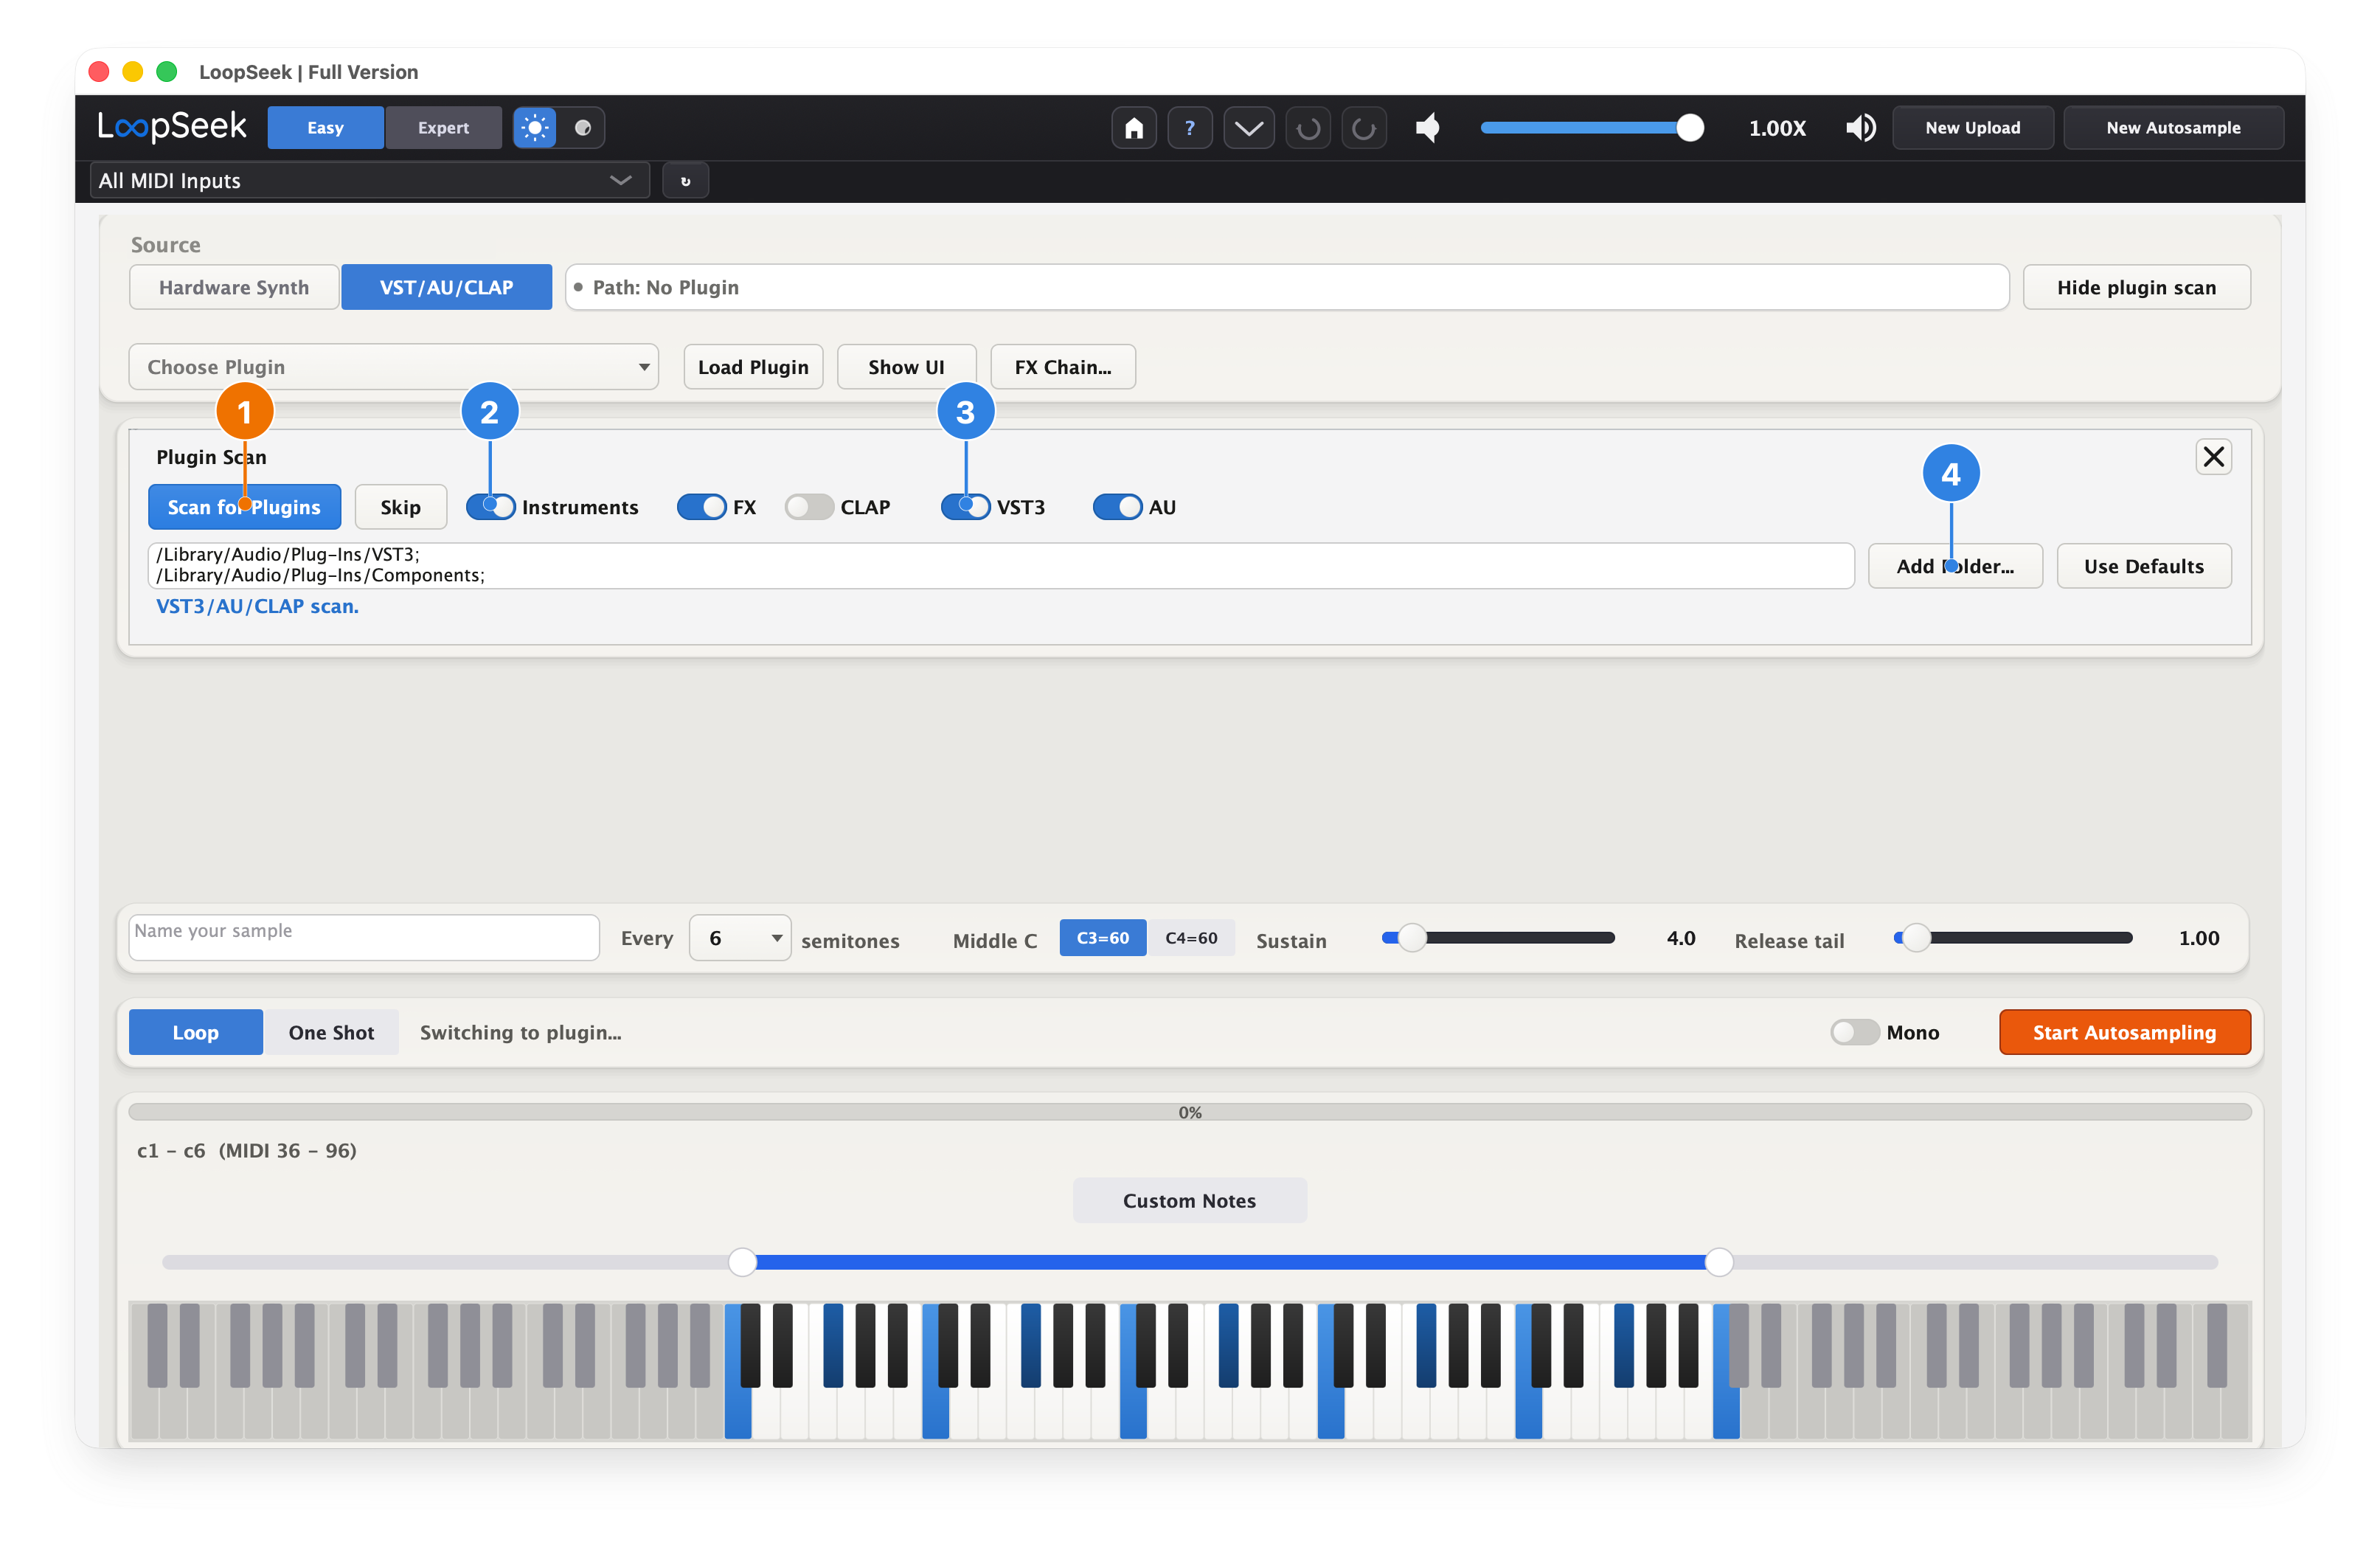
- 1Click Scan for Plugins and wait.
- 2Leave Instruments on (toggle).
- 3Enable VST3 / AU (and CLAP if you use it).
- 4Add Folder… only if plugins live elsewhere — defaults are usually fine. Close the panel when done.
5 Load your instrument
Pick a synth, load it, then open its UI and set a simple sound. On this screenshot the plugin window covers Load Plugin and Show UI — those were on step 3 / appear again on step 6.
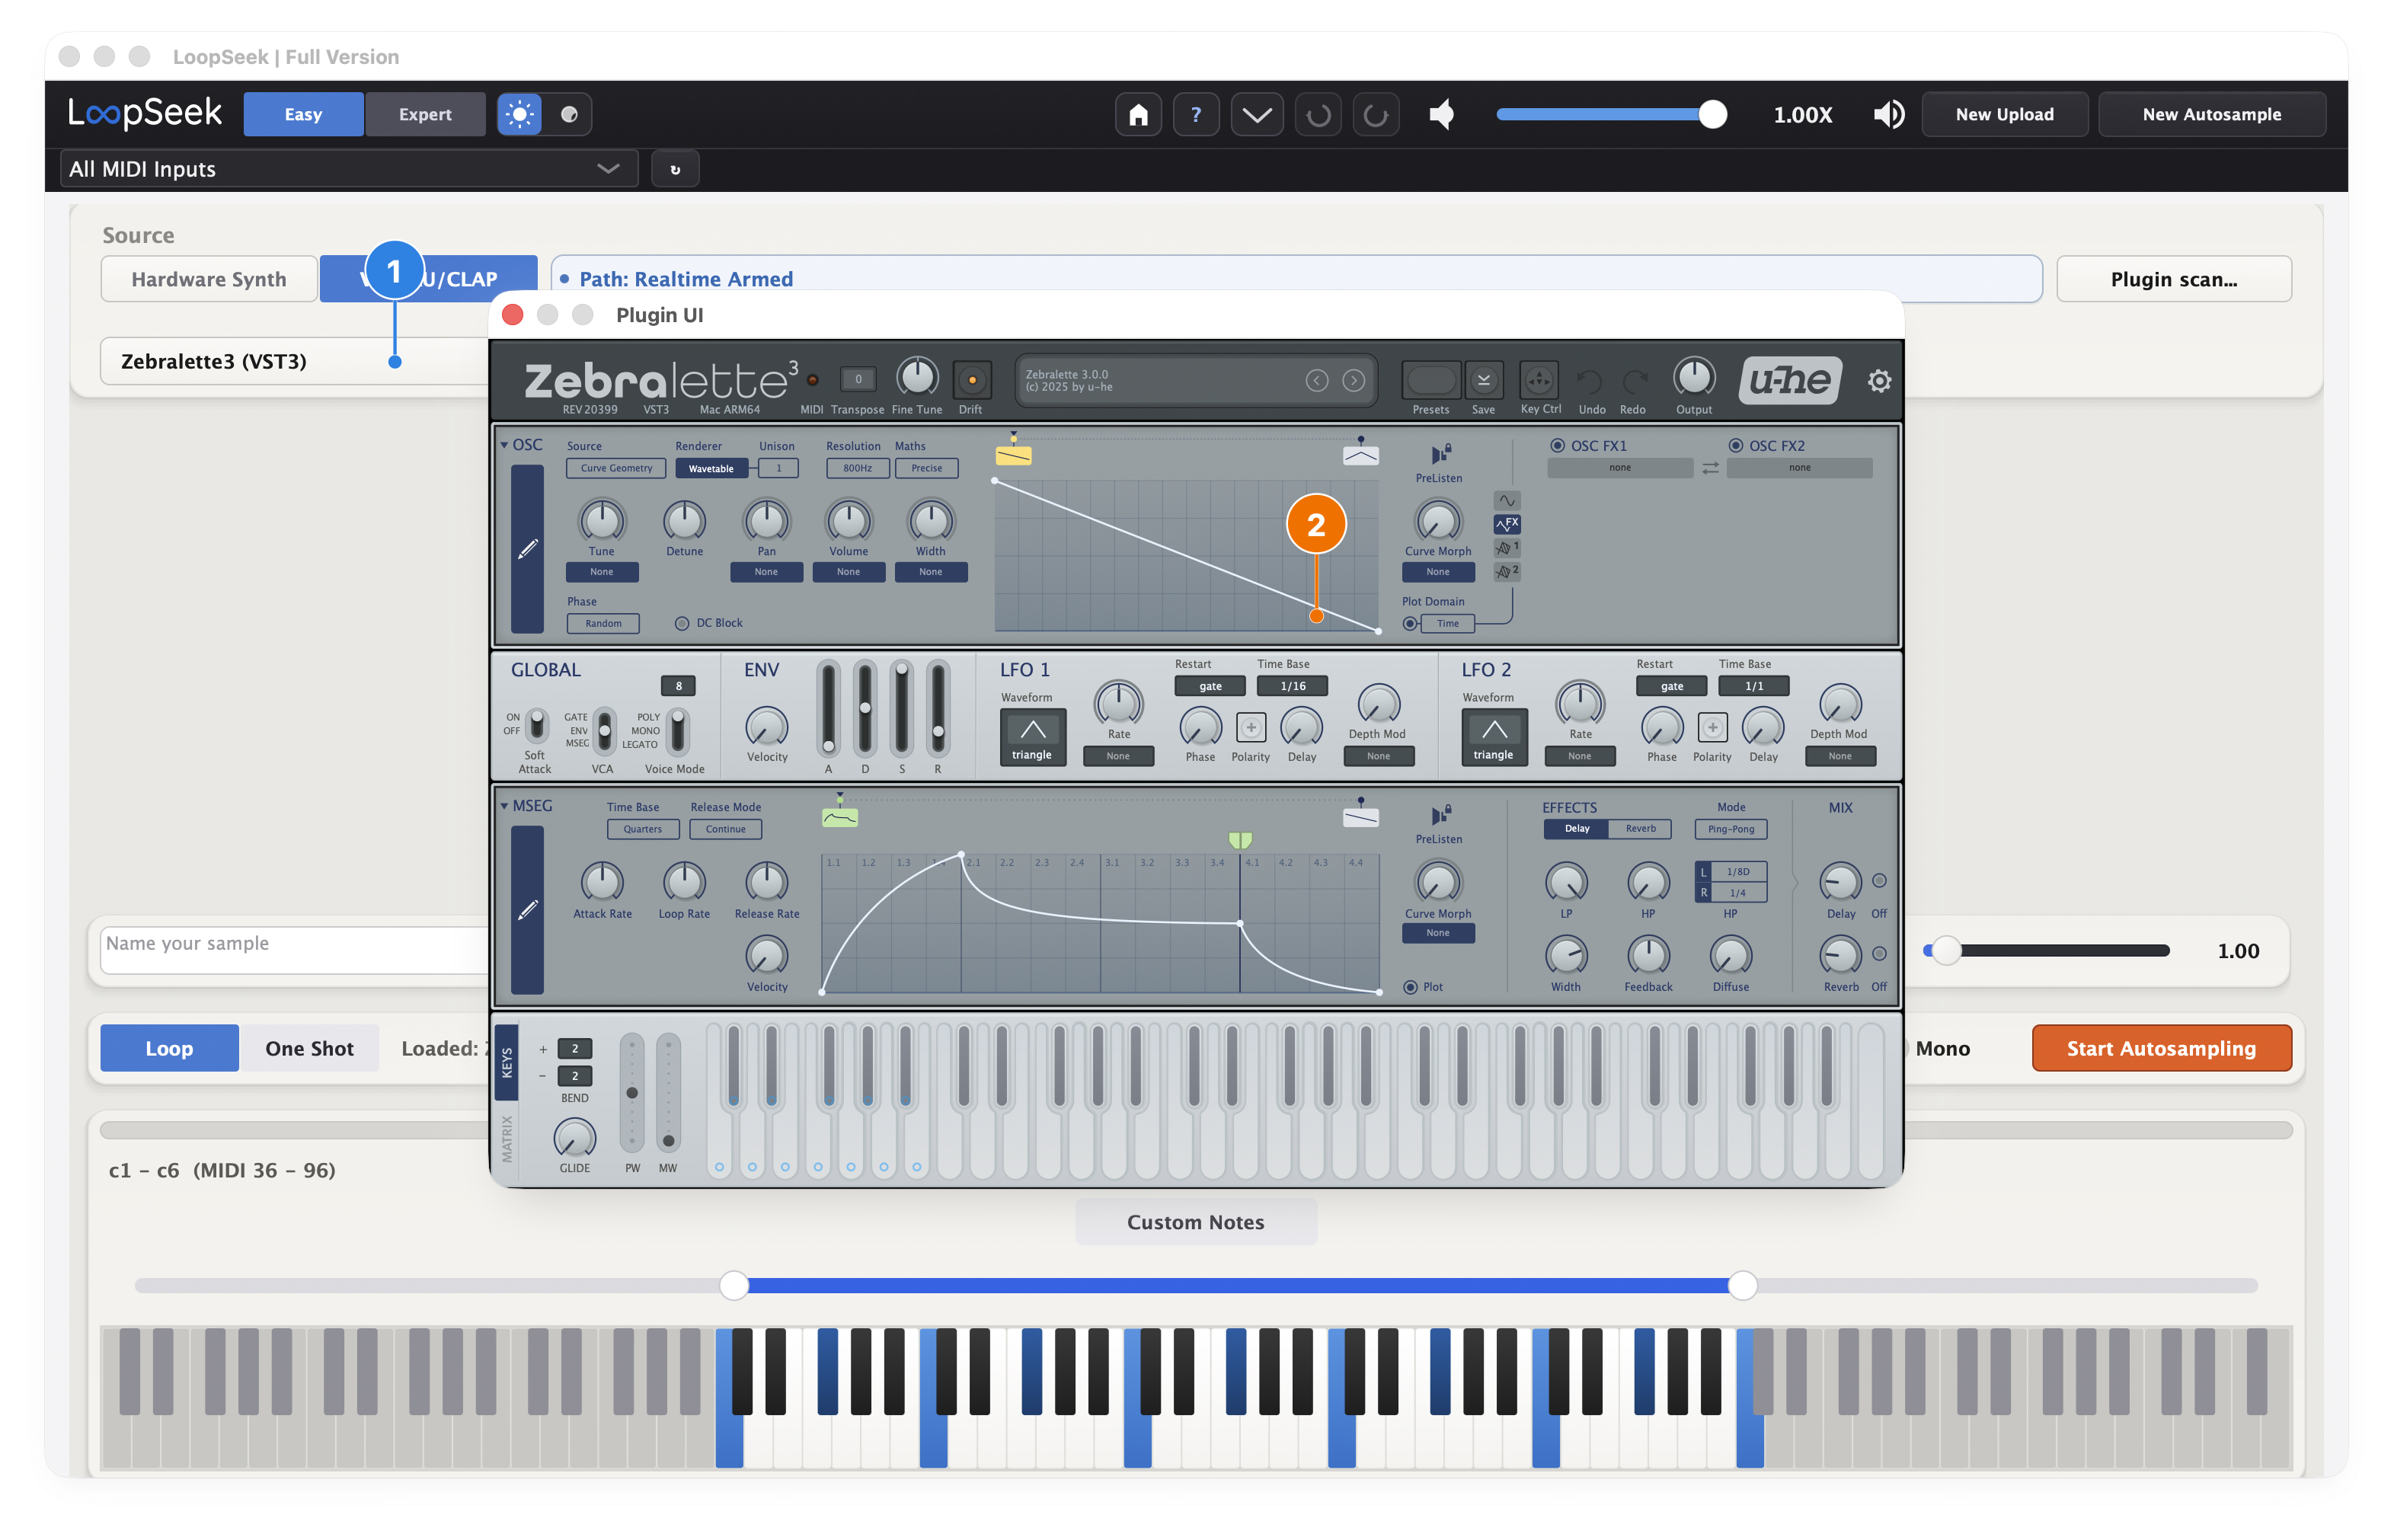
- 1Plugin selected (e.g. Zebralette3). The “Loaded” status sits behind the plugin window — close the UI (or check again in step 6) to confirm it.
- 2Plugin UI window — choose a simple sound you like.
6 Name, spacing, range — then Start
Only a few settings matter for the first run. Plugin UI closed so every control is visible.
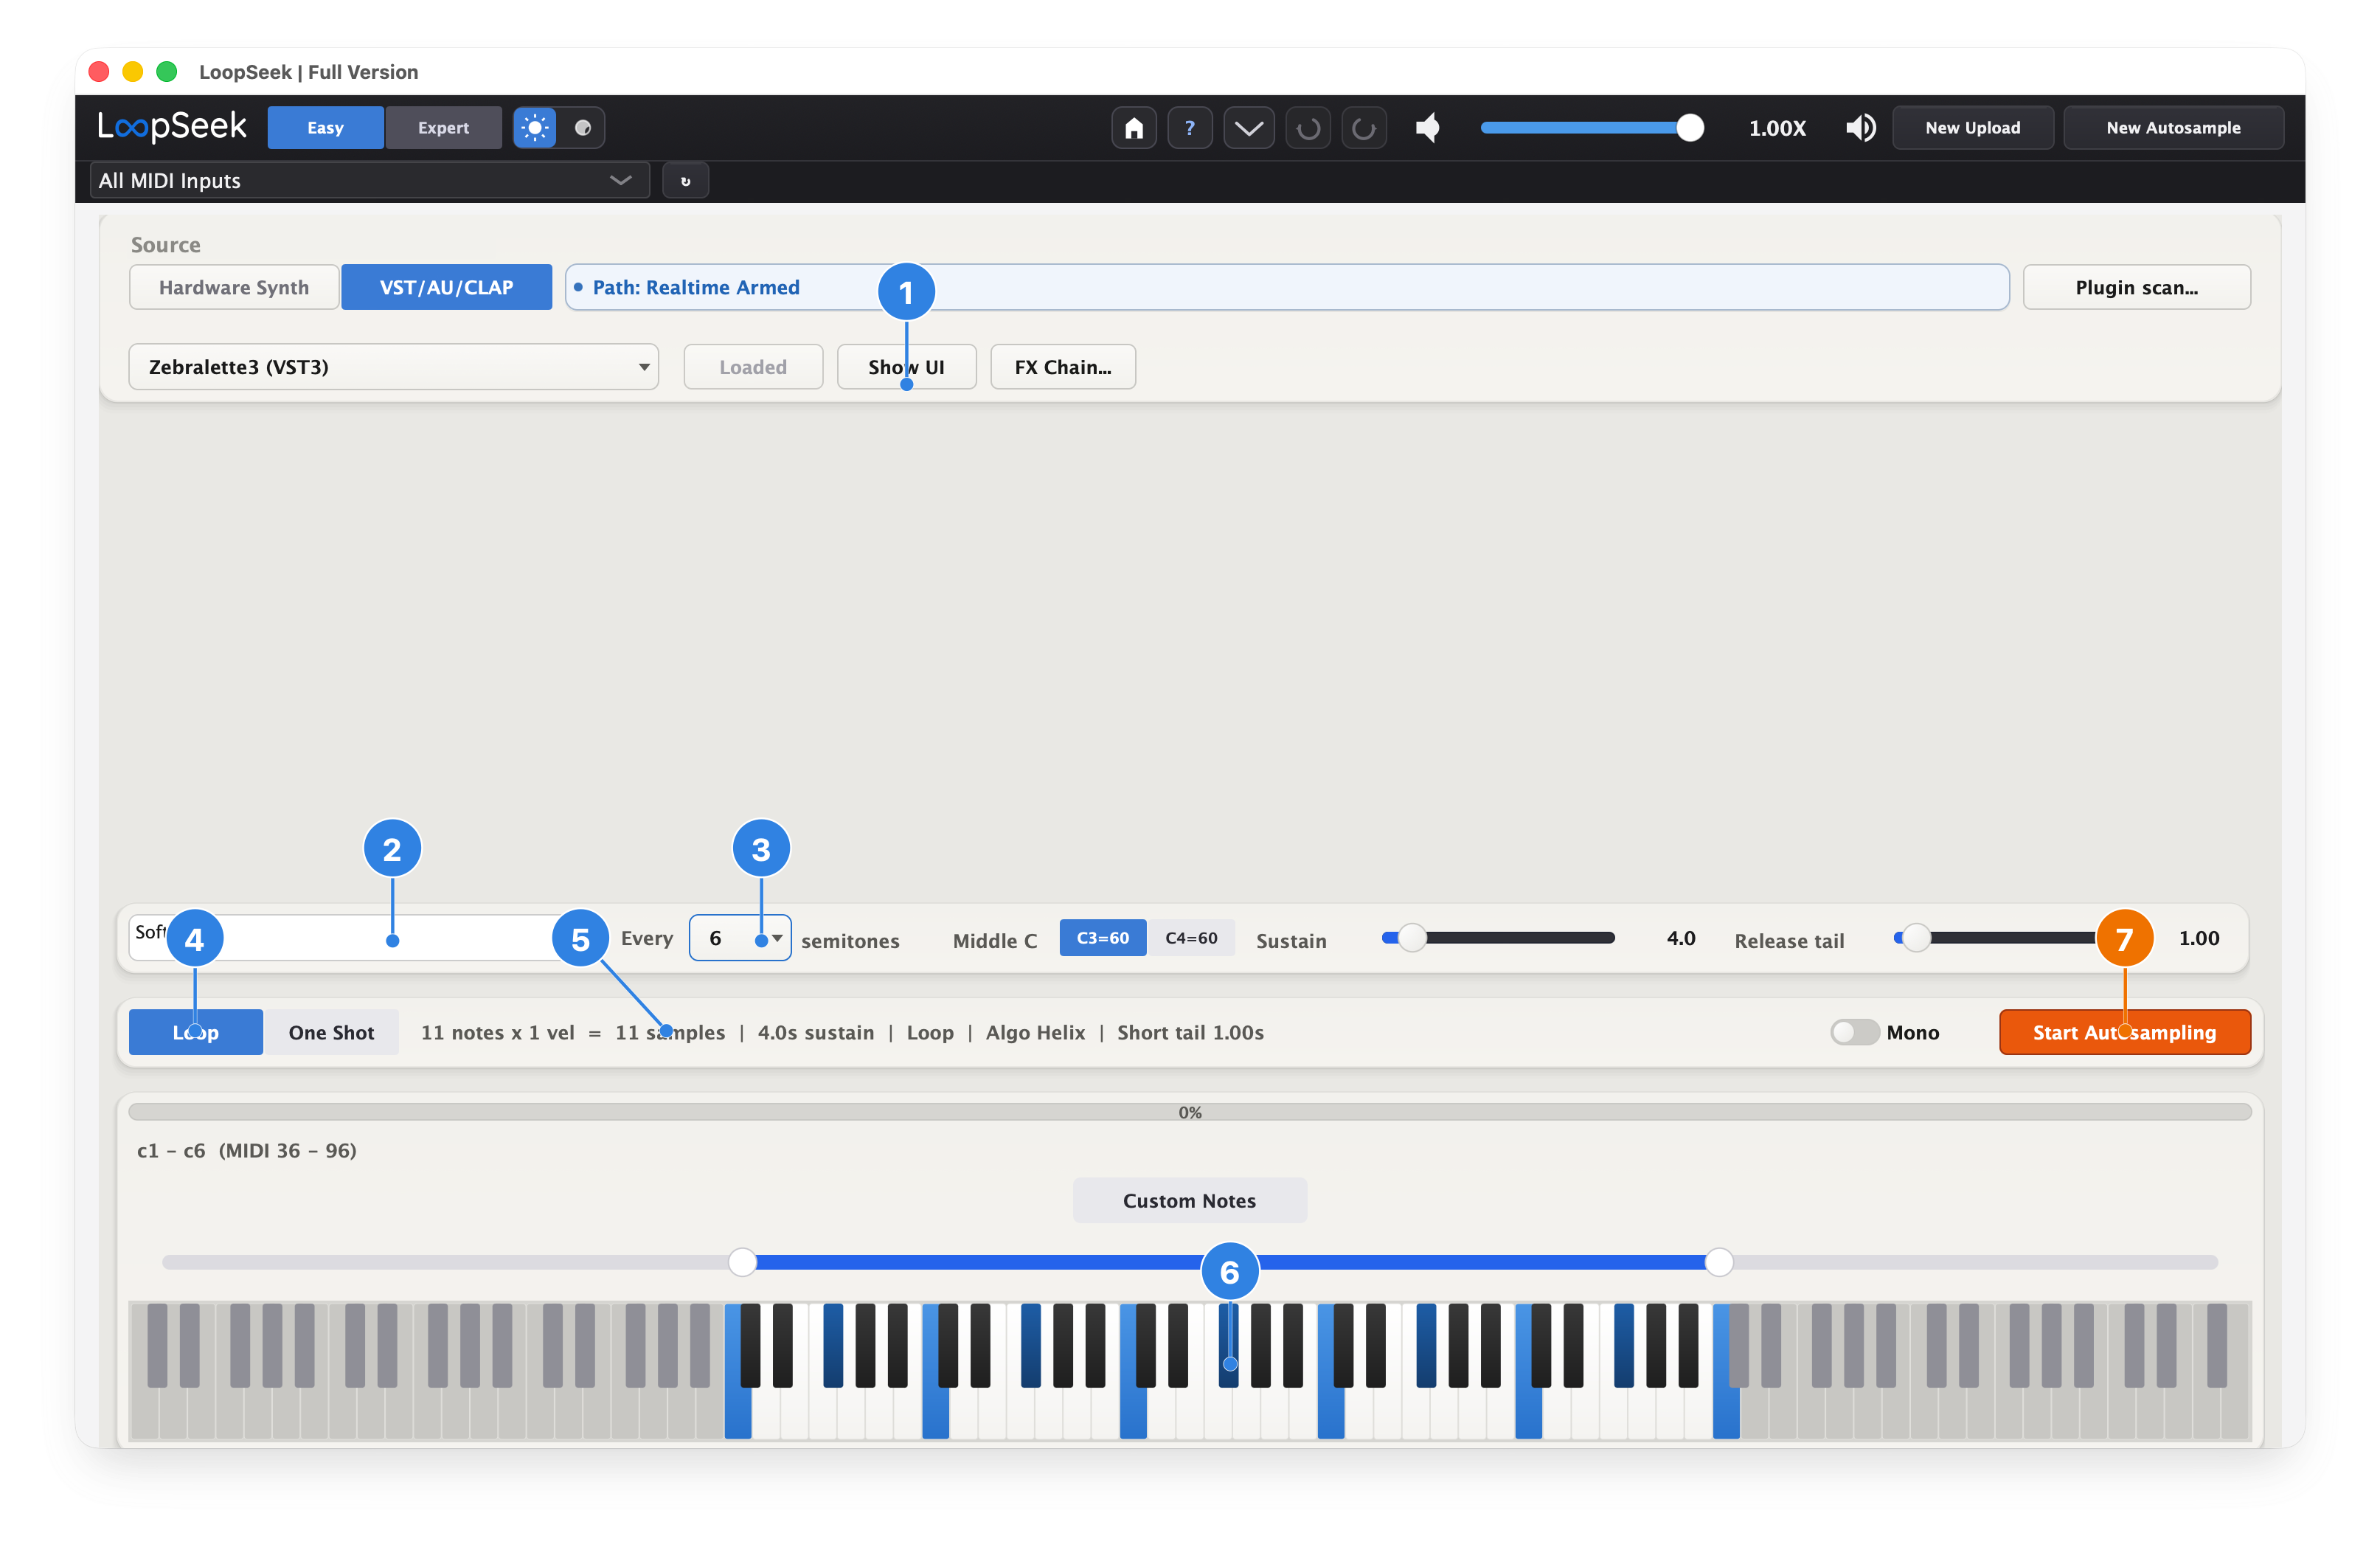
- 1Show UI — reopen the plugin window anytime (was covered in step 5).
- 2Name your sample — e.g. Softpad.
- 3Every N semitones — good starting density (not too many files).
- 4Loop for pads/strings (use One Shot later for drums/plucks).
- 5Summary line — e.g. 11 notes × 1 vel = 11 samples.
- 6Drag the blue range on the keyboard (example: c1–c6). Blue key marks = notes that will record. (Prefer hand-picked keys? See nice to know — Custom Notes below.)
- 7Click Start Autosampling and wait until it finishes.
Don’t use the computer while it records. When done, the Editor opens with your samples.
Custom Notes
The even grid from Every N semitones is enough for most sounds. If bass needs a few extra pitches (or the highs do), turn on Custom Notes and pick keys by hand — still Easy, just more control. In Custom Notes mode the blue range bar is not a drag handle; Shift+click keys instead.
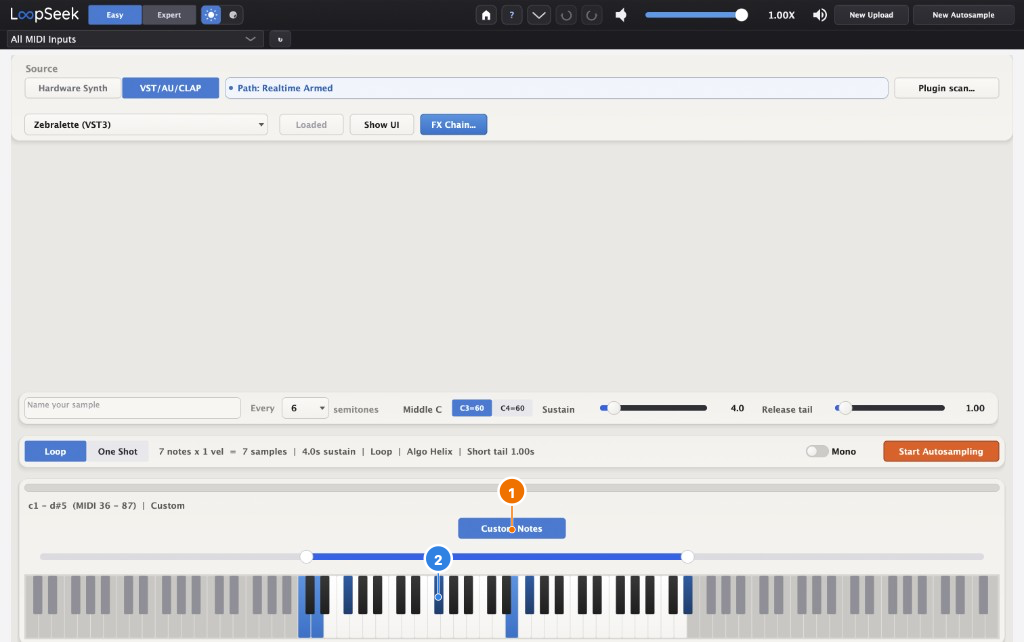
- 1Click Custom Notes (button turns blue when active).
- 2Shift + click keys on the keyboard to add or remove individual notes. Blue marks = notes that will record.
When you are happy with the selection, click Start Autosampling as in step 6, then continue with the Editor below.
7 Editor — check the loops
Each note is one card. LoopSeek already placed loop markers. Steps 7–9 share one capture with the virtual keyboard open — pins mark the Editor chrome still visible above the overlay. Tap the small piano icon at the bottom anytime to hide the keyboard and see full cards.
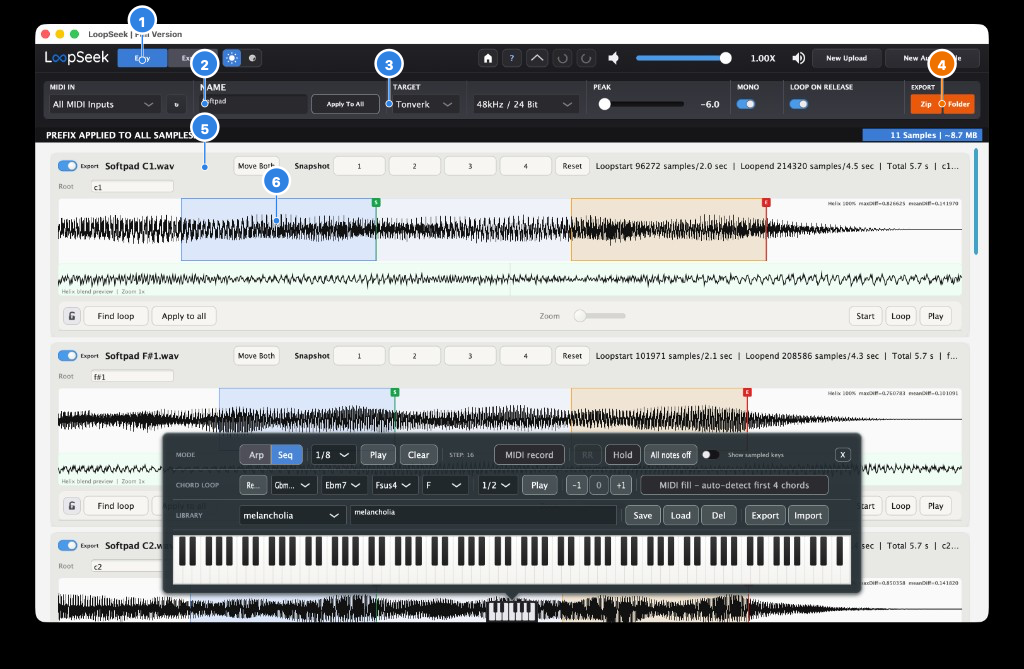
- 1Still in Easy in the app.
- 2NAME + Apply To All — rename the whole set if needed.
- 3TARGET — e.g. Tonverk (device + format).
- 4Zip / Folder — export later (after you listened). Not “New Autosample”.
- 5Sample card — filename + Root note (mapping key).
- 6Waveform — green S / red E are loop start/end. Use Find loop / Play on the card when the keyboard is closed.
8 Play with the virtual keyboard
Same Editor frame as step 7 — focus on the keyboard overlay to audition before exporting.
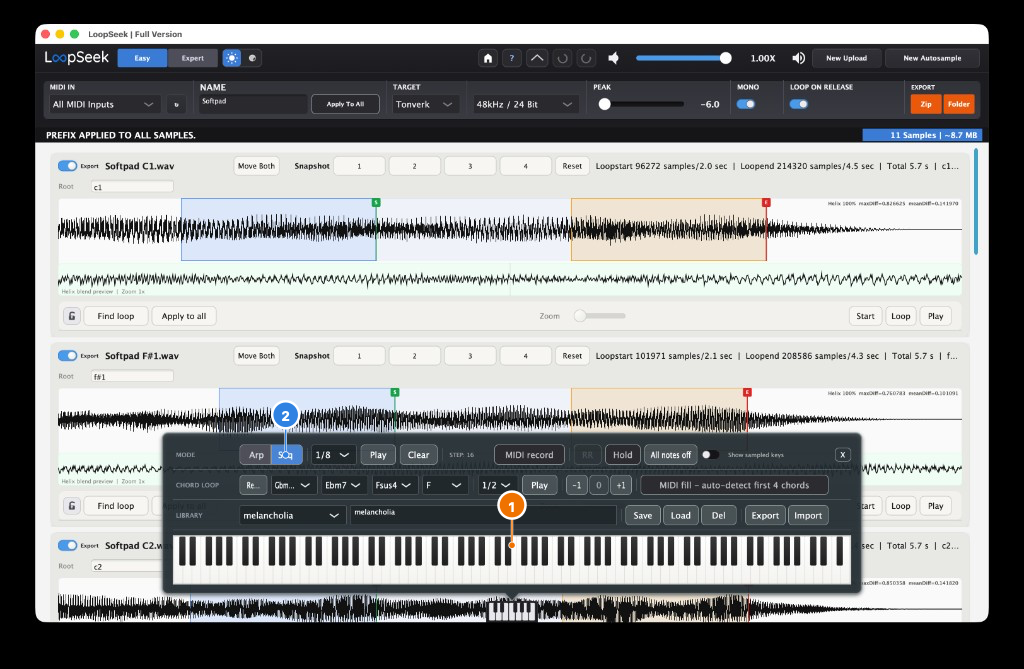
- 1Play keys on this keyboard (or use a real MIDI keyboard if connected).
- 2Arp / Seq / CHORD LOOP — leave them alone for now and just play notes. (This screenshot may show Seq lit — turn it off if you only want single notes.)
9 Export
Same capture as steps 7–8 — pins highlight the top export strip:
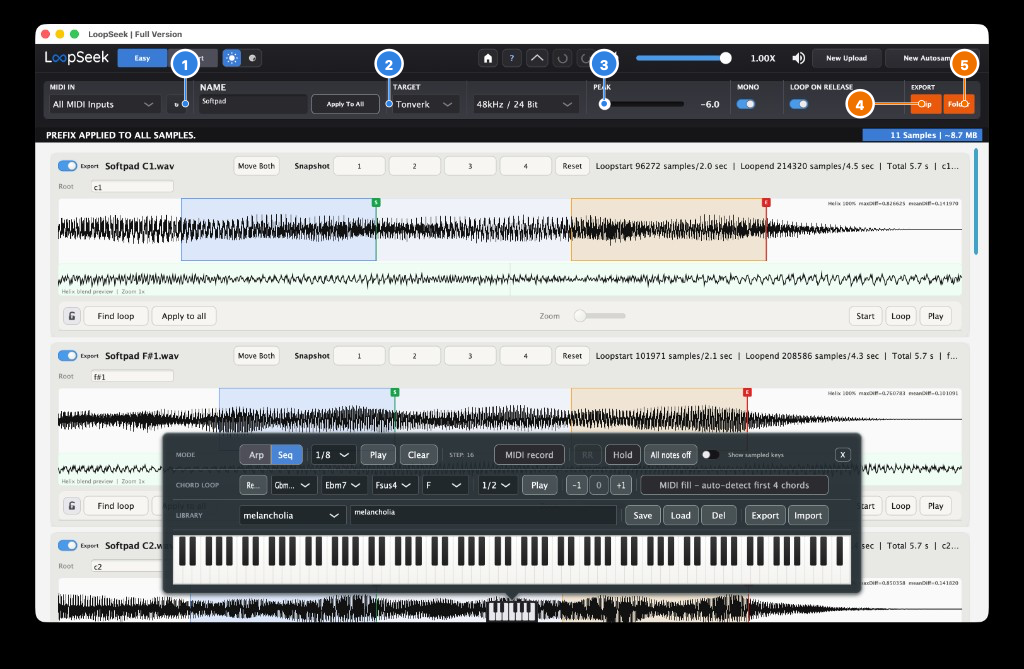
- 1Confirm NAME (e.g. Softpad).
- 2Choose TARGET (Tonverk, SFZ, …) and format.
- 3PEAK (~ −6 to −1 dB) and MONO — for stereo files turn MONO off (this screenshot shows Mono on — flip it if you want stereo WAVs).
- 4Zip — one archive with the device folder layout inside.
- 5Folder — same files, written directly into a folder (no zip).
Hardware Autosample
Same Easy path as with a plugin — only the Source I/O strip changes: pick the MIDI port and audio input for your hardware synth.
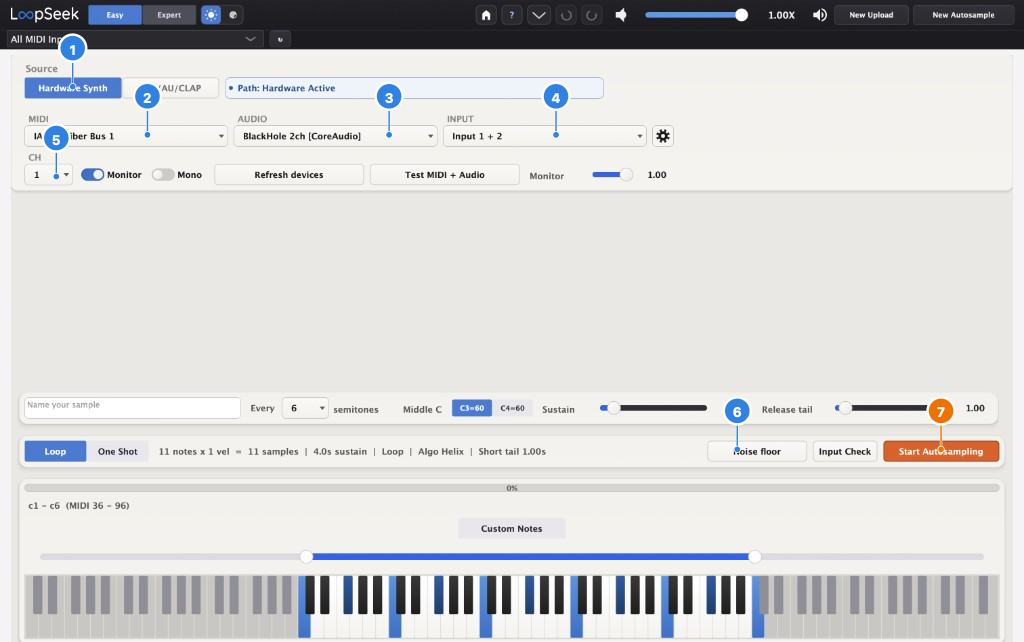
- 1Hardware Synth — switch Source away from VST/AU/CLAP.
- 2MIDI — the port that sends notes to your synth.
- 3AUDIO — the interface / virtual device that records the synth’s output.
- 4INPUT — which channels to capture; gear opens Audio & MIDI settings.
- 5CH — must match the synth’s MIDI channel. Wrong channel → silence or noise only.
- 6Noise floor — for older analog synths that hiss while idle. Measure once with silence at the input; without a profile LoopSeek waits for near-silence and caps the release tail at about 18 s per note.
- 7Start Autosampling — then continue with Editor steps 7–9 as after a plugin run.
Use Test MIDI + Audio / Input Check before a long run. A capture that is only noise usually means wrong Audio + MIDI routing — fix that first, then retry.
Done
You autosampled from a plugin (or hardware), checked loops in the Editor, played the instrument, and exported as Zip or Folder.
Expert multisample path
One Expert path: Second Layer in Split, with velocity layers (and Round Robin if you want), Helix, then the Editor on that same set — Live Play / Loop Detection / Export. Indented nice to know blocks are alternatives (e.g. Layer mode), not a second walkthrough.
Tip: in the LoopSeek app, hover the mouse briefly over a button or control — most show a short tooltip with extra info (this does not apply to the PDF or this online guide).
1 Start screen
Open LoopSeek. For this guide you create samples from plugins in Expert mode.
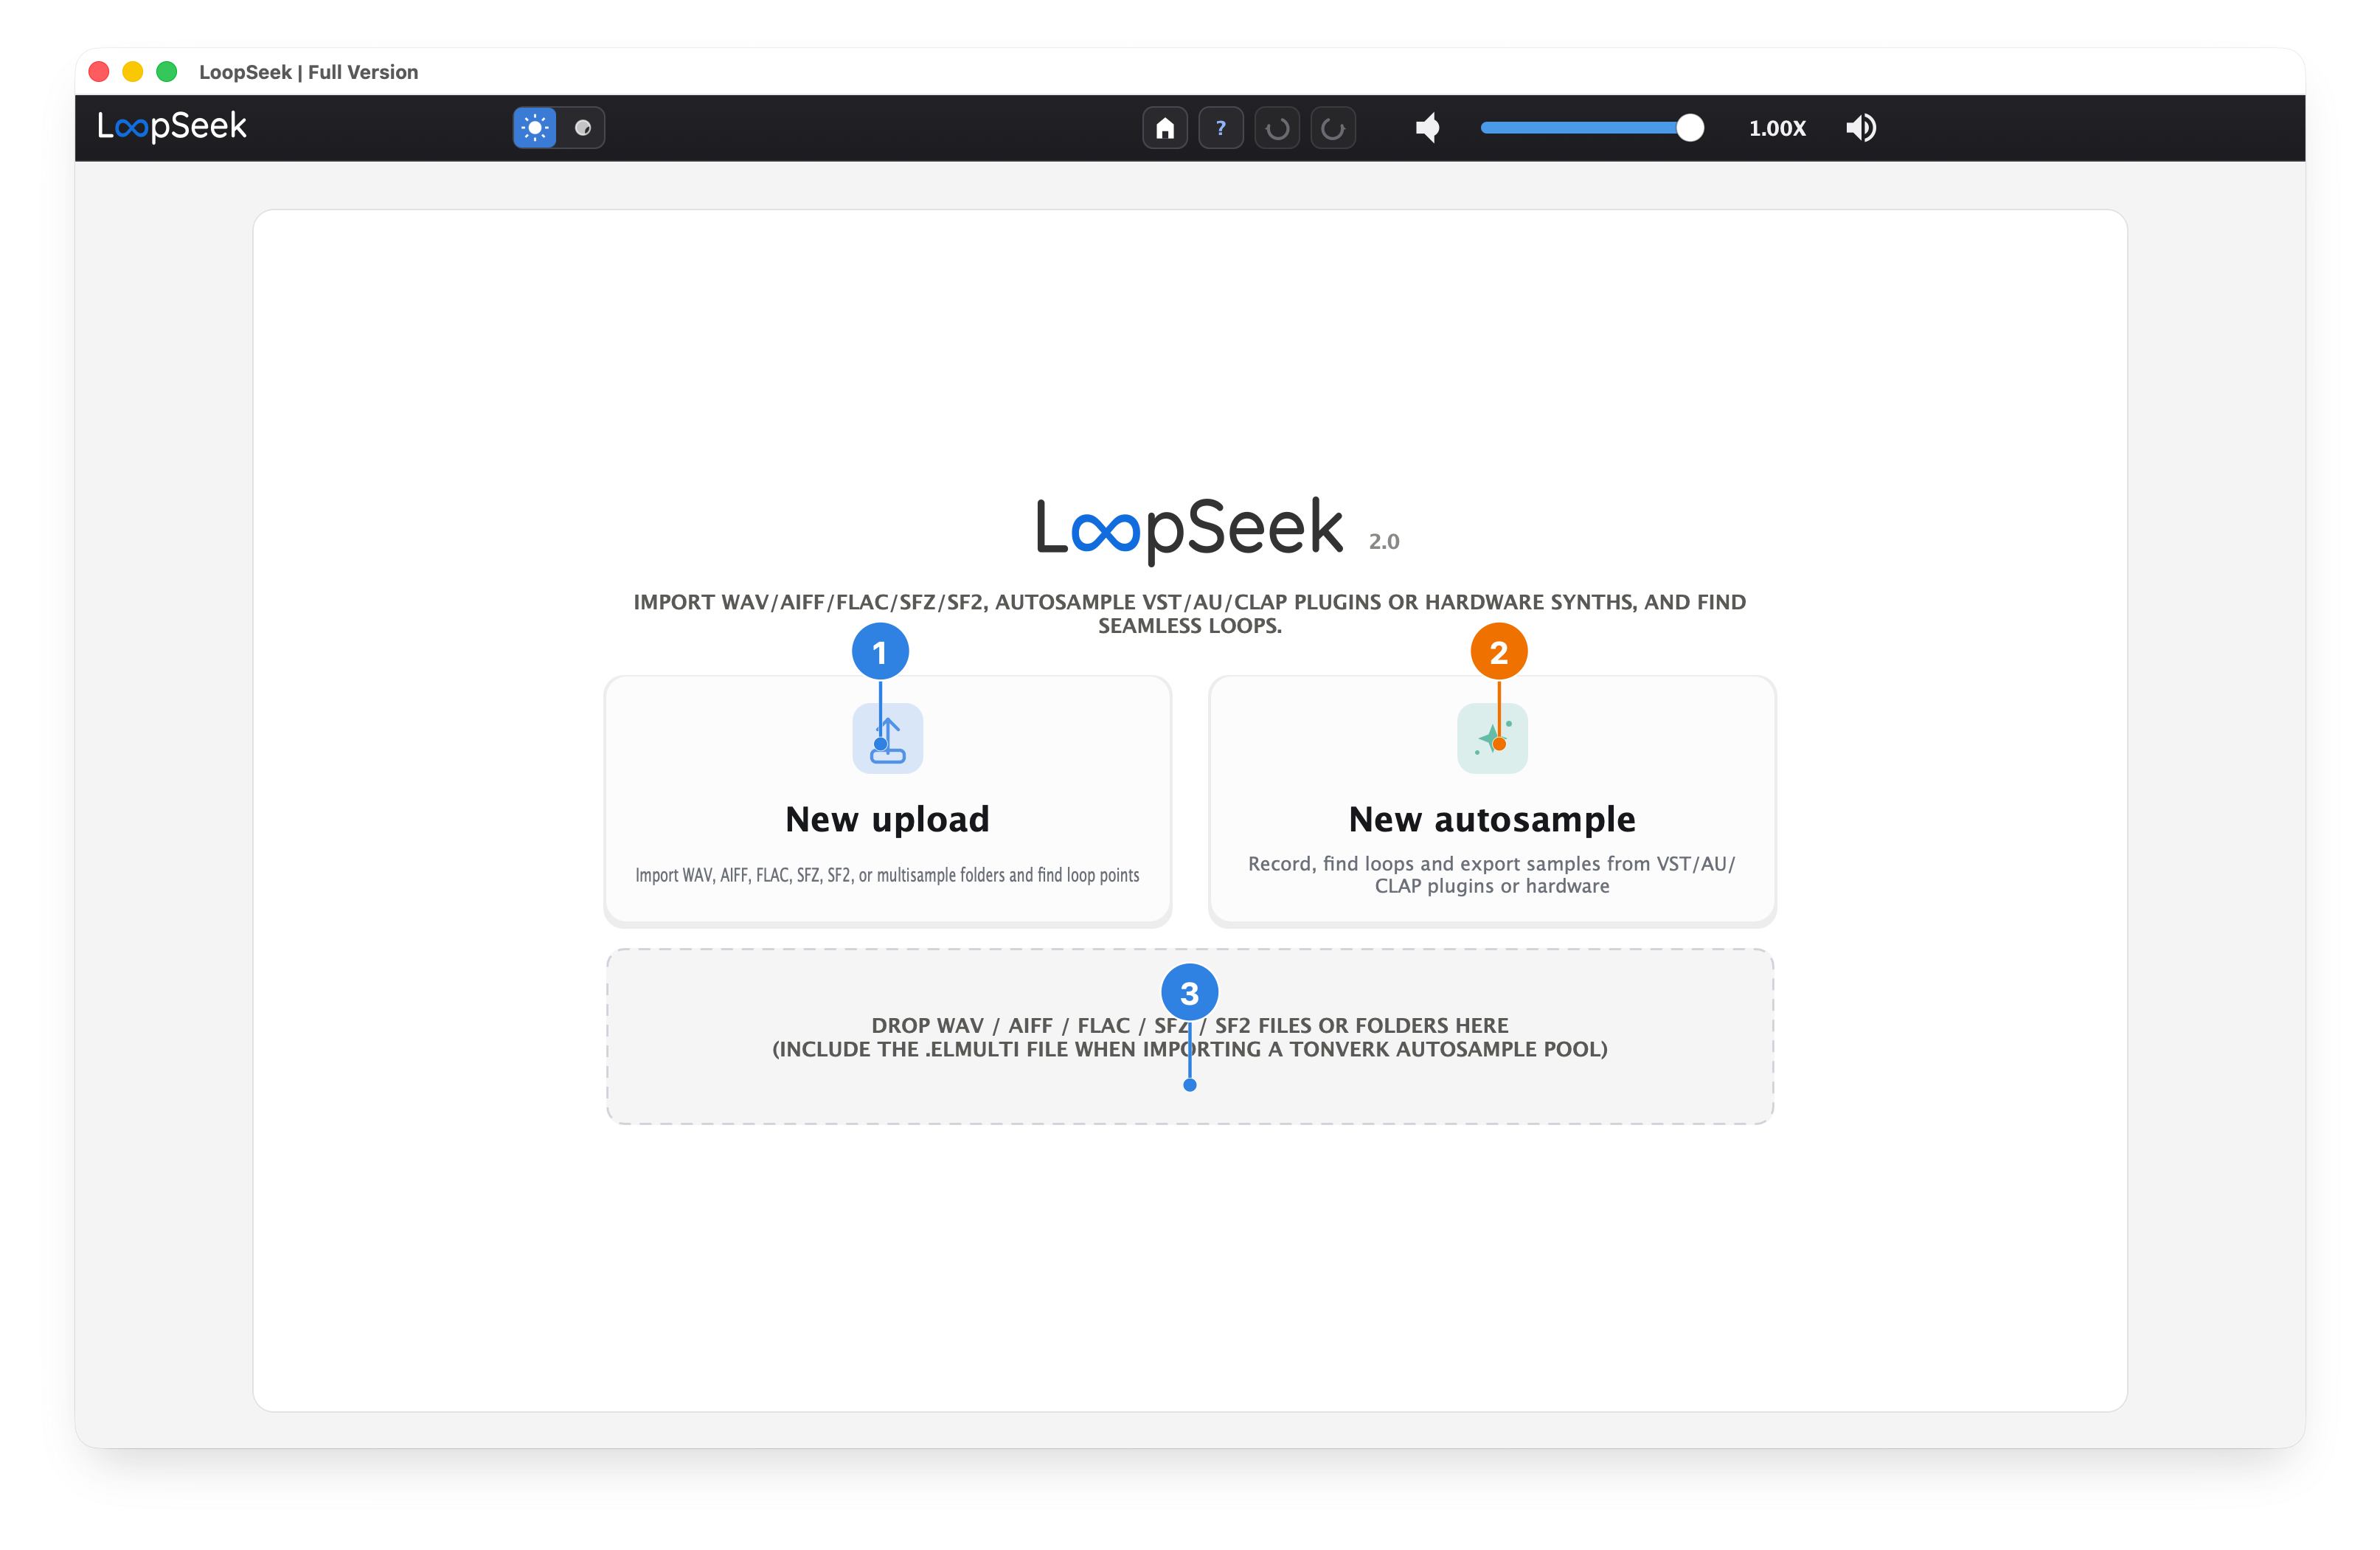
- 1New upload — import existing WAV/folders (not used in this guide).
- 2New autosample — click this to open the Autosampler.
- 3Drop zone — optional: drag files here instead of New upload.
2 Expert Autosample — what is different
Switch to Expert in the top bar. Same basics as Easy (plugin, name, spacing, range) — this guide then uses Split + velocity layers. The pins below are the Expert extras; we only follow the Split path in the numbered steps.
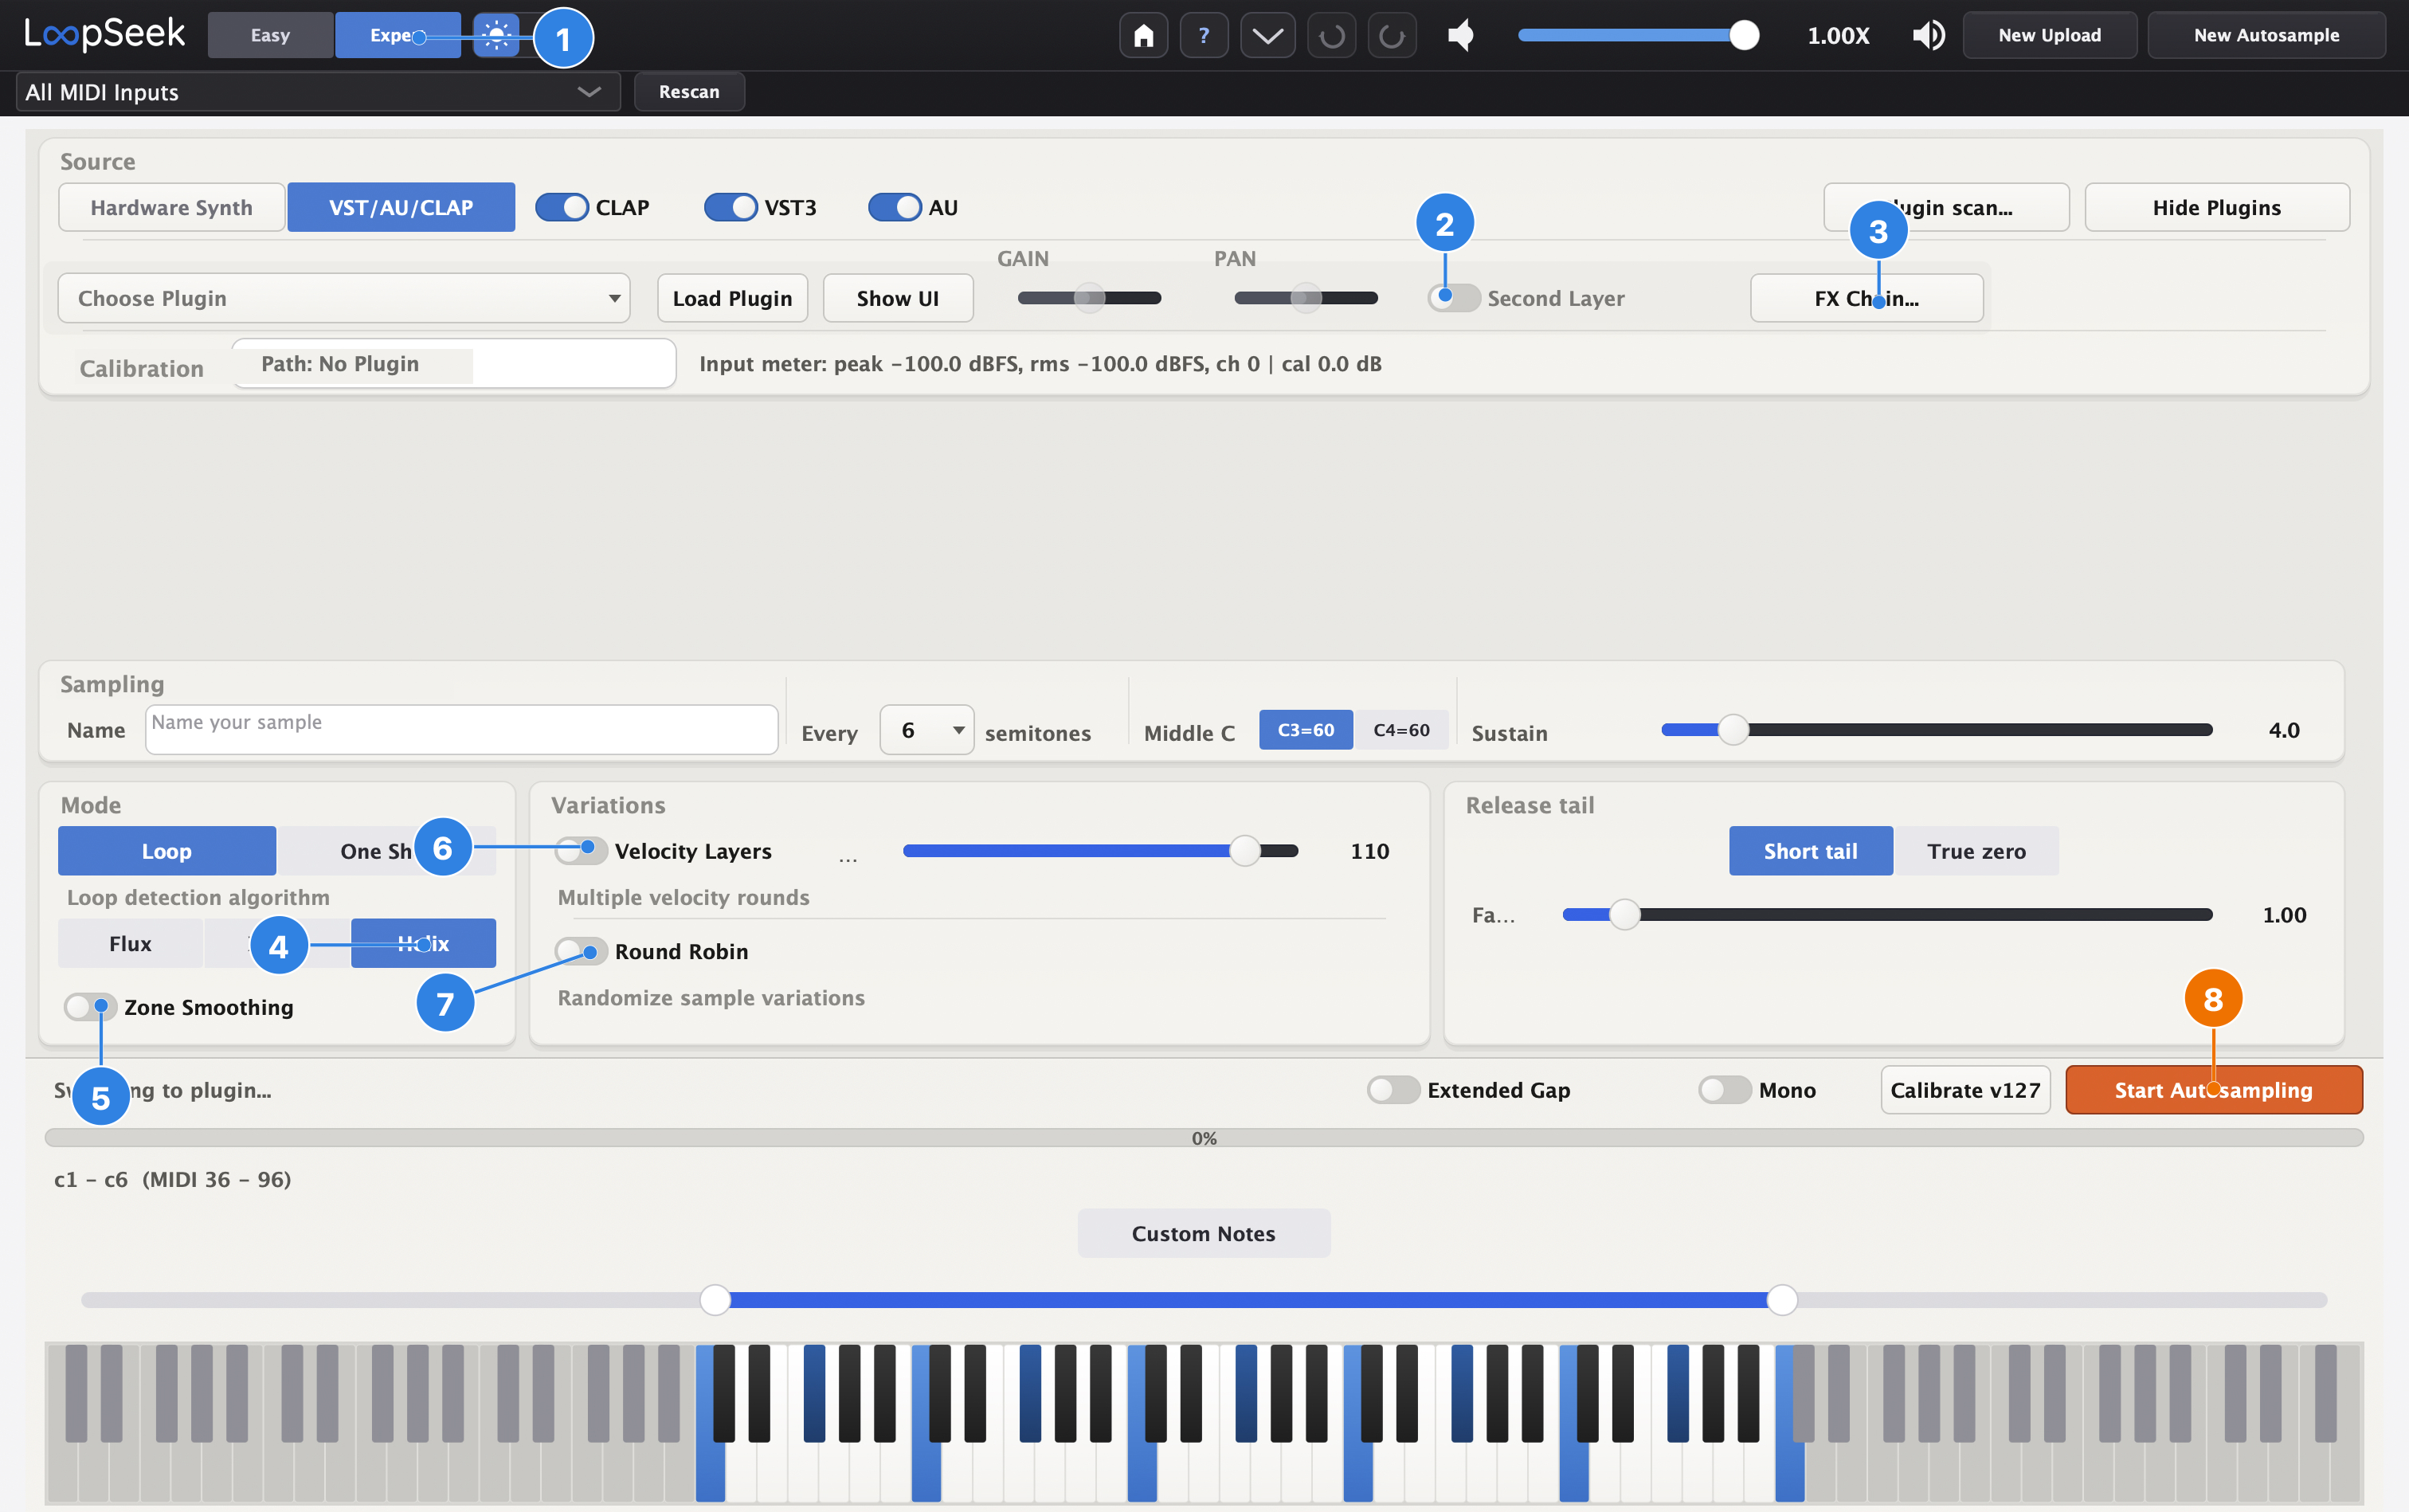
- 1Expert — stay here for this guide.
- 2Second Layer — we turn this on for Split (step 5). Layer mode is nice to know only.
- 3FX Chain… — optional before Start (step 7).
- 4Helix (Flux / X-ray also exist) — we use Helix (step 4).
- 5Zone Smoothing — optional, subtle.
- 6Velocity Layers — part of this guide’s path (step 6).
- 7Round Robin — optional with velocity (same step).
- 8Start Autosampling — after setup.
Easy ↔ Expert keeps Expert settings in memory, but Easy capture always stays simple (one velocity, no RR, no second layer). Switching to Easy forces Helix for the Easy path; return to Expert and re-select Flux/X-ray if you need them. Optional rows such as Calibrate v127, Extended Gap, and Short tail / True zero are Expert extras — leave them alone until you need them.
3 Load your instrument(s)
Pick a synth for Layer 1, load it, open the UI, and set a clear sound. You will add Layer 2 in the Split step — Gain and Pan stay per layer.
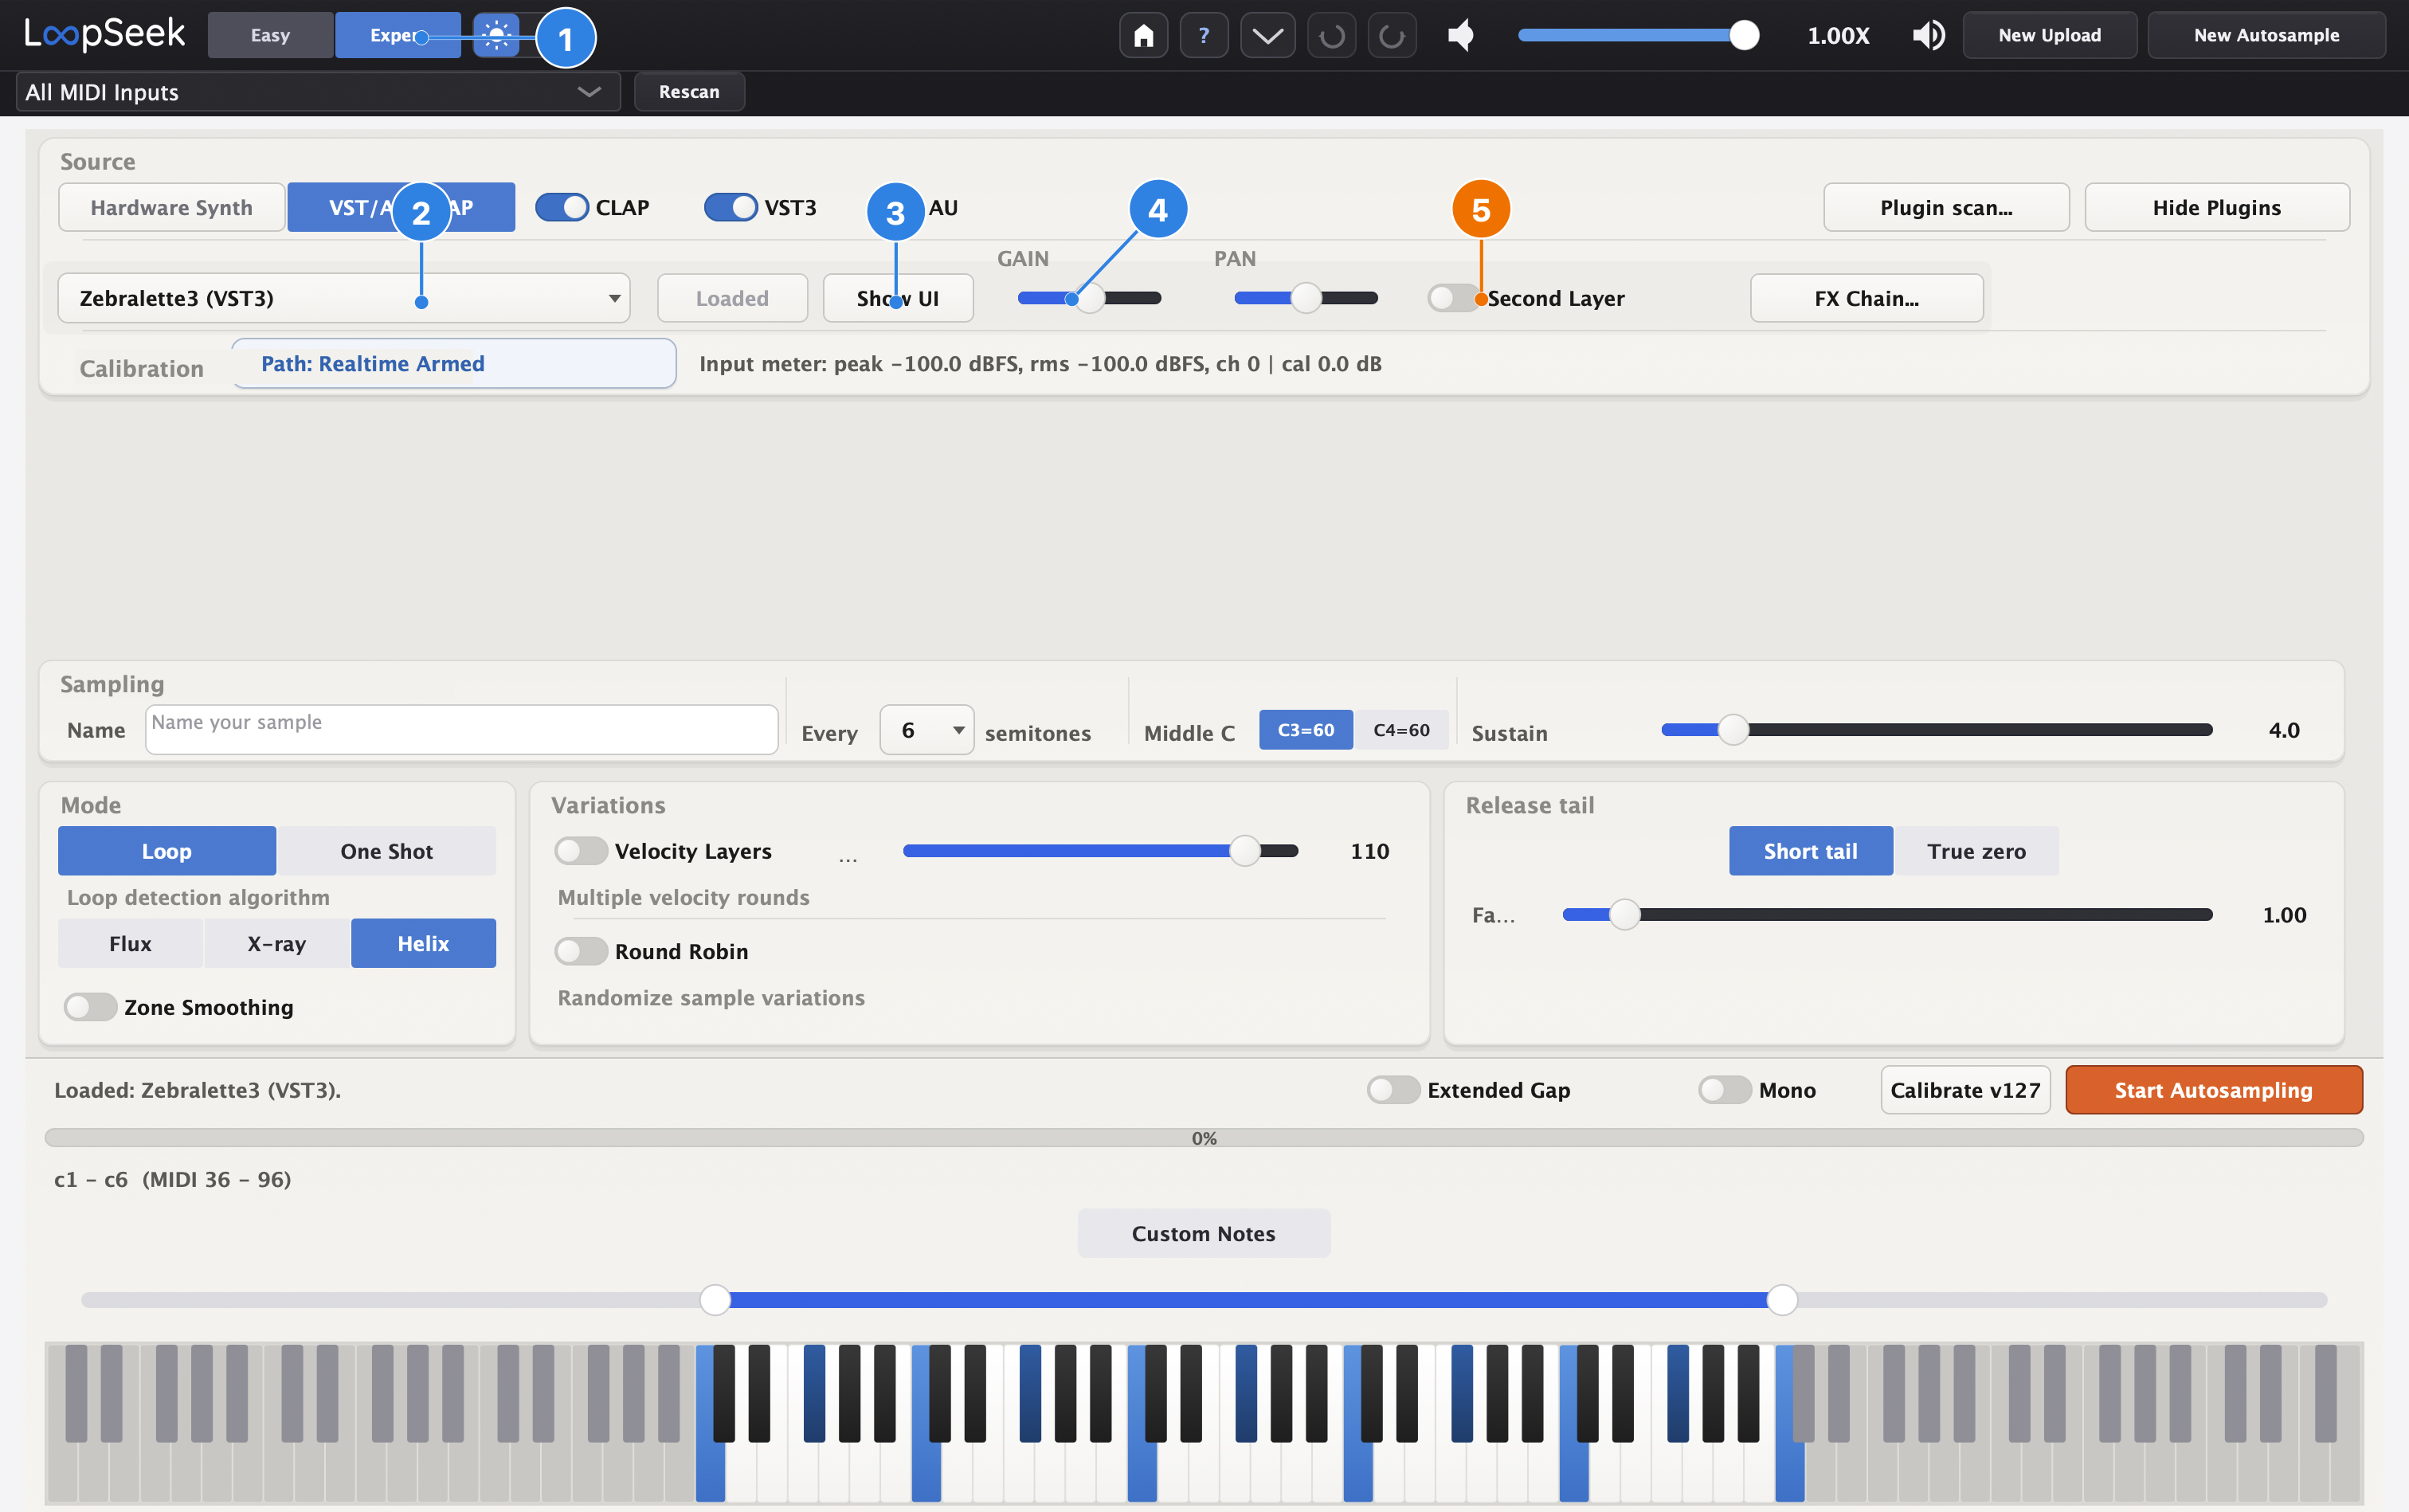
- 1Stay on Expert.
- 2Plugin selected and loaded (status / path line confirms it).
- 3Show UI — open the instrument window and set a clear sound.
- 4Gain / Pan — balance Layer 1 before sampling.
- 5Second Layer — turn on in step 5 when you set Split and load Layer 2.
4 Loop algorithms (Helix / Flux / X-ray)
In Expert you pick the algorithm before capture (Easy always forces Helix when you switch to Easy). This crop of the Mode panel only marks the algorithm strip and Zone Smoothing.
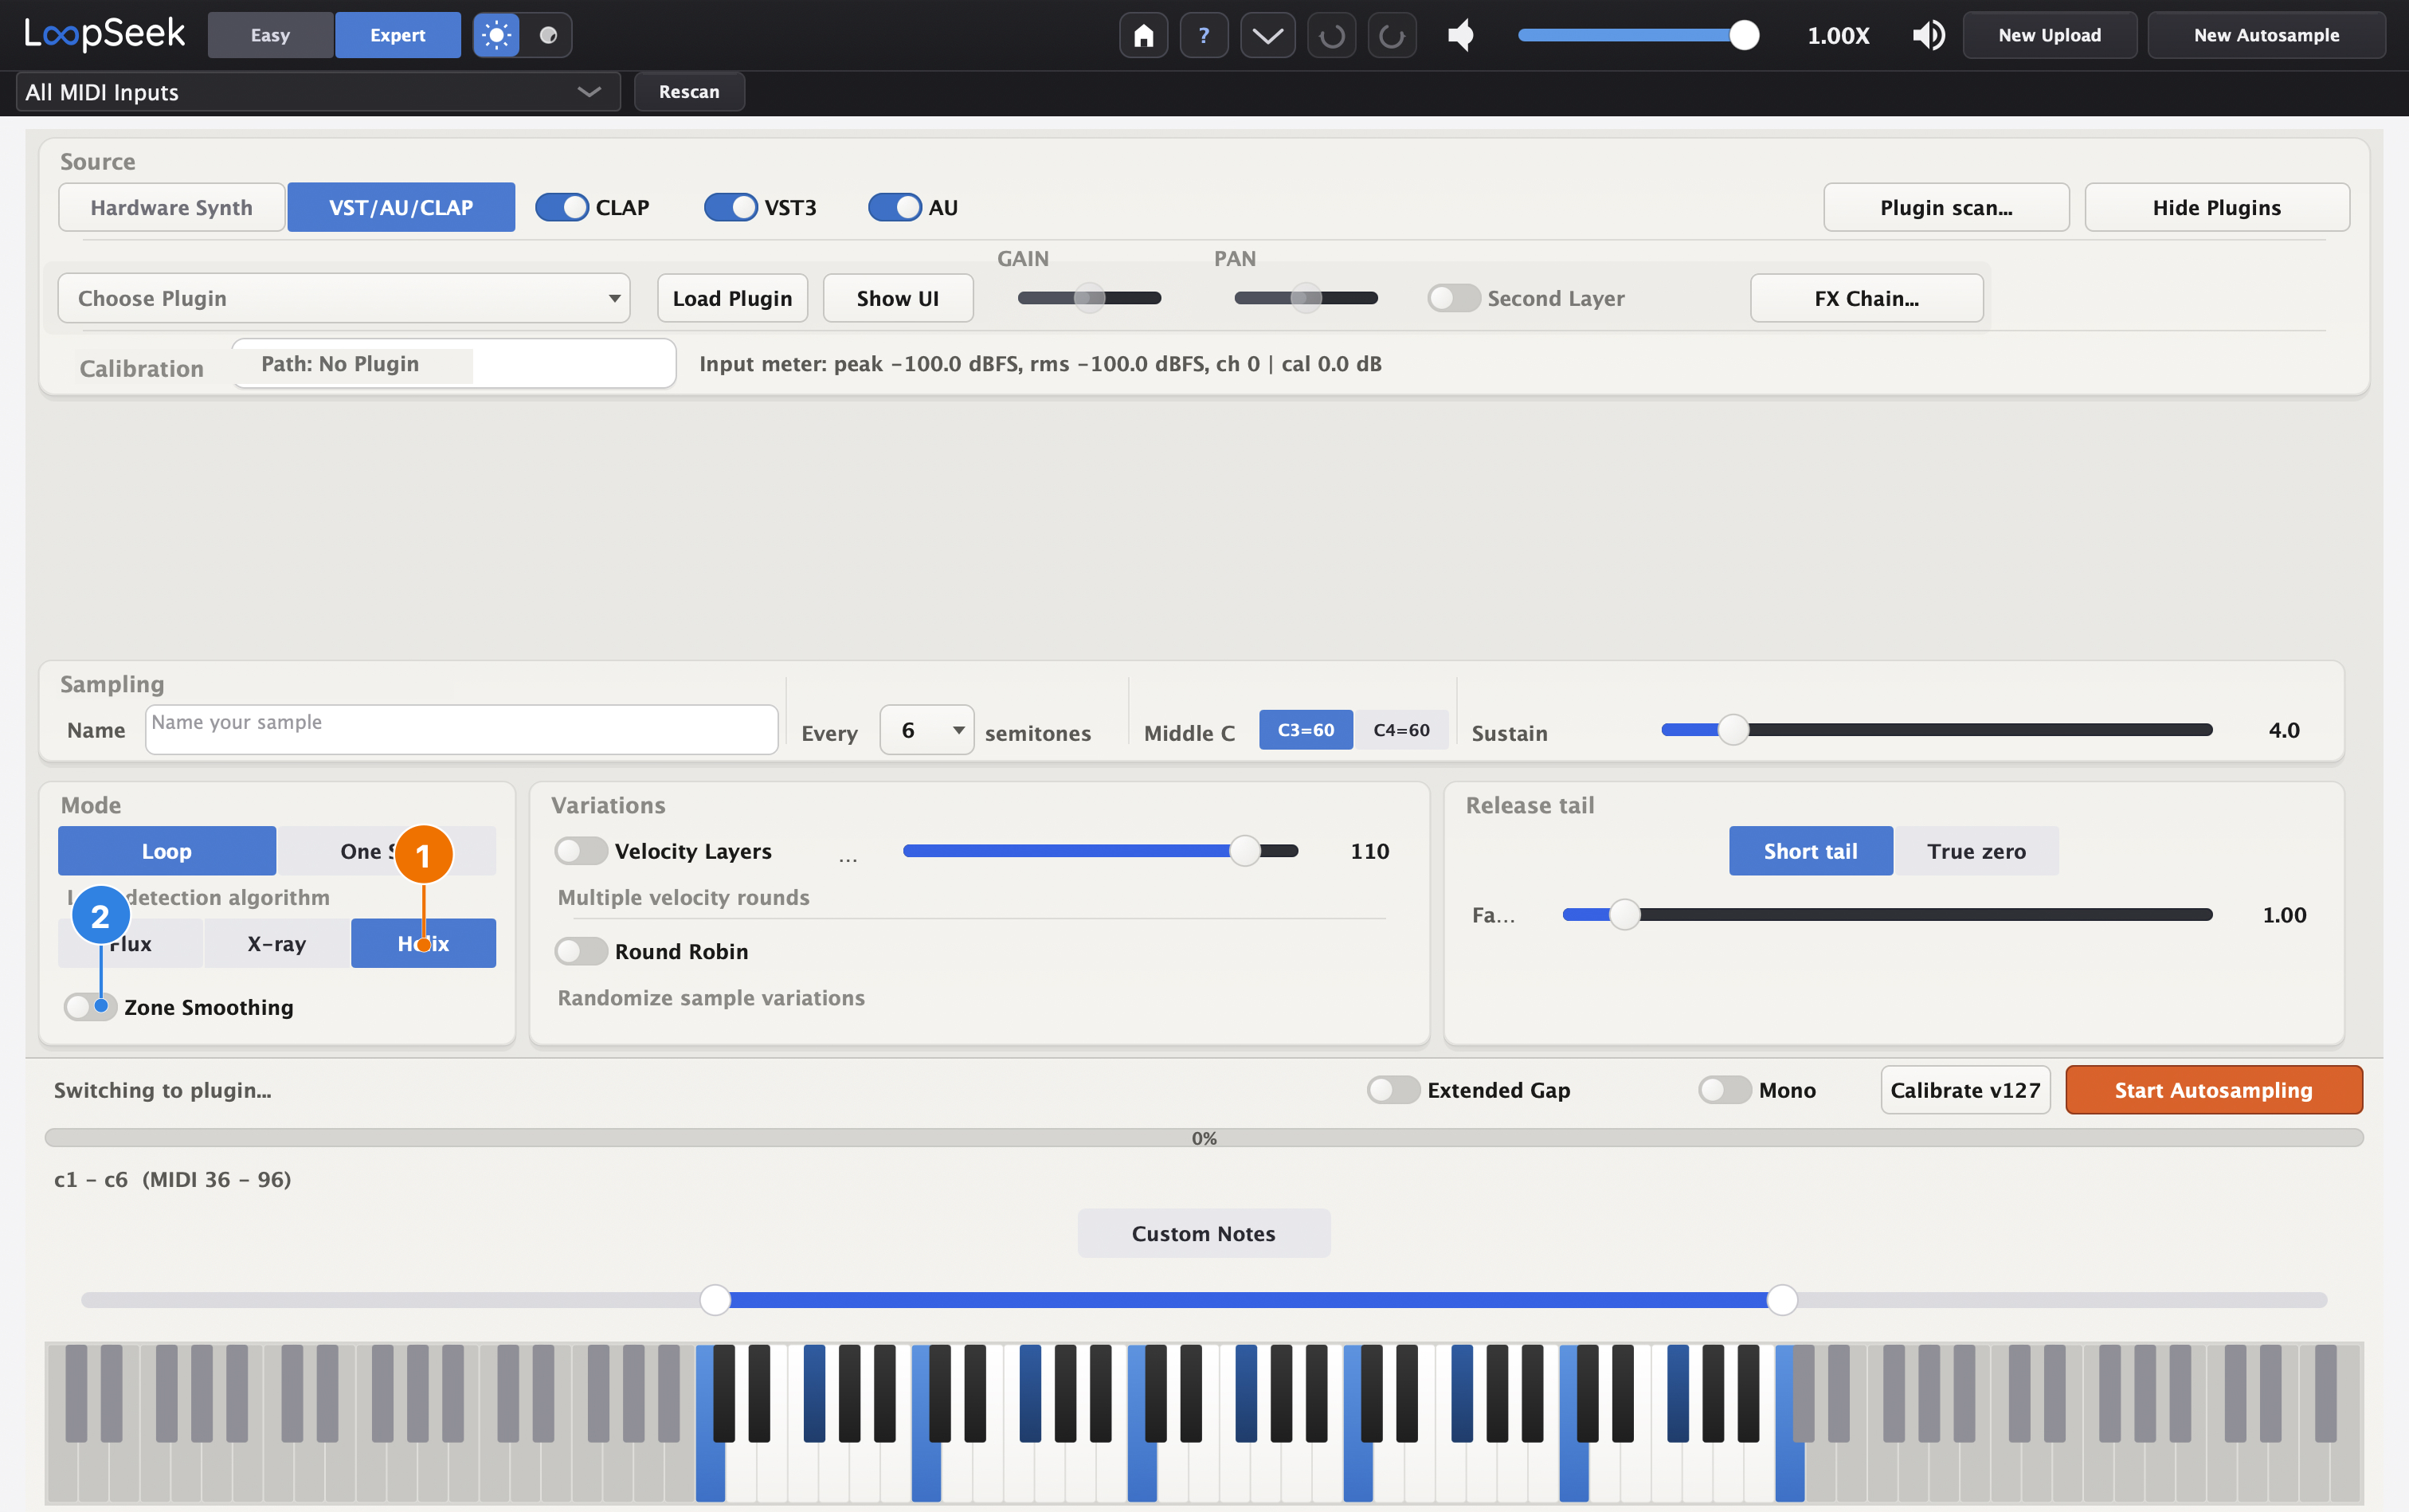
- 1Helix — best default for most instruments (pads, keys, evolving synths). Flux — often strong on very static tones (pure saw/sine, little modulation). X-ray — classic crossfade-style finder; compare in the Editor later.
- 2Zone Smoothing — optional, subtle homogenizing of note transitions.
You can change the algorithm again in the Editor’s Loop Detection tab and re-apply per sample or to all.
5 Second Layer — Split
Turn on Second Layer, load Layer 2, and choose Split so low and high keys play different sounds (bass left / pad right — useful on hardware with limited tracks). Each layer can use its own sustain and Loop / One Shot. This is the dual-layer mode for the rest of this guide.
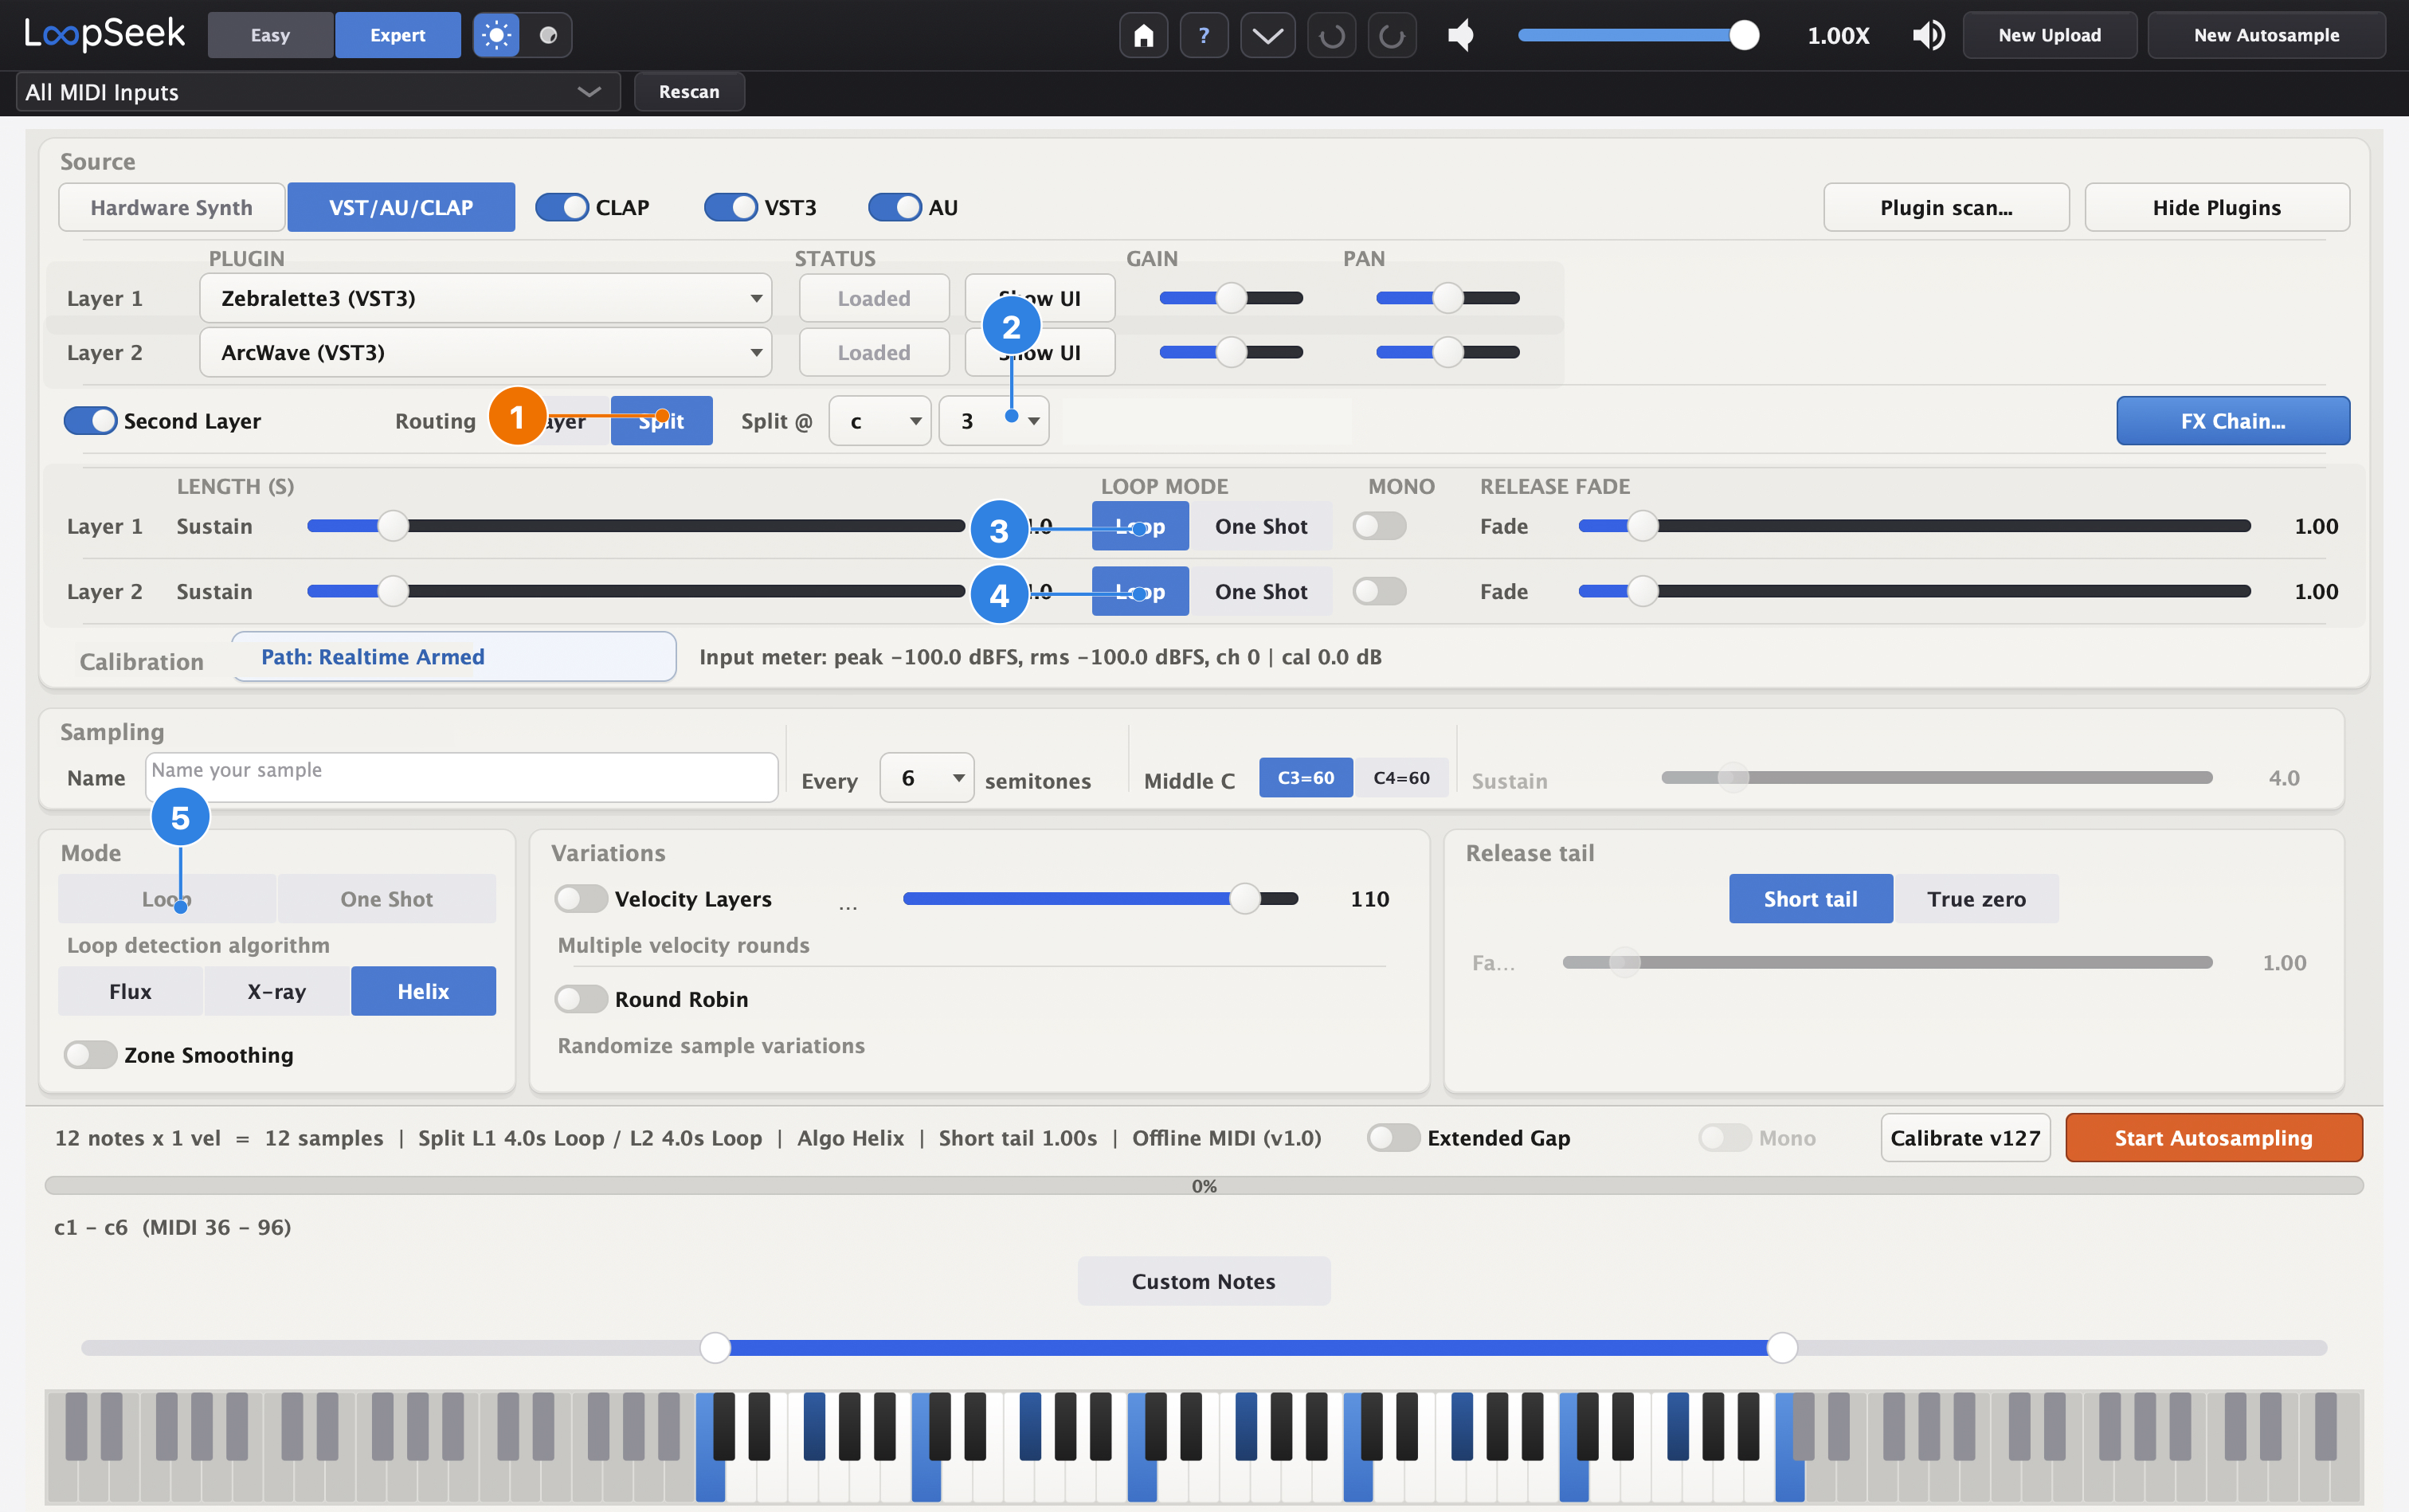
- 1Split — keyboard split (not Layer stacking).
- 2Split note — first note of Layer 2 (e.g. C3). Keys below play Layer 1.
- 3Layer 1 capture — Loop or One Shot (and sustain) for this layer alone.
- 4Layer 2 capture — can differ from Layer 1 (e.g. L1 One Shot + L2 Loop).
- 5Global Loop / Sustain / release in the lower panels are greyed out — those settings live per layer under the plugins.
At the split edge LoopSeek always samples the note just under the split (e.g. B2 when L2 starts at C3) so the zone transition lands cleanly on hardware.
Most hardware samplers have one envelope for the whole multisample. If the left side needs a snappy bass, keep Attack near zero on the device. If the right side is a pad, bake the Attack you want into the recording in LoopSeek — you cannot give each split its own hardware envelope.
Layer mode instead of Split
Choose Layer (not Split) if both instruments should sound together on every key — e.g. a pad under a pluck. Same Second Layer + two plugins; different routing. This guide’s Editor screens assume Split; skip this if you follow the main path.
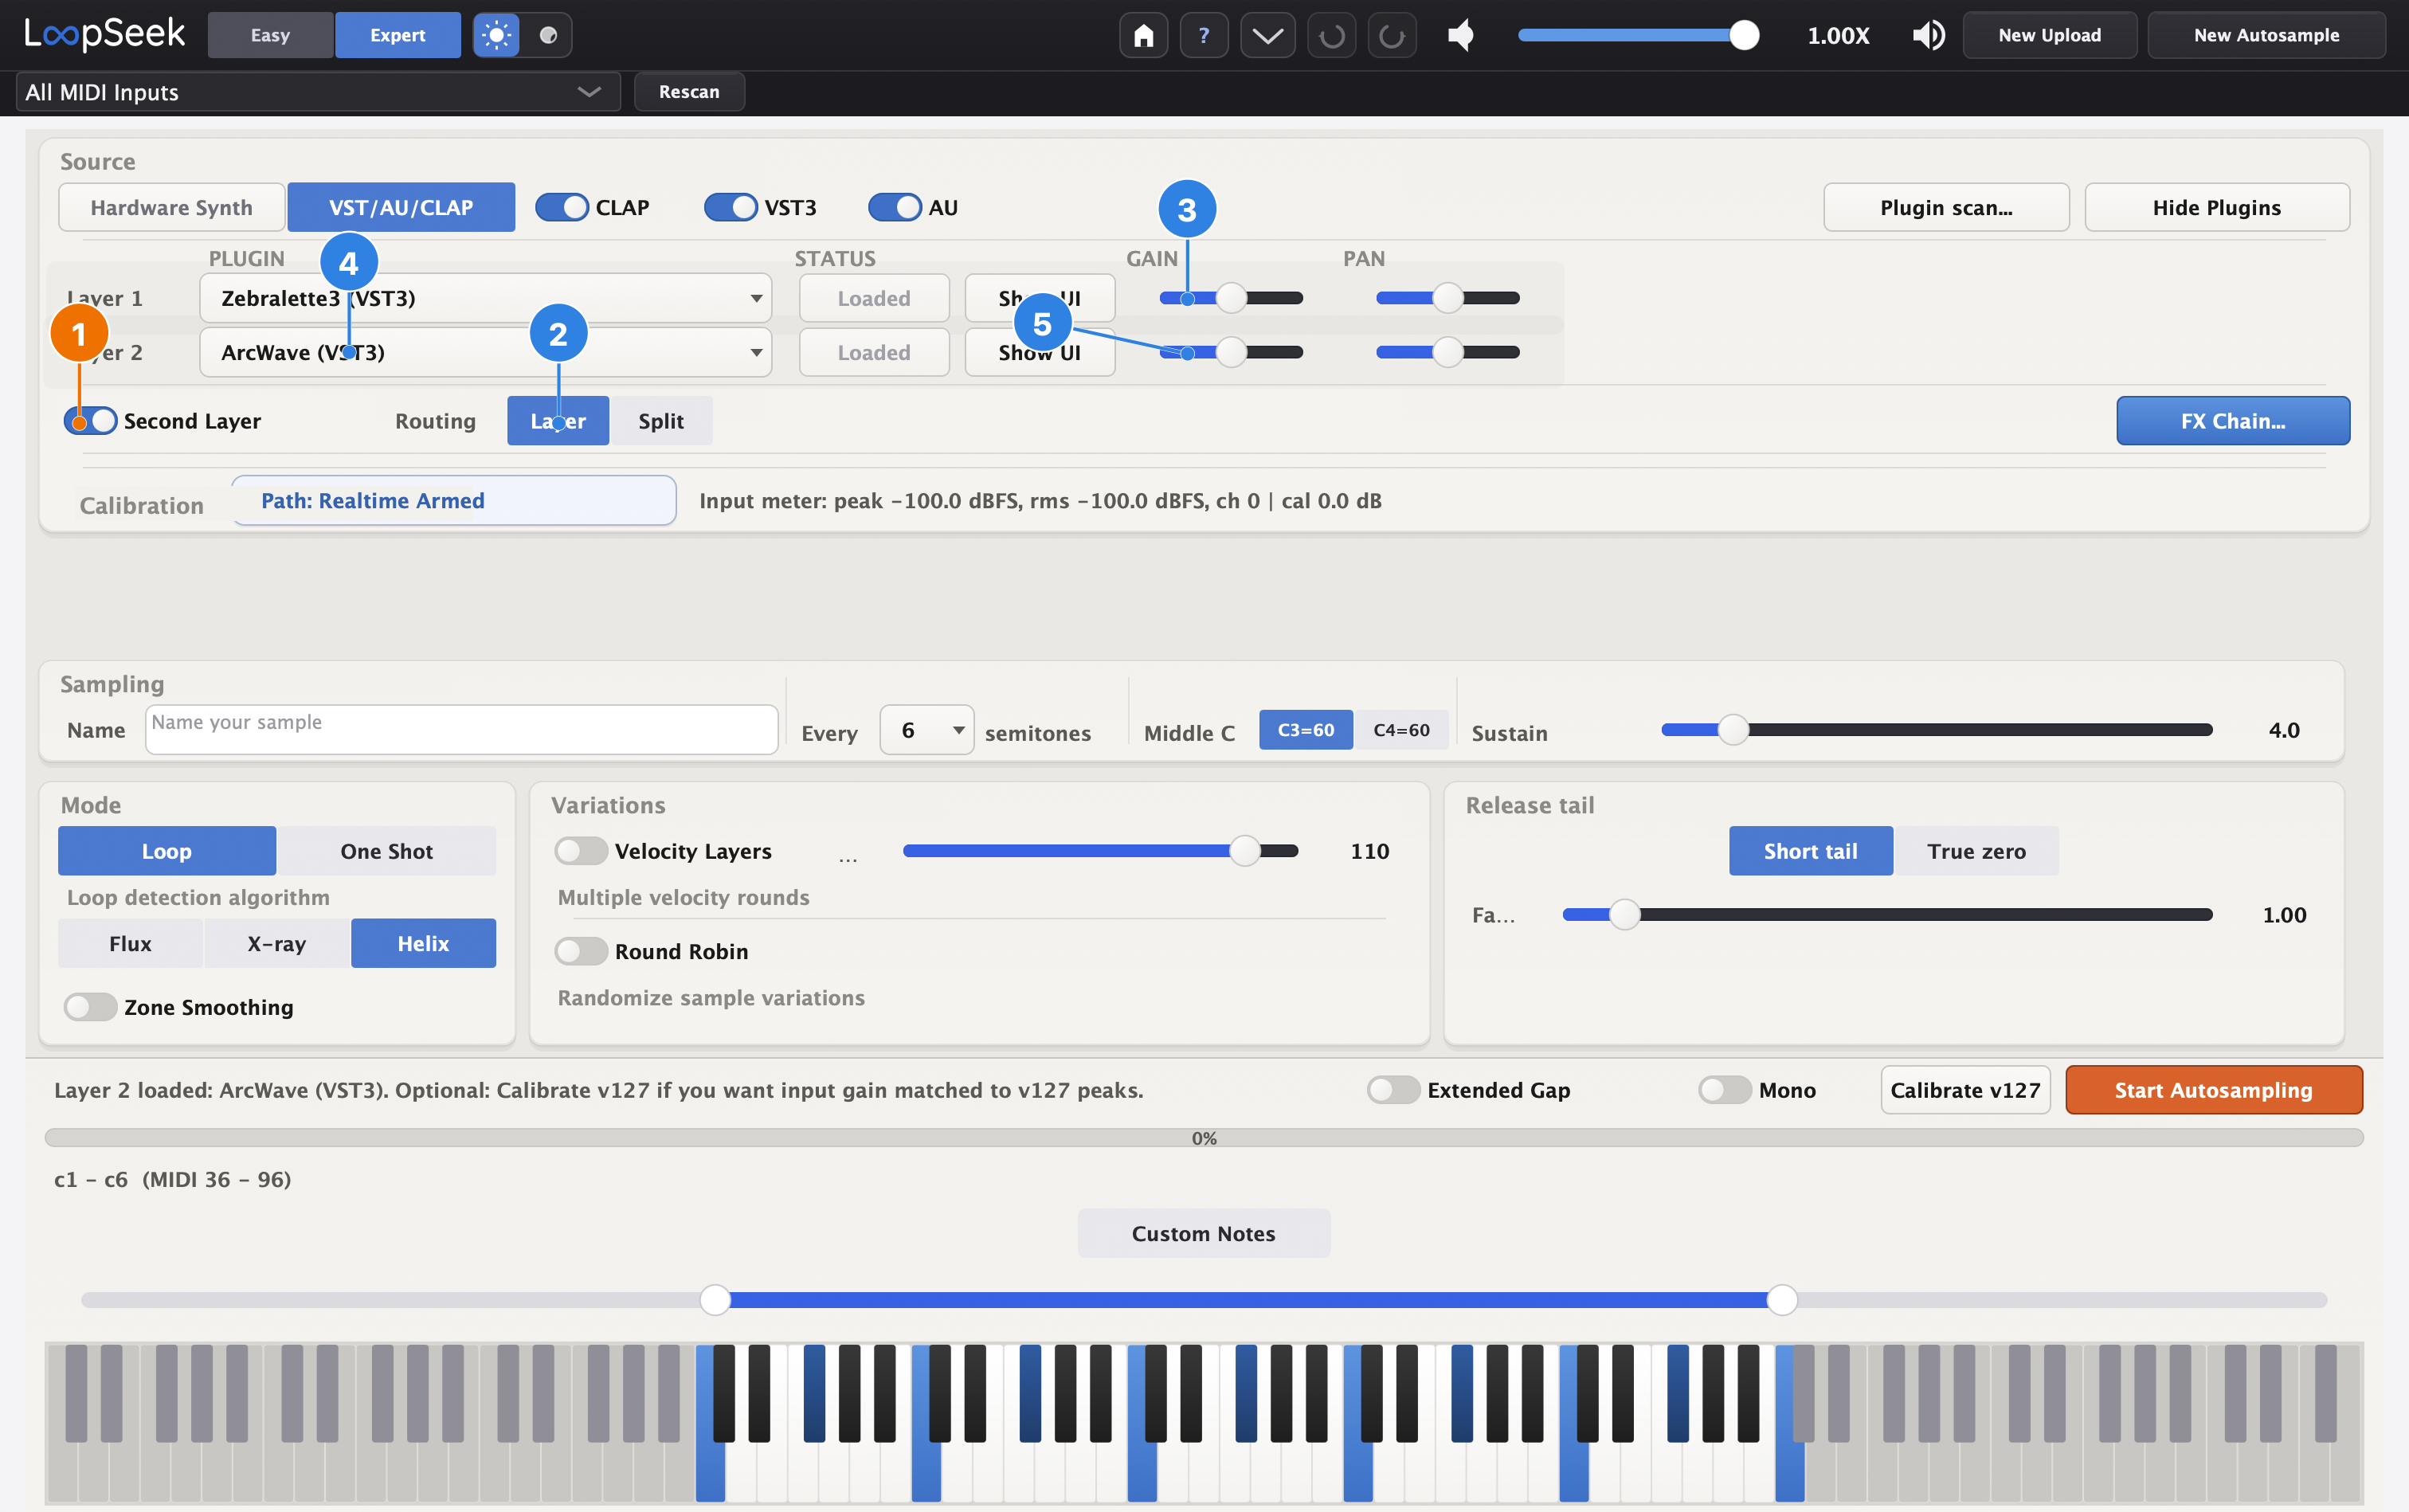
- 1Second Layer on.
- 2Layer — both plugins play at once (summed).
- 3Layer 1 Gain / Pan.
- 4Layer 2 plugin loaded.
- 5Layer 2 Gain / Pan — blend and place the two tones.
6 Velocity layers & Round Robin
Velocity layers record the same notes at several strengths (comma-separated, e.g. 30,60,90,110).
That multiplies sample count (here 12 notes × 4 velocities = 48).
Round Robin adds variation so repeated notes do not machine-gun.
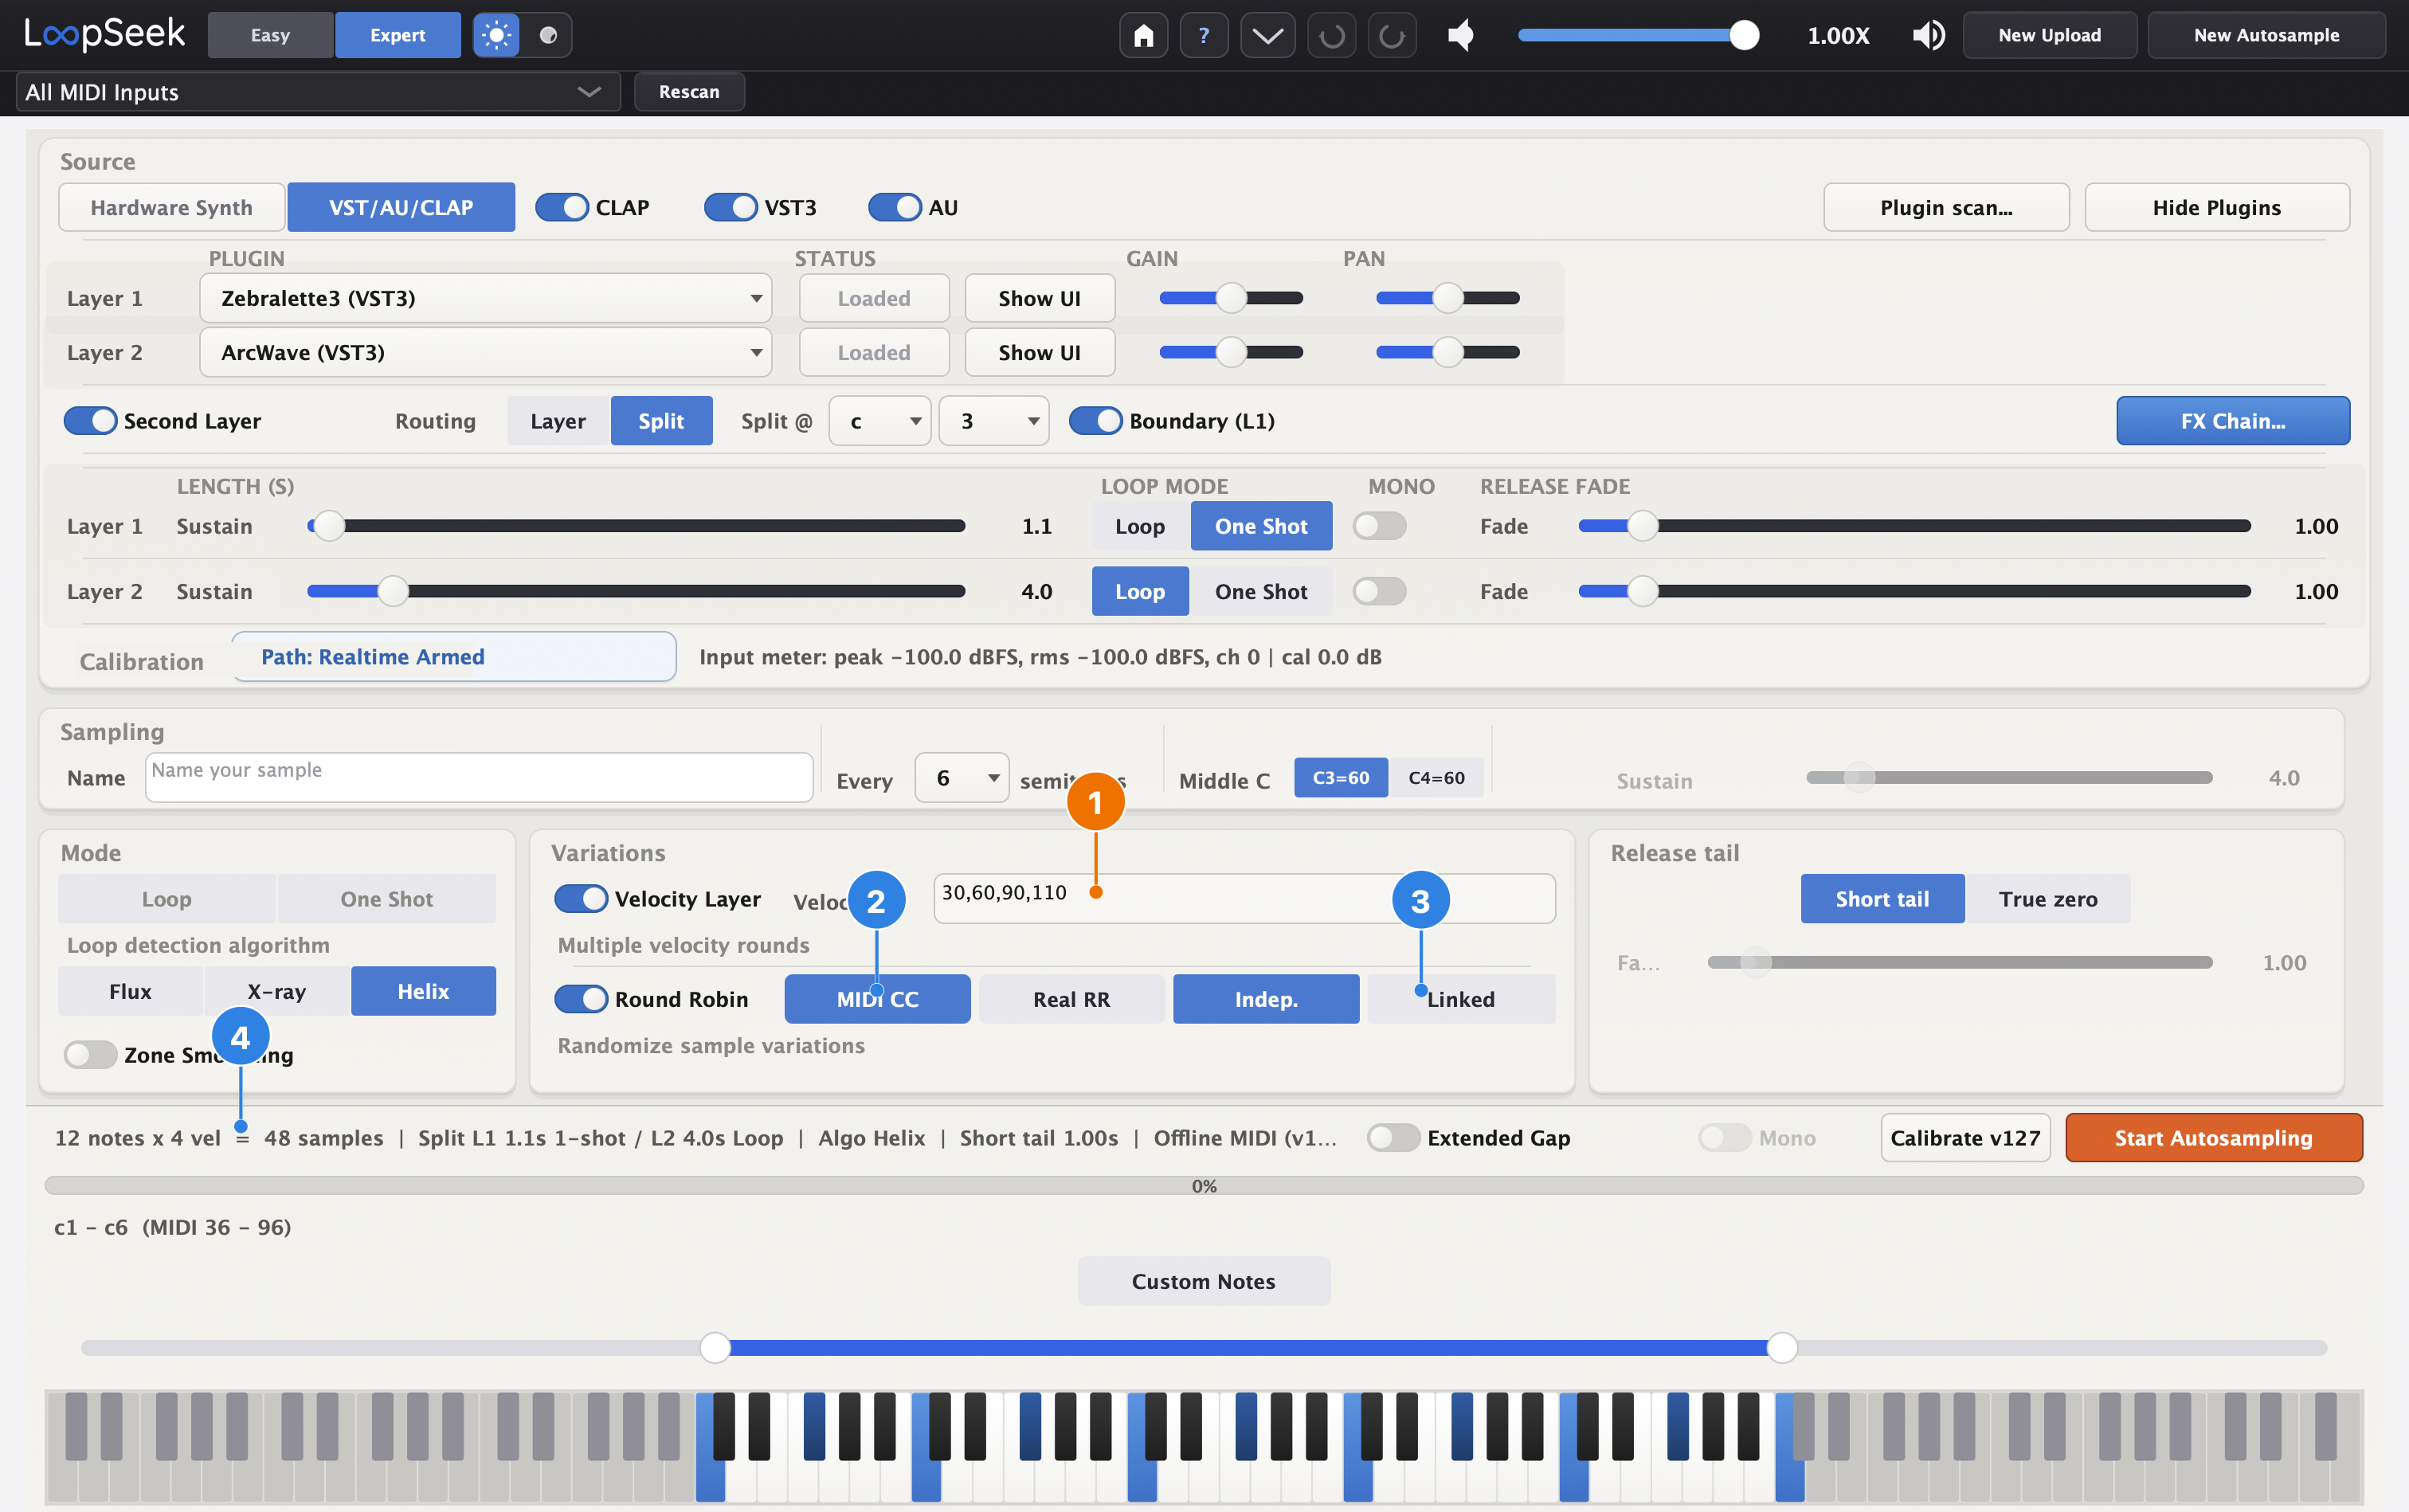
- 1Velocities — comma list. Target sampler must support velocity layers.
- 2MIDI CC / Real RR — Real RR: plugin/hardware already varies each hit (no parameter change). MIDI CC: Learn a parameter (e.g. filter cutoff), set Steps and a small From->To range (e.g. 32–45) for subtle differences when the instrument has no built-in RR.
- 3Linked — for samplers that have velocity layers but no Round Robin: RR variant 1 binds to velocity layer 1, RR2 to VL2, and so on. Use close velocities (e.g. 90,95,100,110) so playing harder also nudges timbre. You need as many RR steps as velocity layers (Linked opens the RR window with Steps prefilled). (Screenshot shows Indep. selected — switch to Linked when you want that mapping.)
- 4Summary line at the bottom left — e.g. 12 notes × 4 vel = 48 samples (do not Start yet if you still want FX).
Indep. (independent) renders every velocity × every RR variant (more files).
Linked keeps one RR variant per velocity and omits rr tags in filenames.
You can skip velocity entirely for a smaller set — then the Editor still works the same, just fewer cards.
Next: optional FX (step 7), then Start Autosampling.
7 FX Chain (optional), then Start
Up to four FX slots after the instrument. Set them before you Start. With Second Layer on, each slot can route to L1, L2, or both (e.g. three FX on Layer 1 and one on Layer 2).
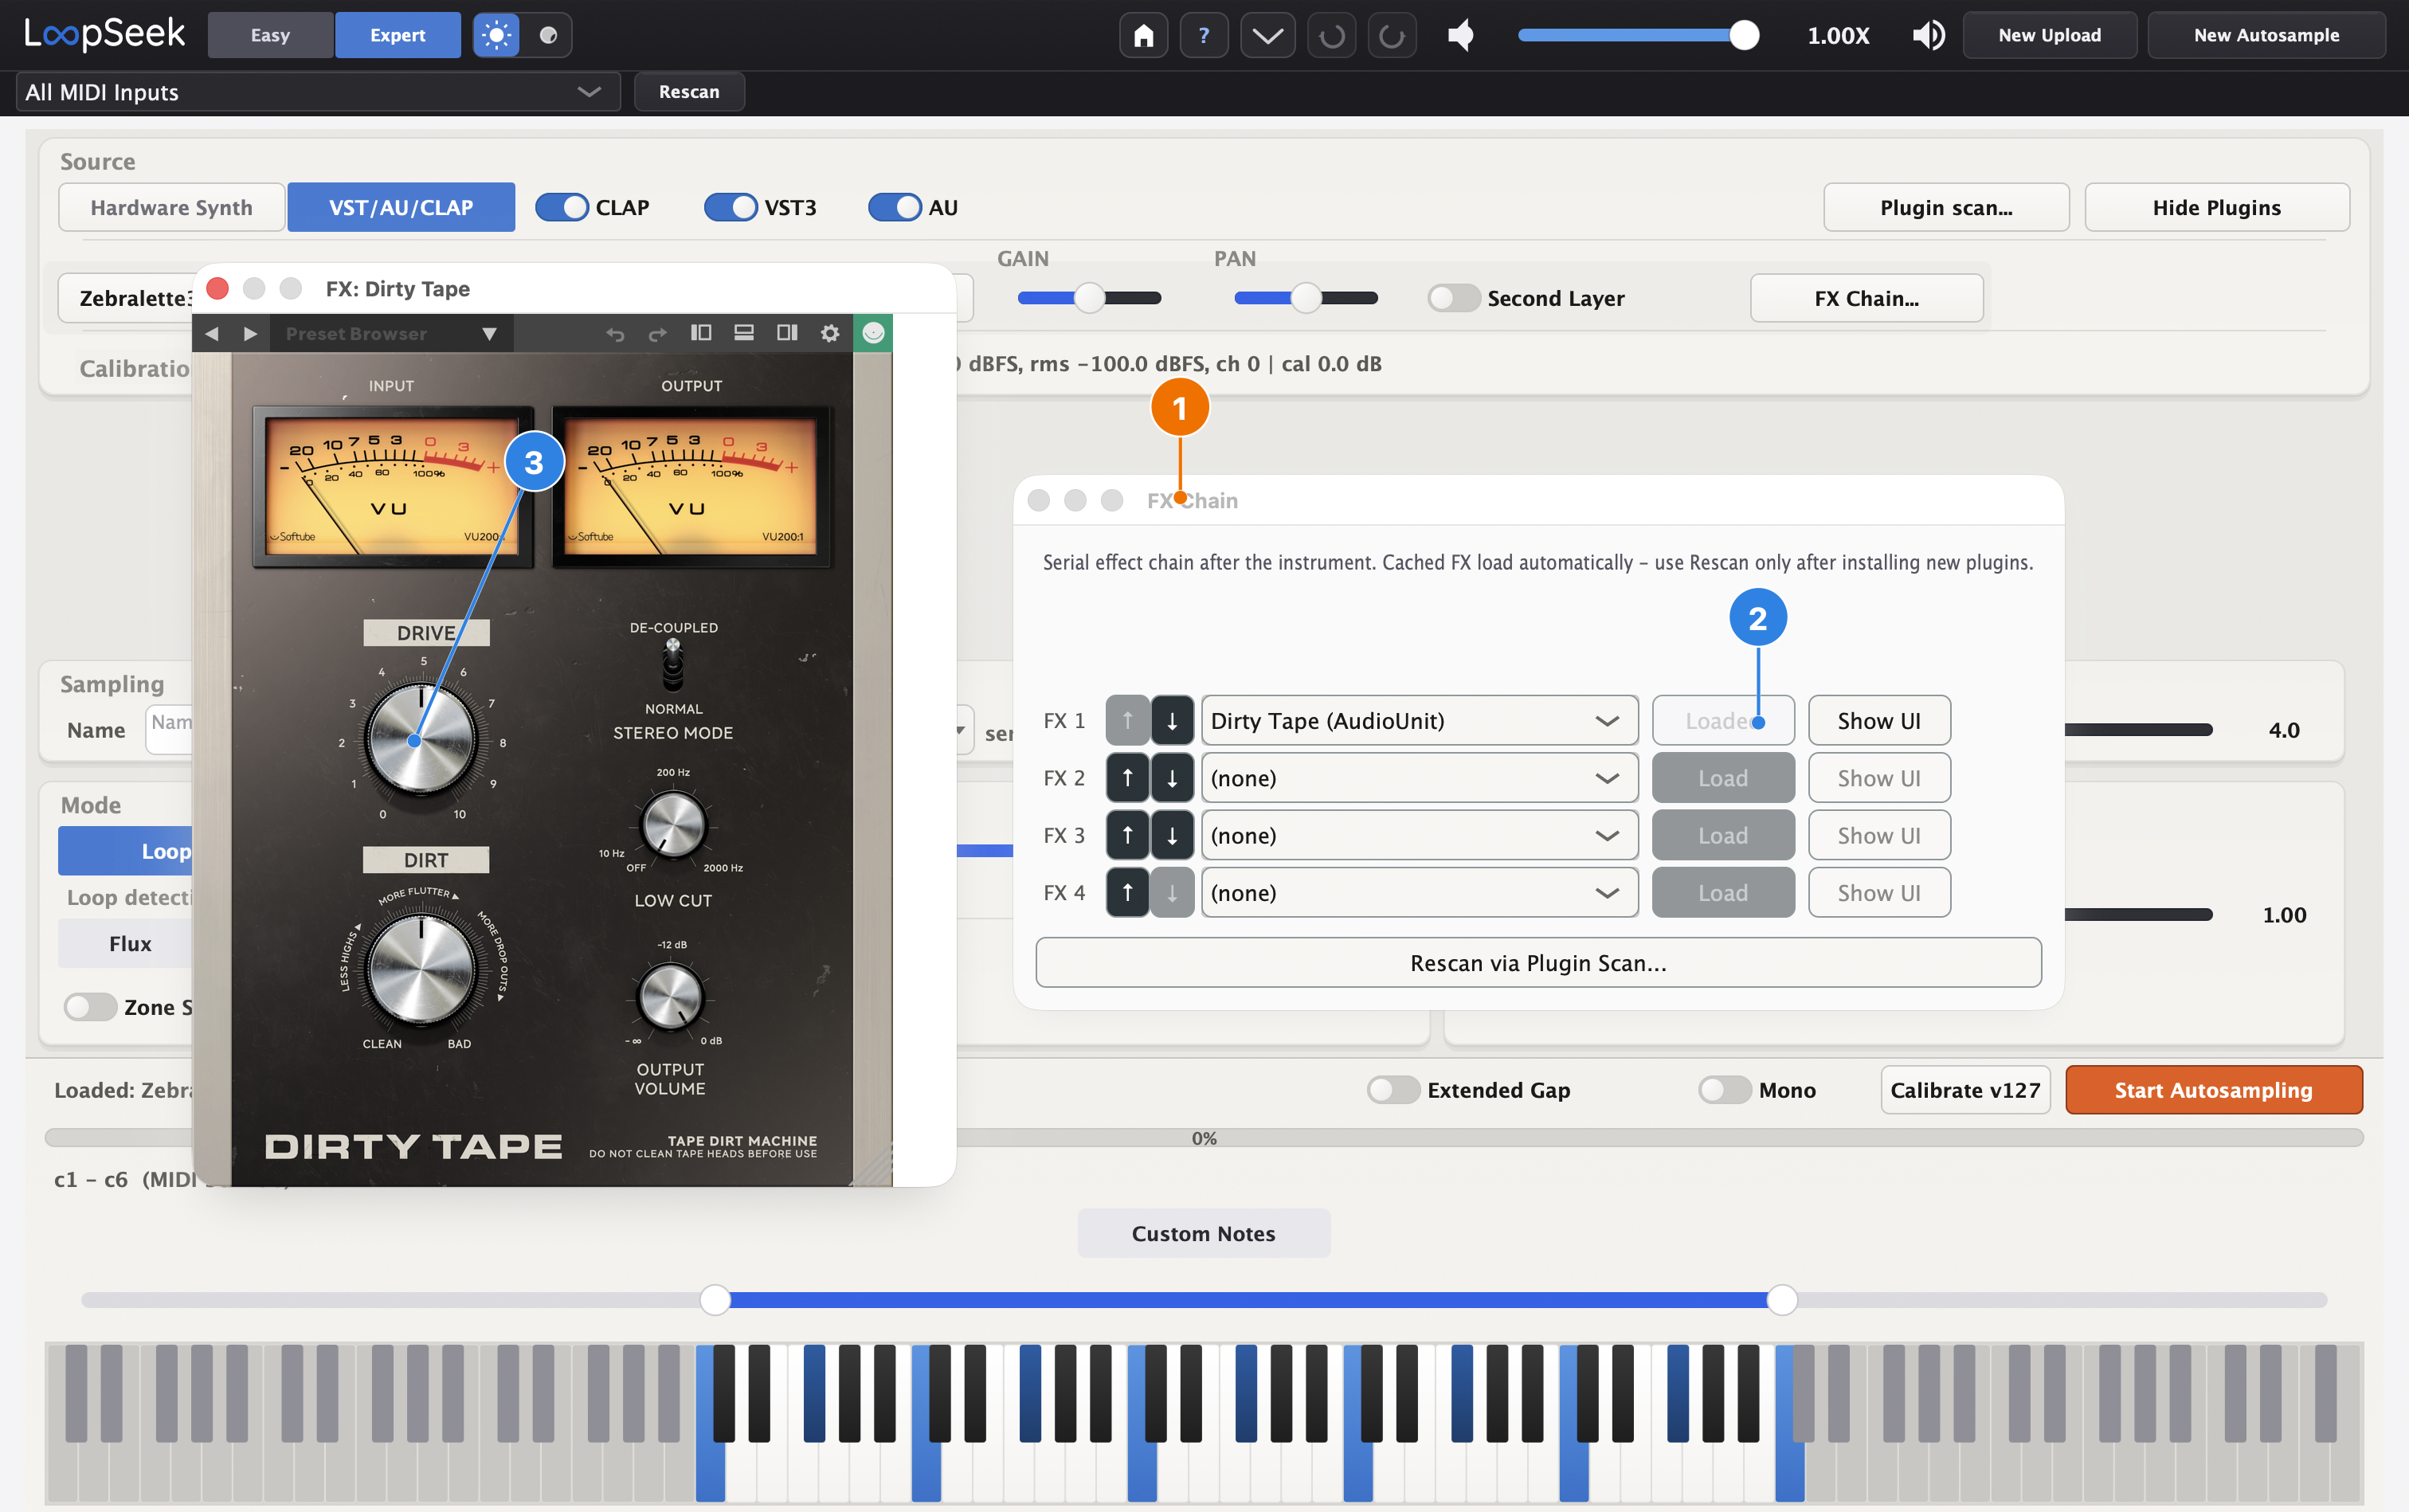
- 1FX Chain window — serial chain after the instrument.
- 2Slot FX 1 Loaded (example: Dirty Tape) — Filter/EQ, drive, dynamics, lo-fi fit multisampling well.
- 3FX plugin UI (left) — tweak the sound here before you capture.
After Vel/RR (step 6), leave Split as you set it, then Start.
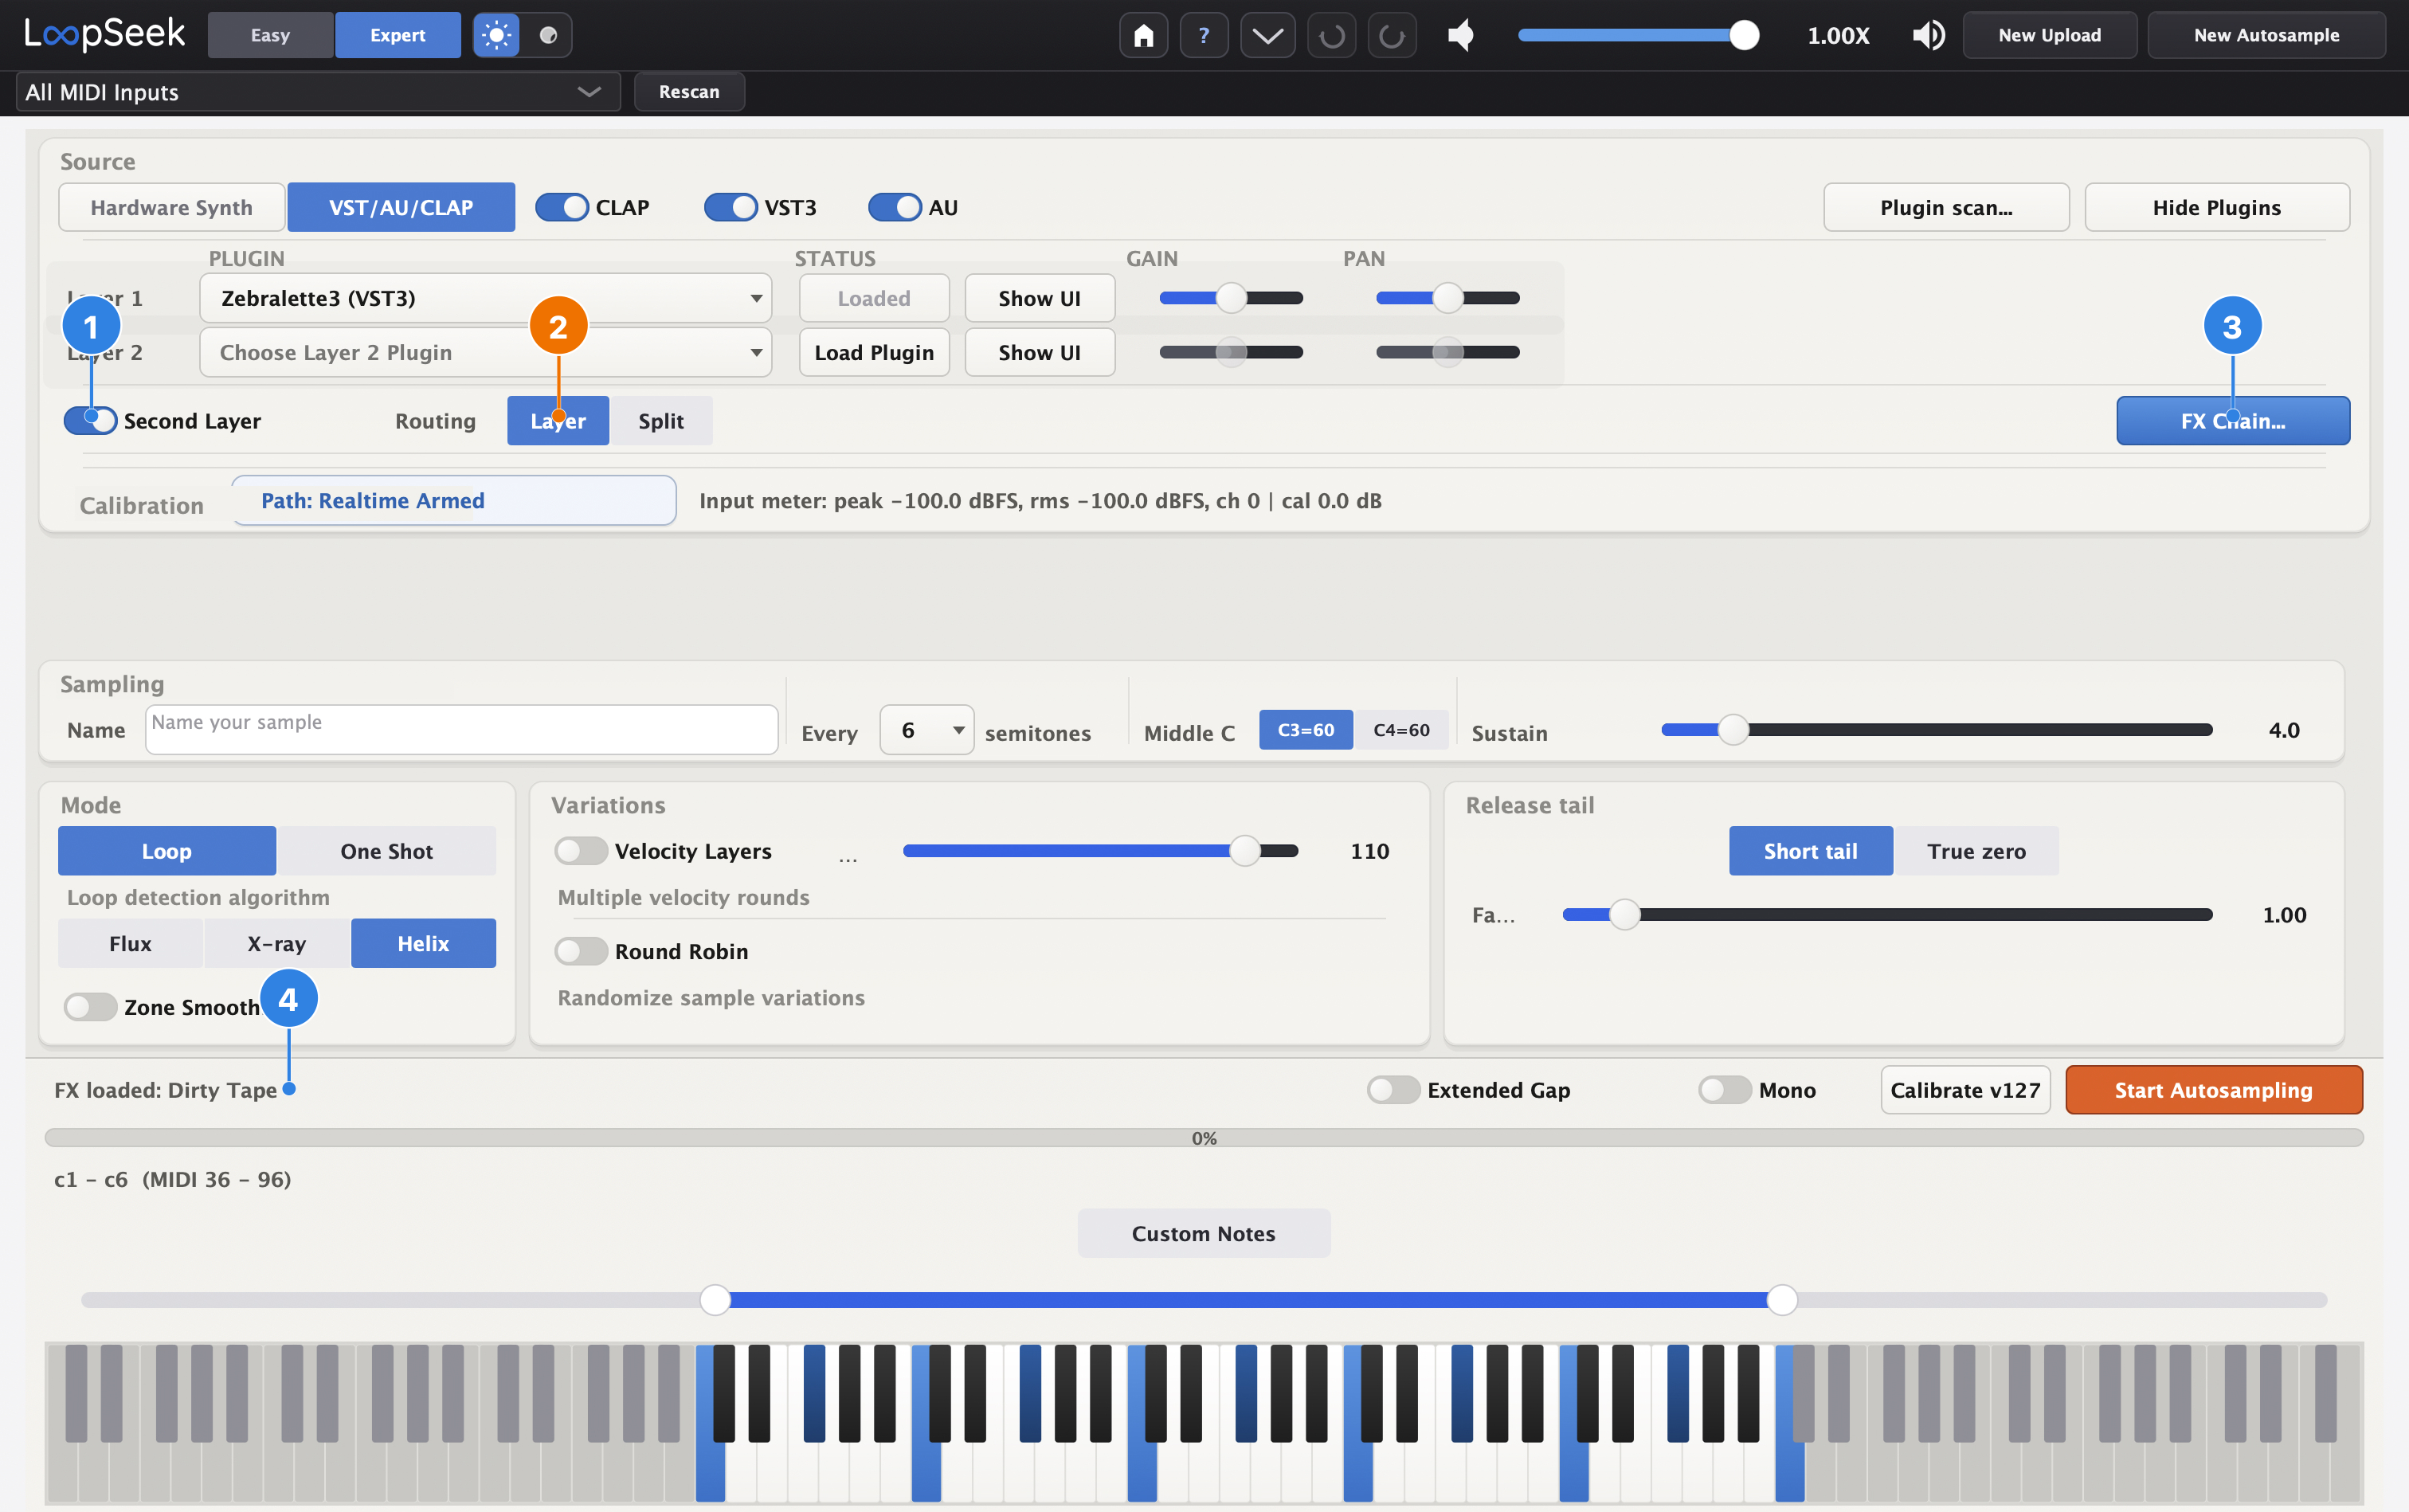
- 1Second Layer on — required for per-layer FX routing.
- 2Layer (or Split) — play mode for the two instruments.
- 3Open FX Chain… again to set each slot to L1 / L2 / Both (routing controls live inside the FX Chain window — not visible on this overview shot).
- 4Status line shows FX loaded when a slot is active.
Avoid Reverb, Delay, and heavy modulation FX when multisampling — they make loop finding harder, and most target samplers already offer those effects. When FX (or none) are set, click Start Autosampling and wait for the Editor.
8 Editor — Loop Detection
After your Split + velocity capture, Expert opens the Editor with three tabs: Live Play, Loop Detection, Export. Unlike Easy, you choose the loop region (start/end), drag on a sample, then apply to others. The next steps stay on this set — not a different dual-layer mode.
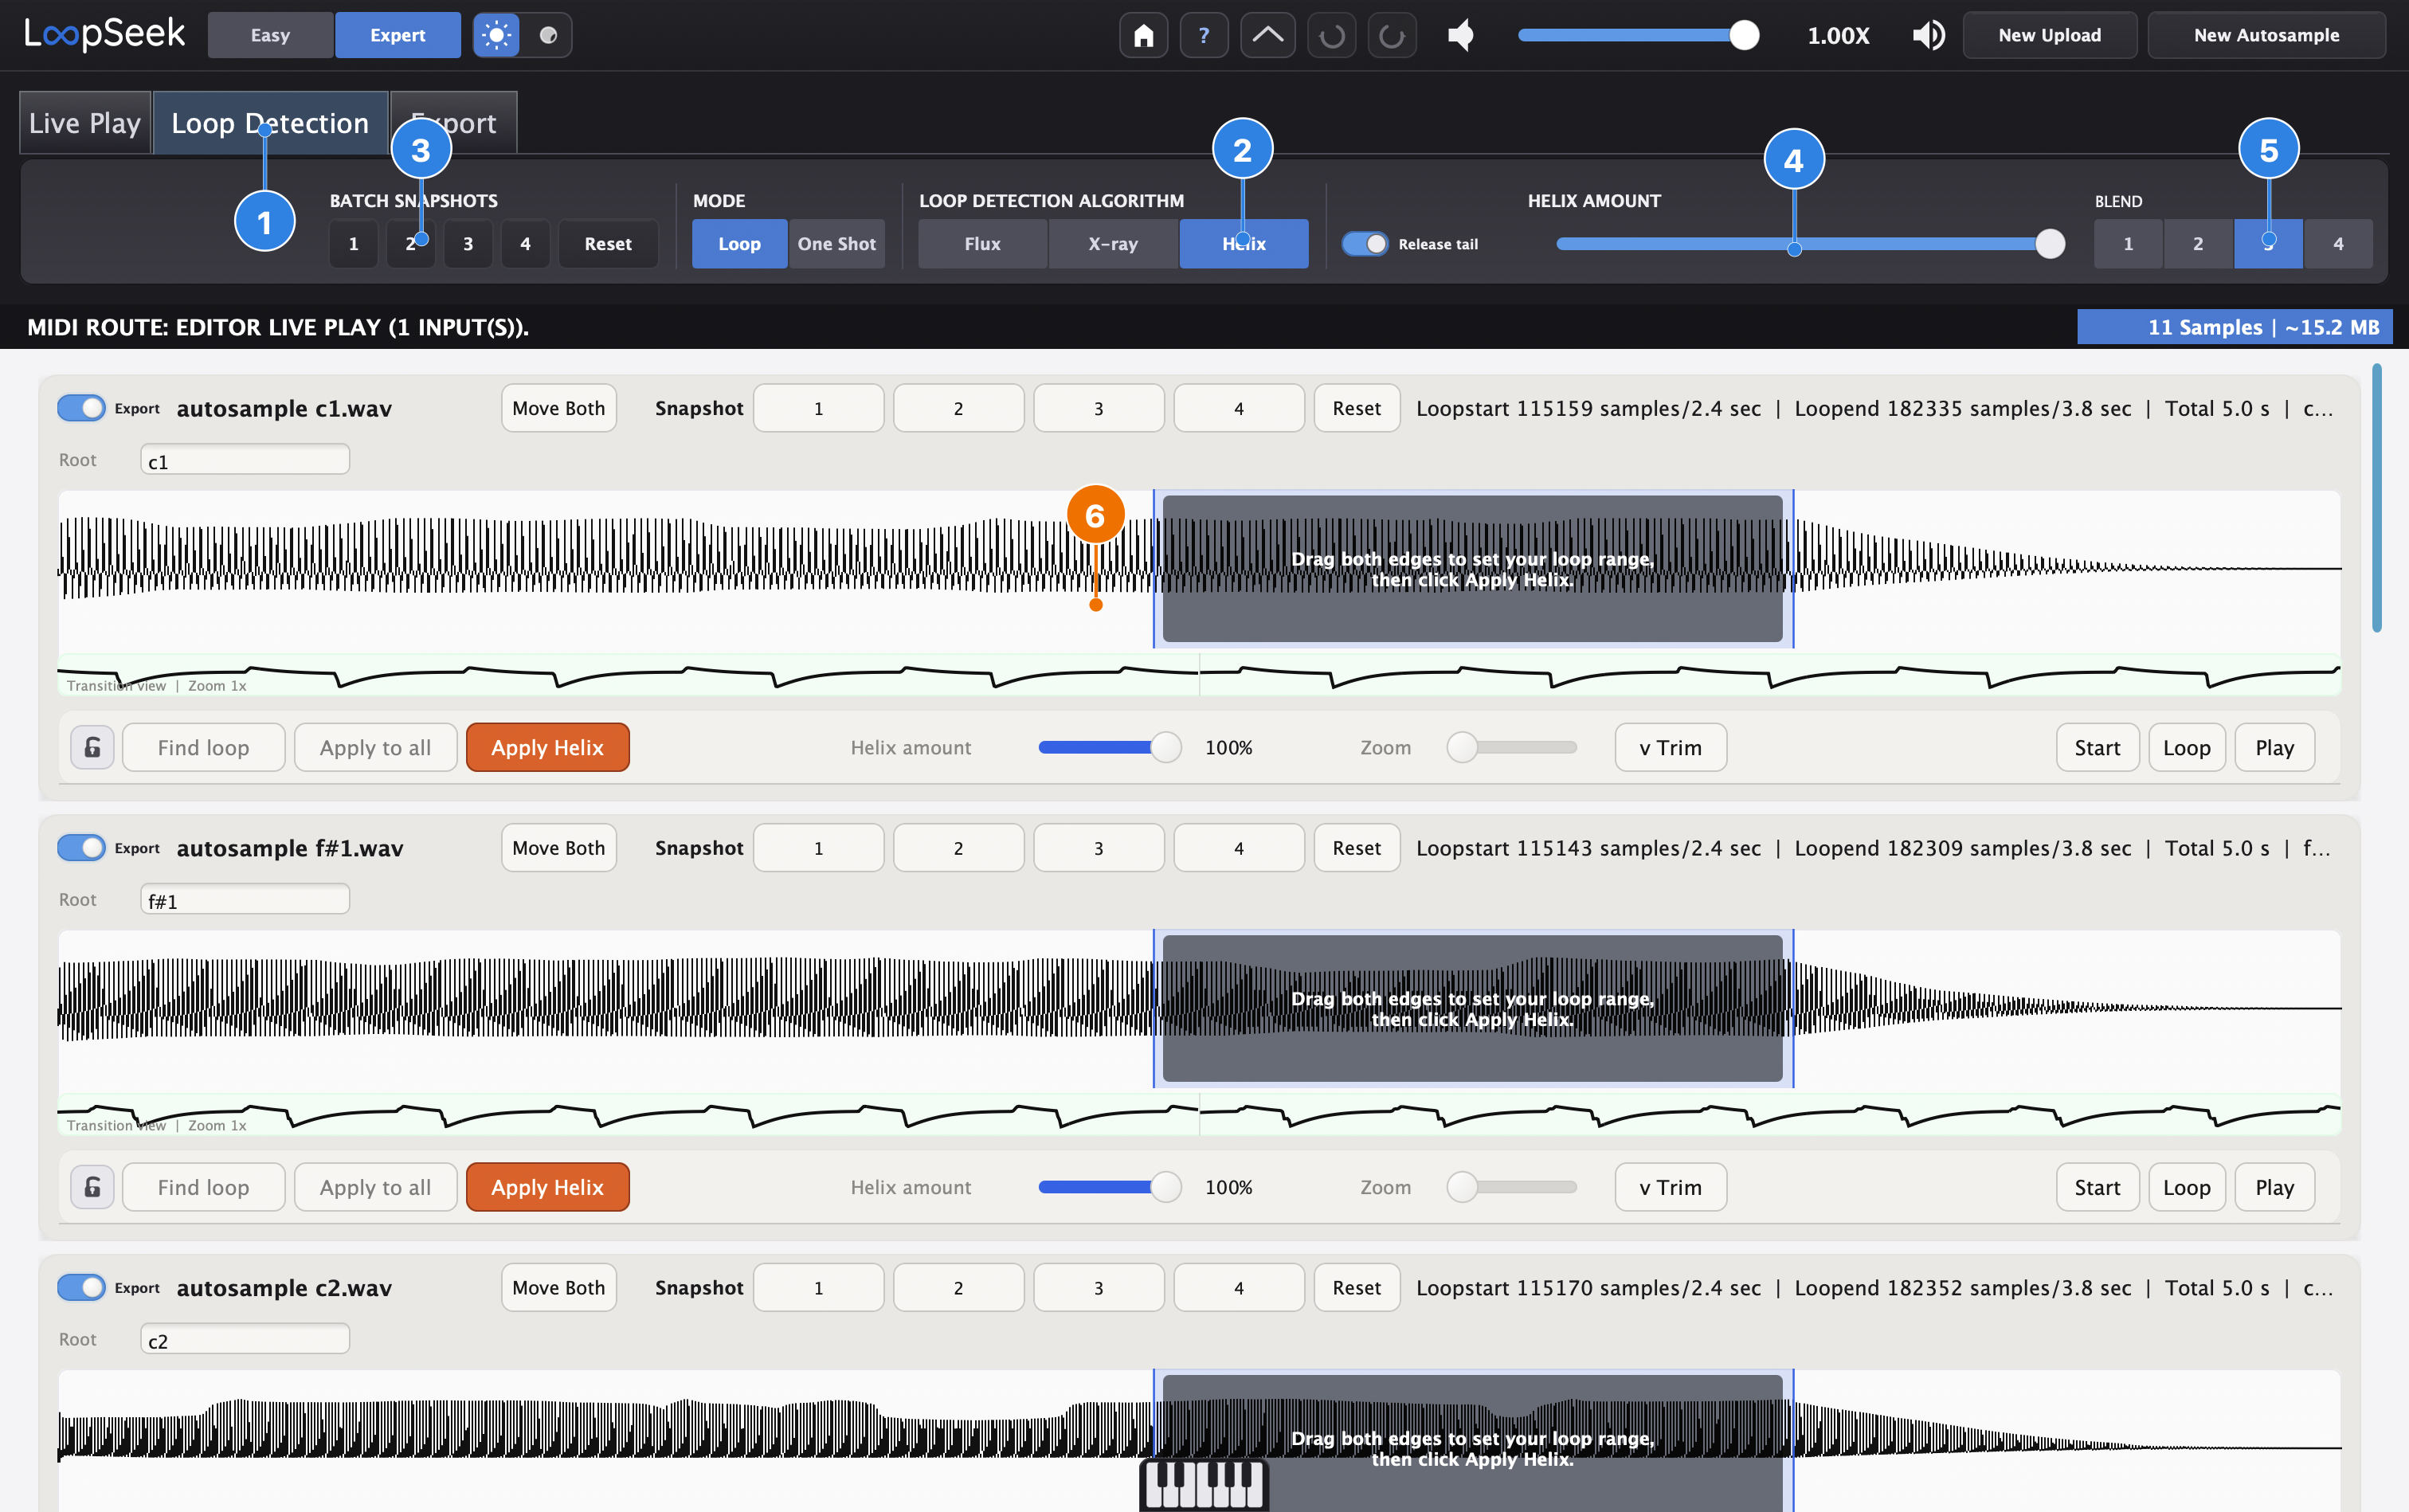
- 1Loop Detection tab.
- 2Algorithm — Helix / Flux / X-ray (try what sounds best).
- 3Batch Snapshots 1–4 — quick A/B of different loop setups.
- 4Helix Amount (and Release tail) — how strongly Helix shapes the loop crossfade.
- 5Blend 1–4 — different blend modes. You do not need to memorize what each does; try a few on a tricky sample. Depending on the sound, another blend can give a cleaner loop than the default — worth a quick experiment.
- 6Waveform — drag the loop range, then Apply Helix / Find loop. Green S / red E markers.
9 Split in the Editor
Your Split capture shows a visual split line; Layer 1 / Layer 2 can keep different loop modes. Layer toggles filter which cards you edit.
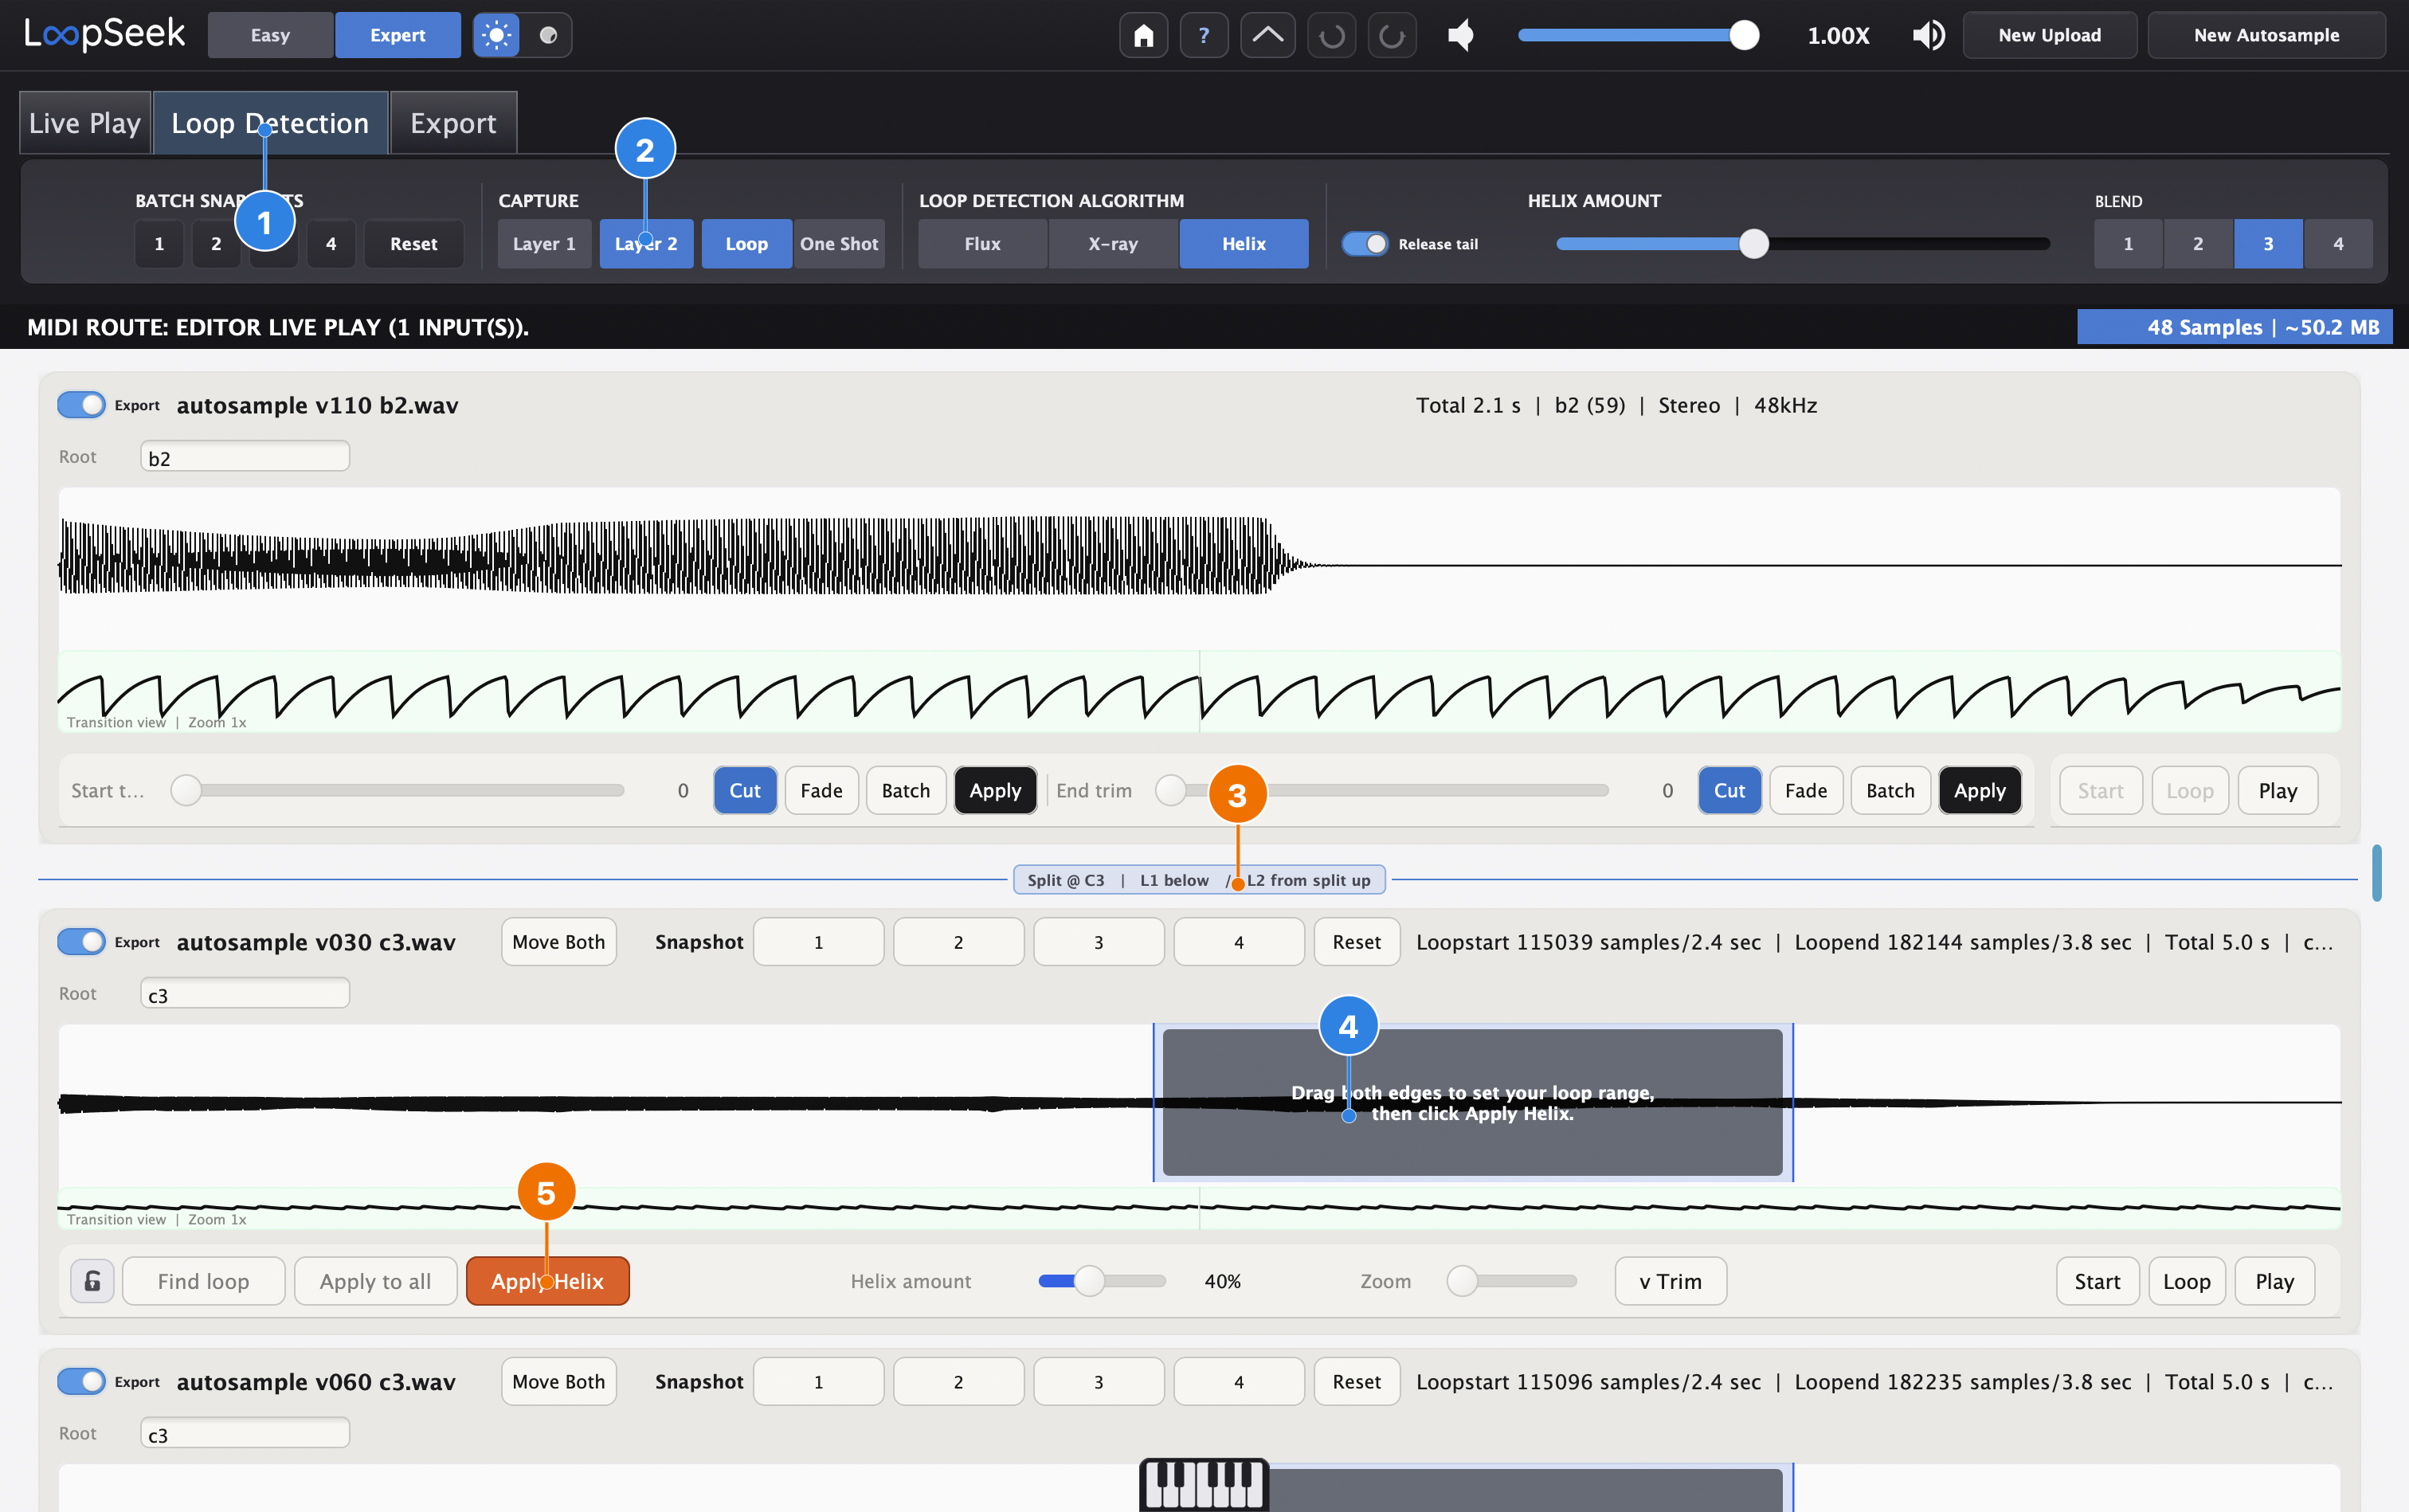
- 1Loop Detection tab.
- 2Layer 1 / Layer 2 — focus cards for that layer.
- 3Split marker line (e.g. Split @ C3 — L1 below / L2 from split up).
- 4Drag both edges of the loop range on the focused sample.
- 5Apply Helix — then optionally Apply to all (next step).
10 Apply Helix to all
Batch-apply can ask how to handle region markers across samples.
From here on, some screenshots switch to a shorter Easy-style run (11 samples) instead of the Split × velocity set (48 samples) from steps 5–9. Same Editor tools — different demo take, not a second Autosample in your session.
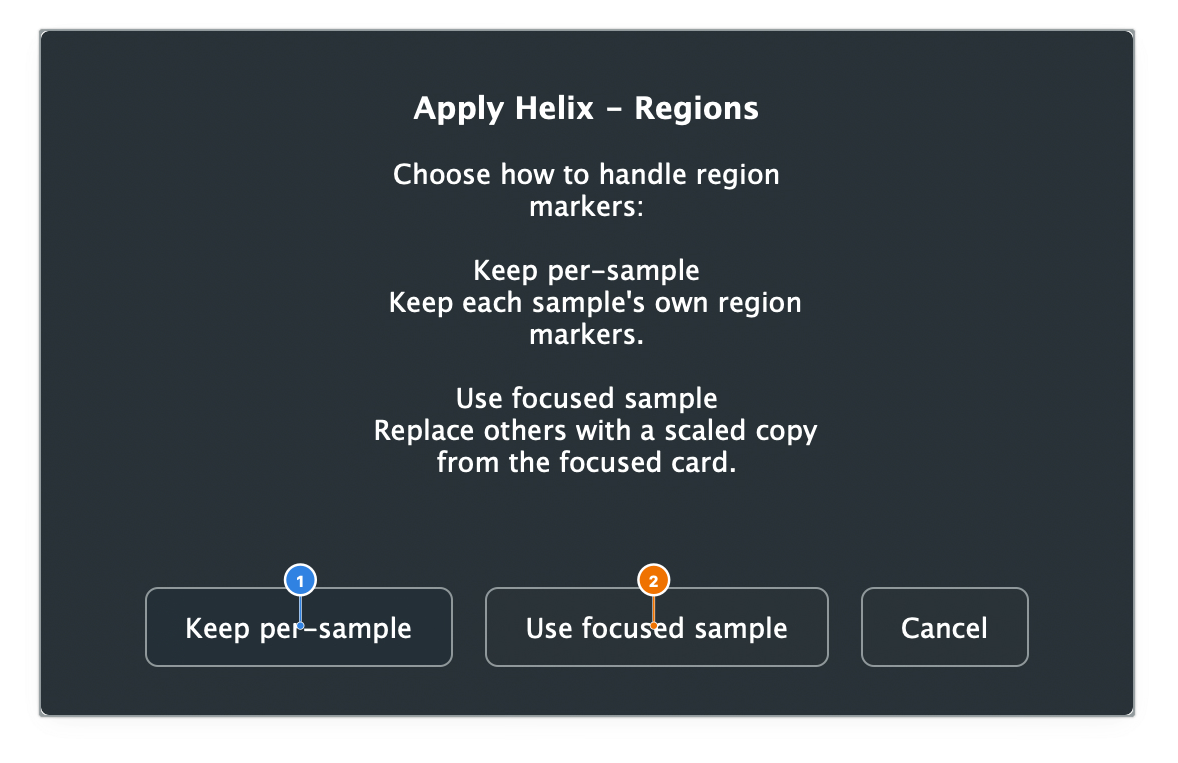
- 1Keep per-sample — left button; each file keeps its own marker positions.
- 2Use focused sample — middle button; copy the focused range proportionally to the others.
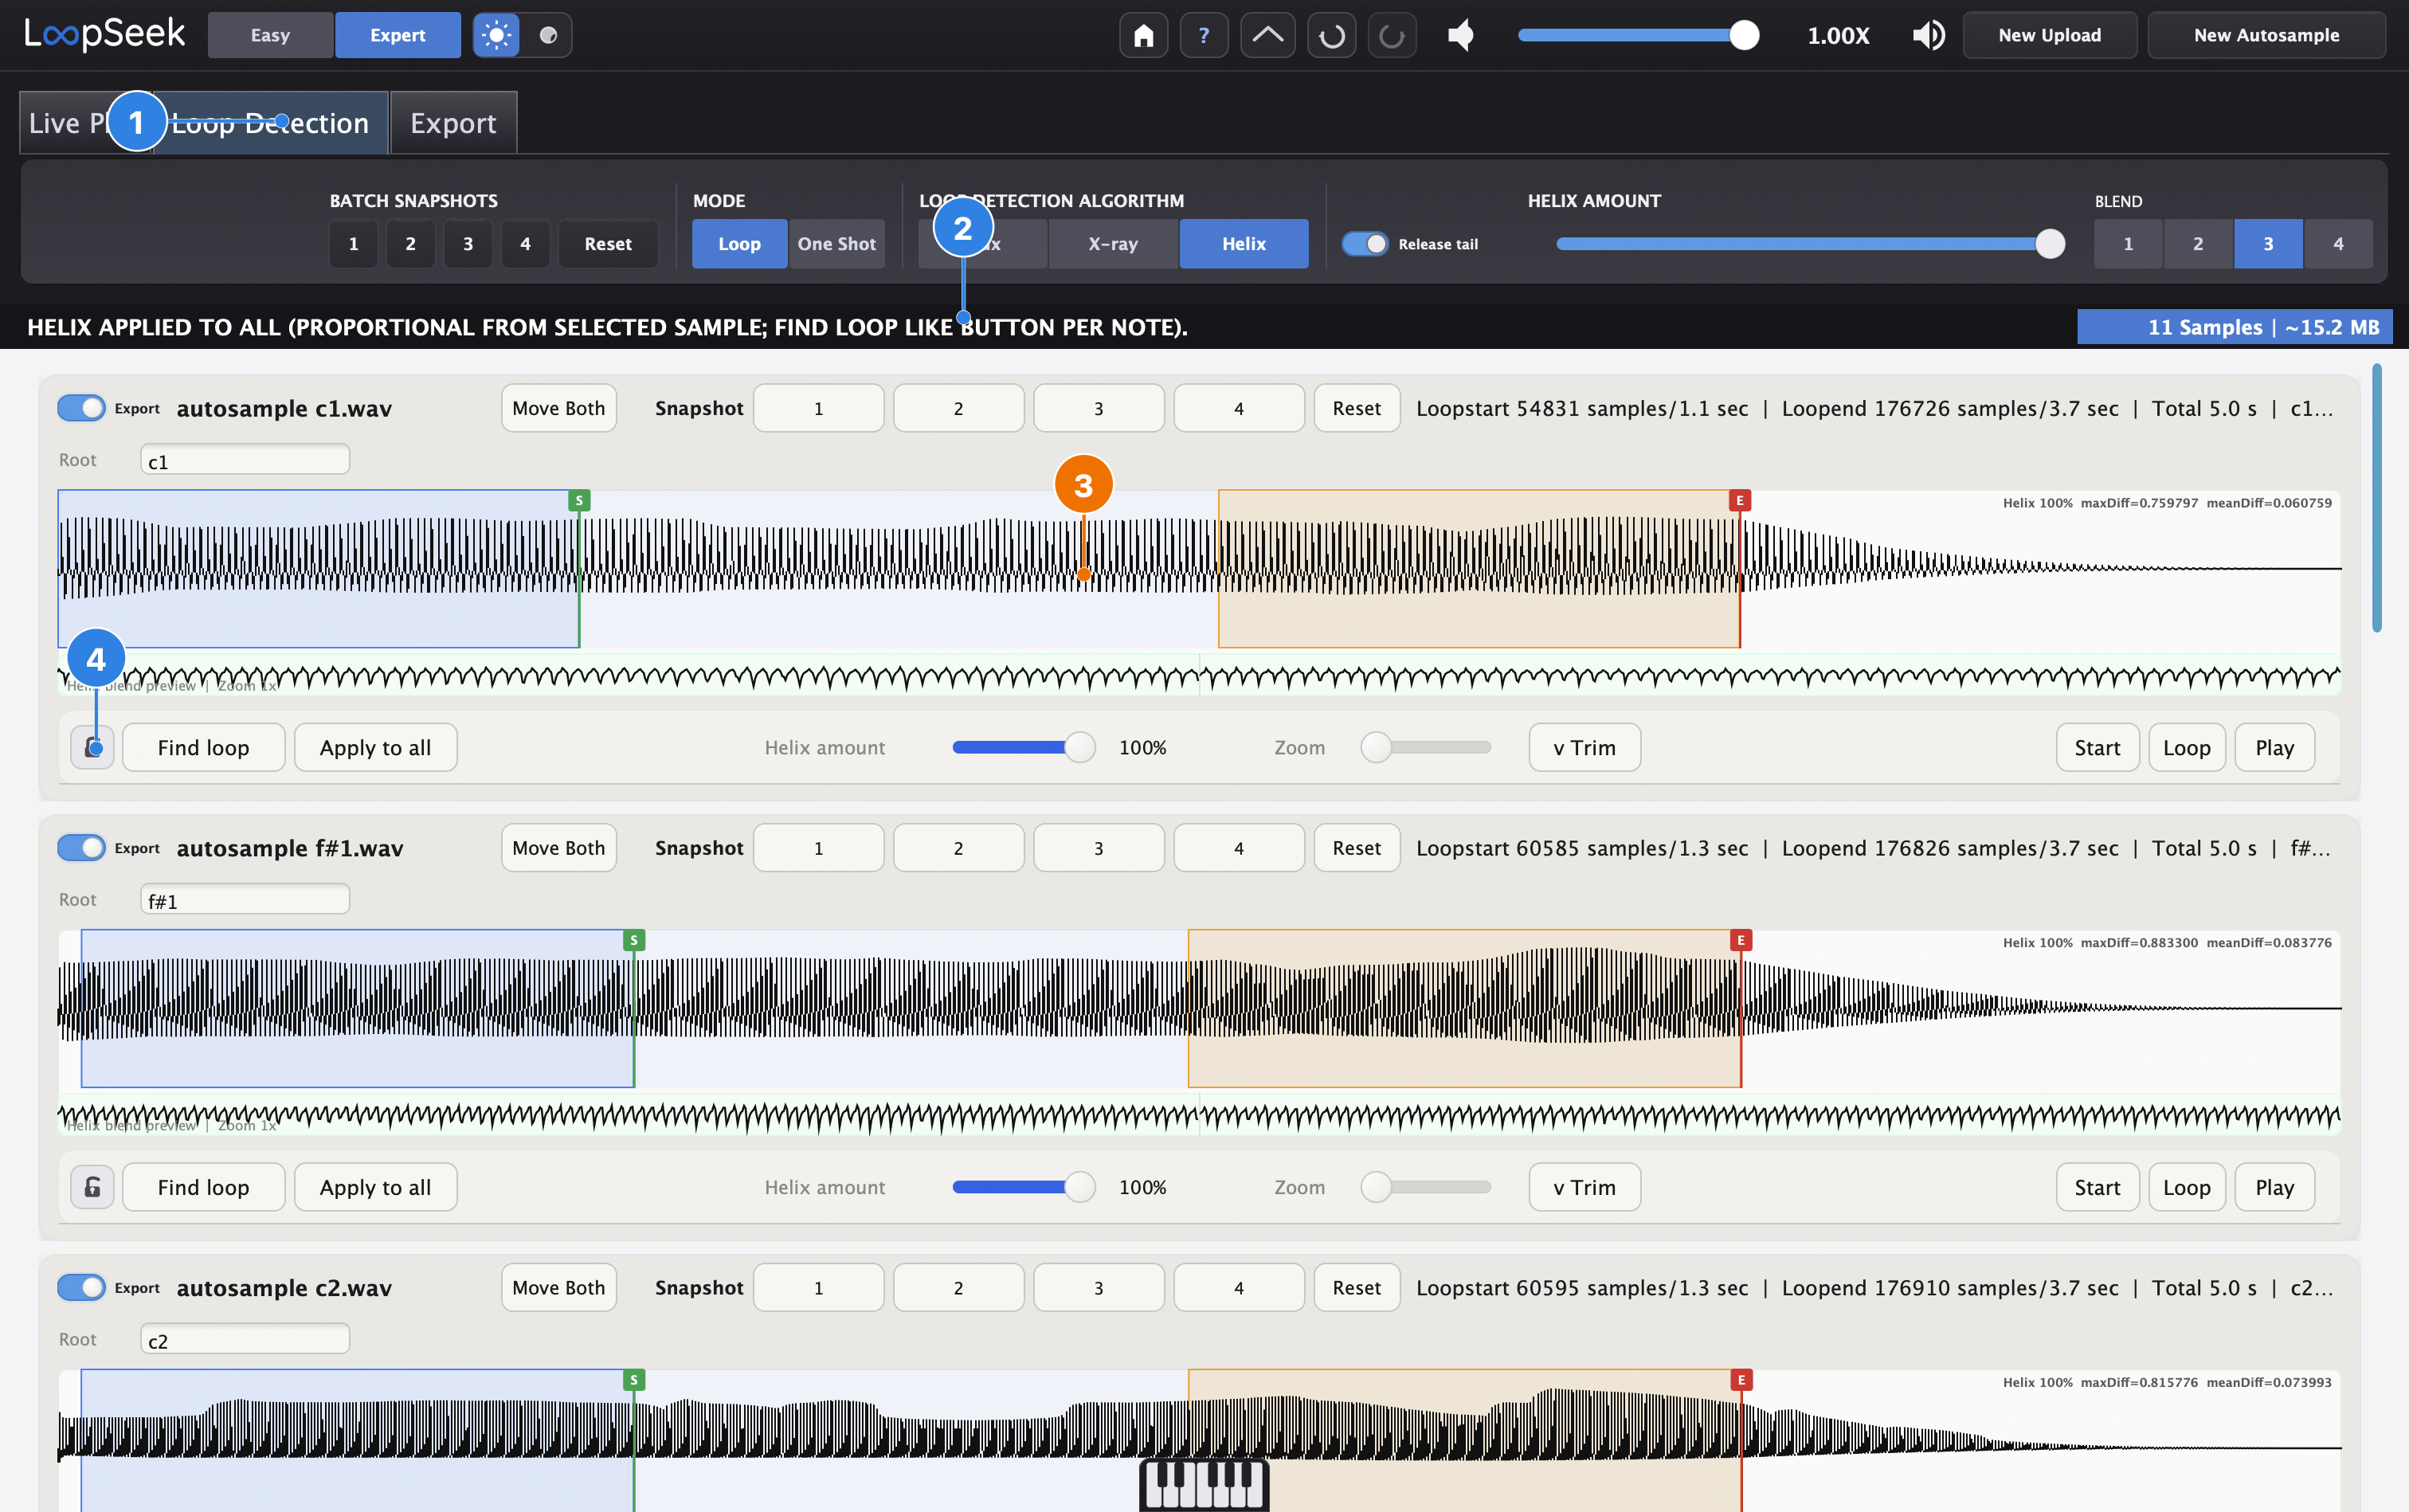
- 1Still on Loop Detection.
- 2Status confirms Helix applied across the set.
- 3S/E markers and Helix preview on each card — listen and nudge if needed.
- 4Lock icon — lock a good loop so a later algorithm change skips that card (power-user).
11 Batch cut, lock, exclude
Too much silence after the note? Open Trim on a card, drag End trim — the region to remove is shown in red. Use Batch + Apply to cut (or fade) that tail across many samples.
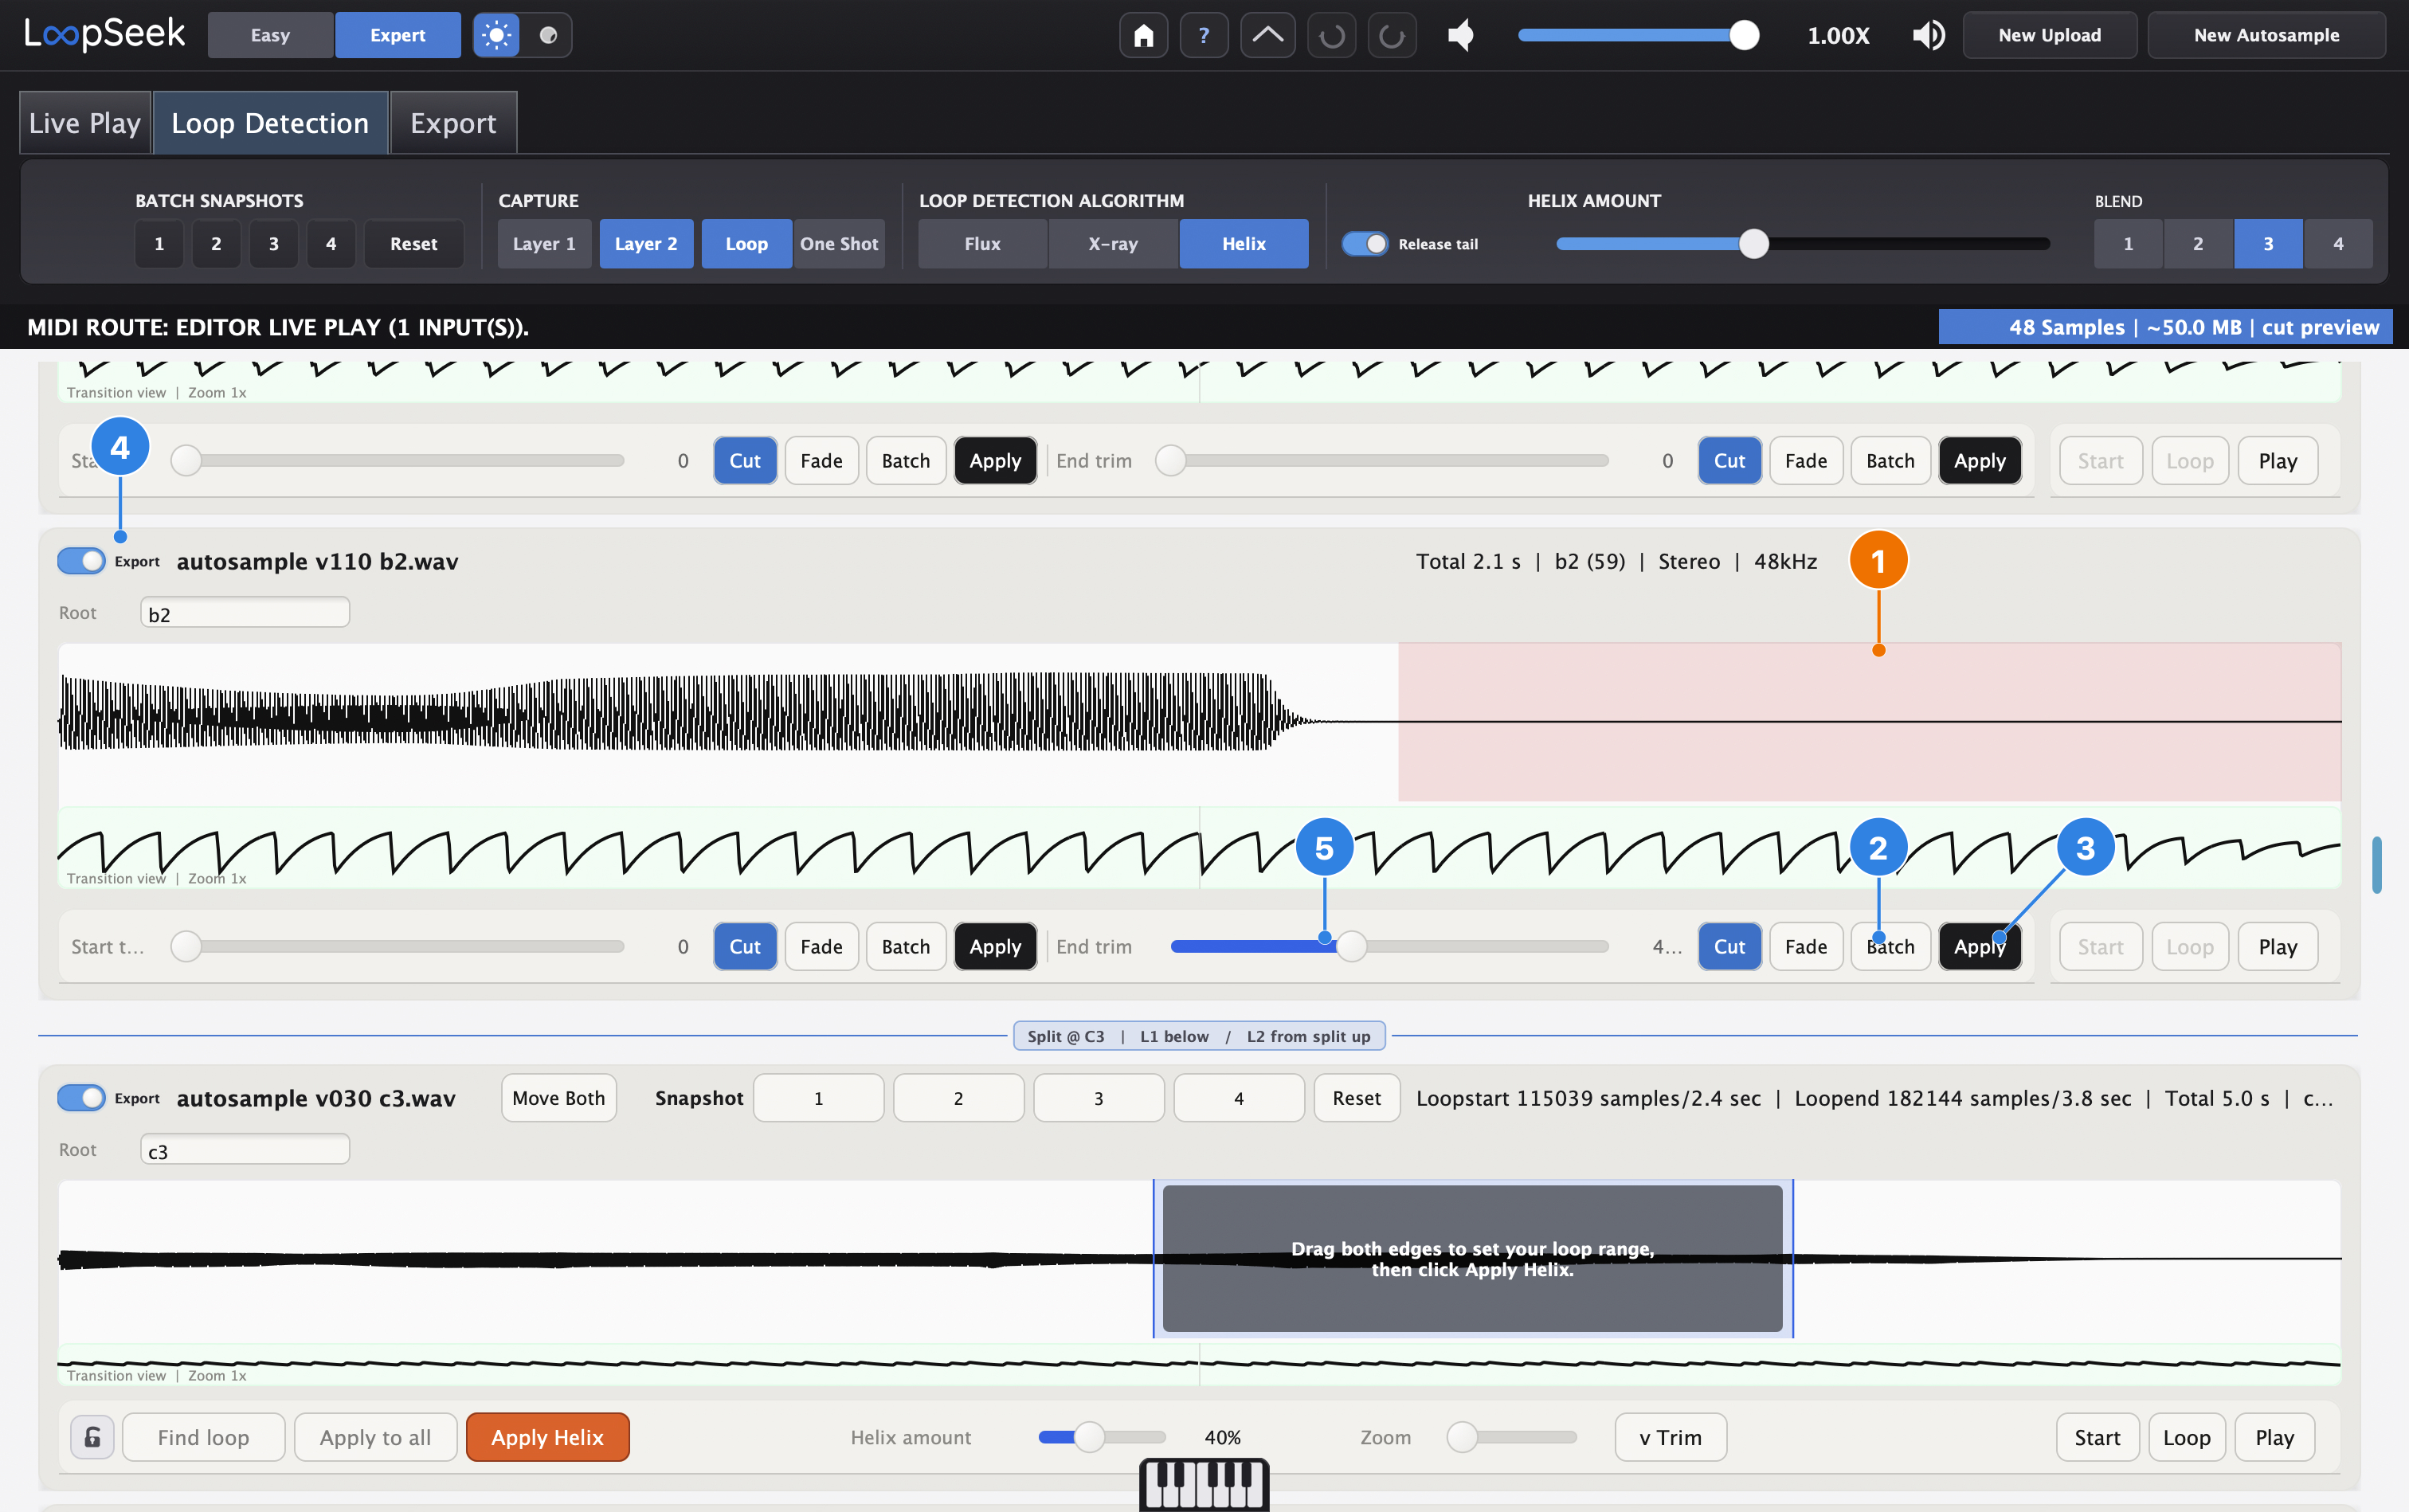
- 1Red highlight — the portion that will be removed (end trim preview).
- 2Batch — apply this trim to matching samples (same layer / set).
- 3Apply — commit the cut or fade.
- 4Export toggle — turn off to exclude a sample from Zip/Folder (waveform collapses).
- 5End trim slider / Cut · Fade row — set how much tail to remove.
All numbered pins on this screenshot sit on one sample card (the one with the red region). Status may show cut preview while you adjust. Prefer Cut for hard silence; Fade for a softer end.
Lock and nudge (power-user): lock a good loop before changing algorithms; nudge S/E in small steps.
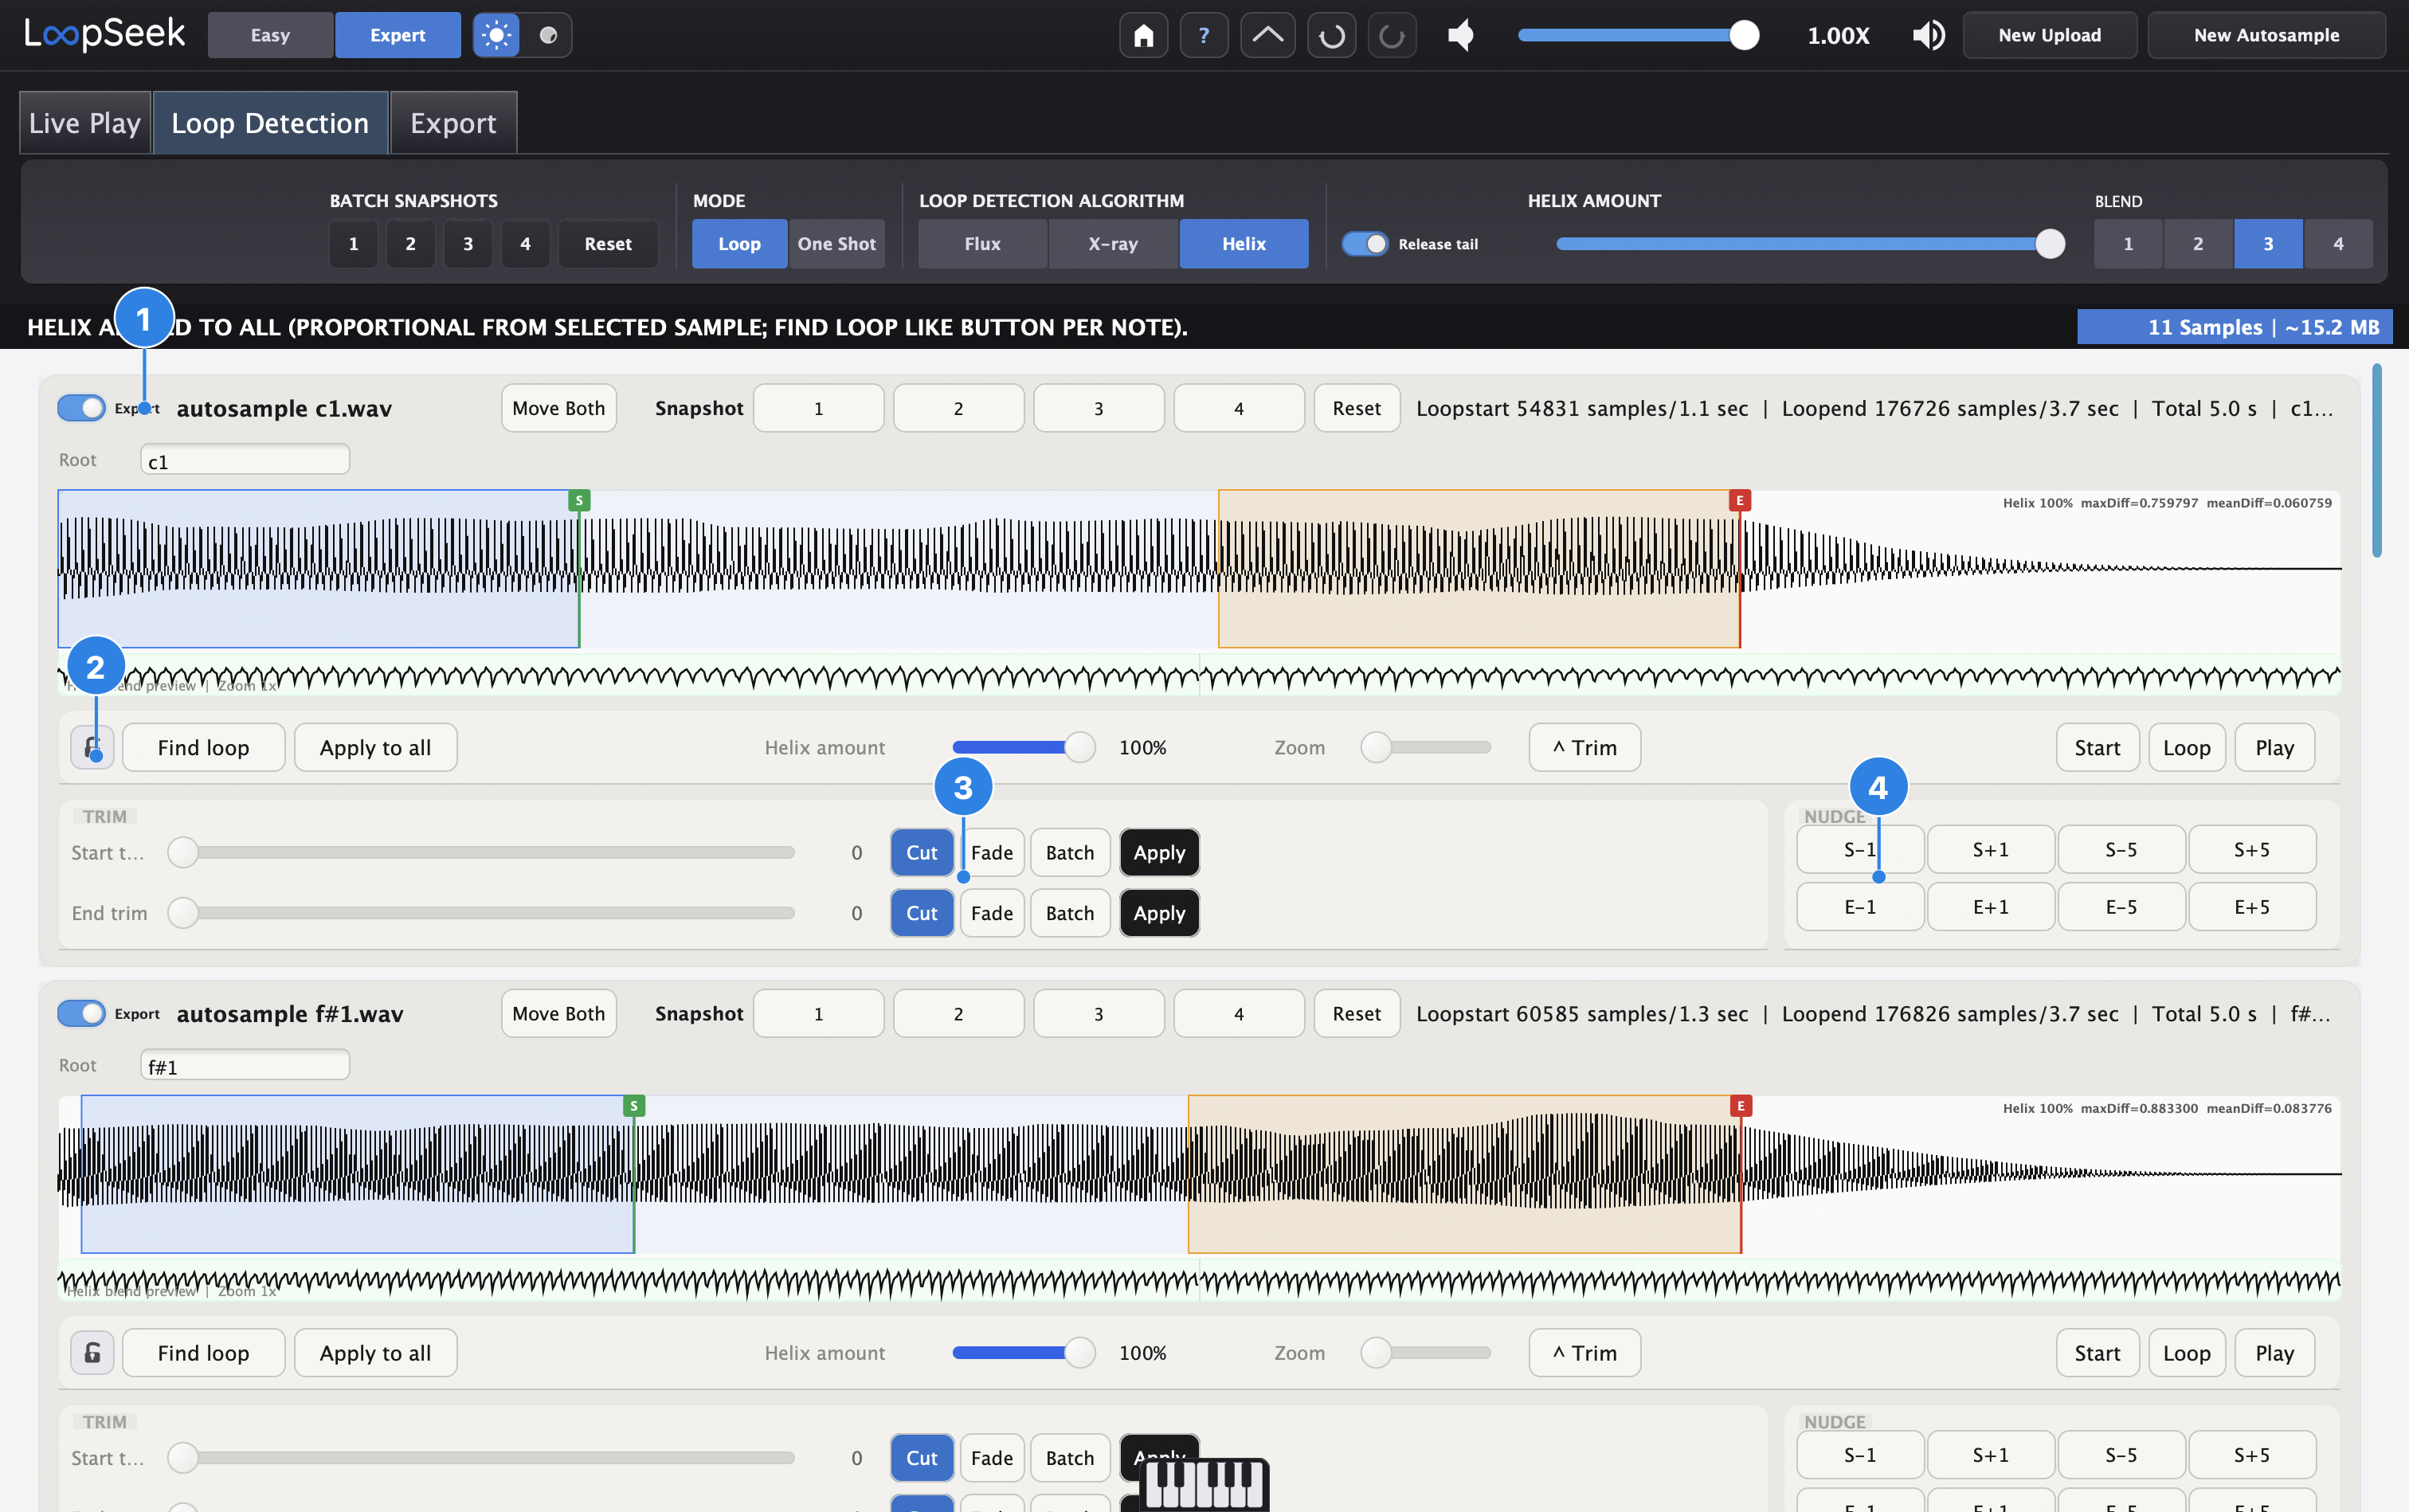
- 1Export toggle — exclude unused samples.
- 2Lock — protect this sample’s loop from batch algorithm changes.
- 3Trim tools — same cut/fade/batch row as above.
- 4Nudge S/E — small sample shifts after Helix.
X-ray (compare with Helix)
Switch the global algorithm to X-ray when Helix is not ideal — compare Seamless Match / crossfade controls, then re-apply. Not required for the main path.
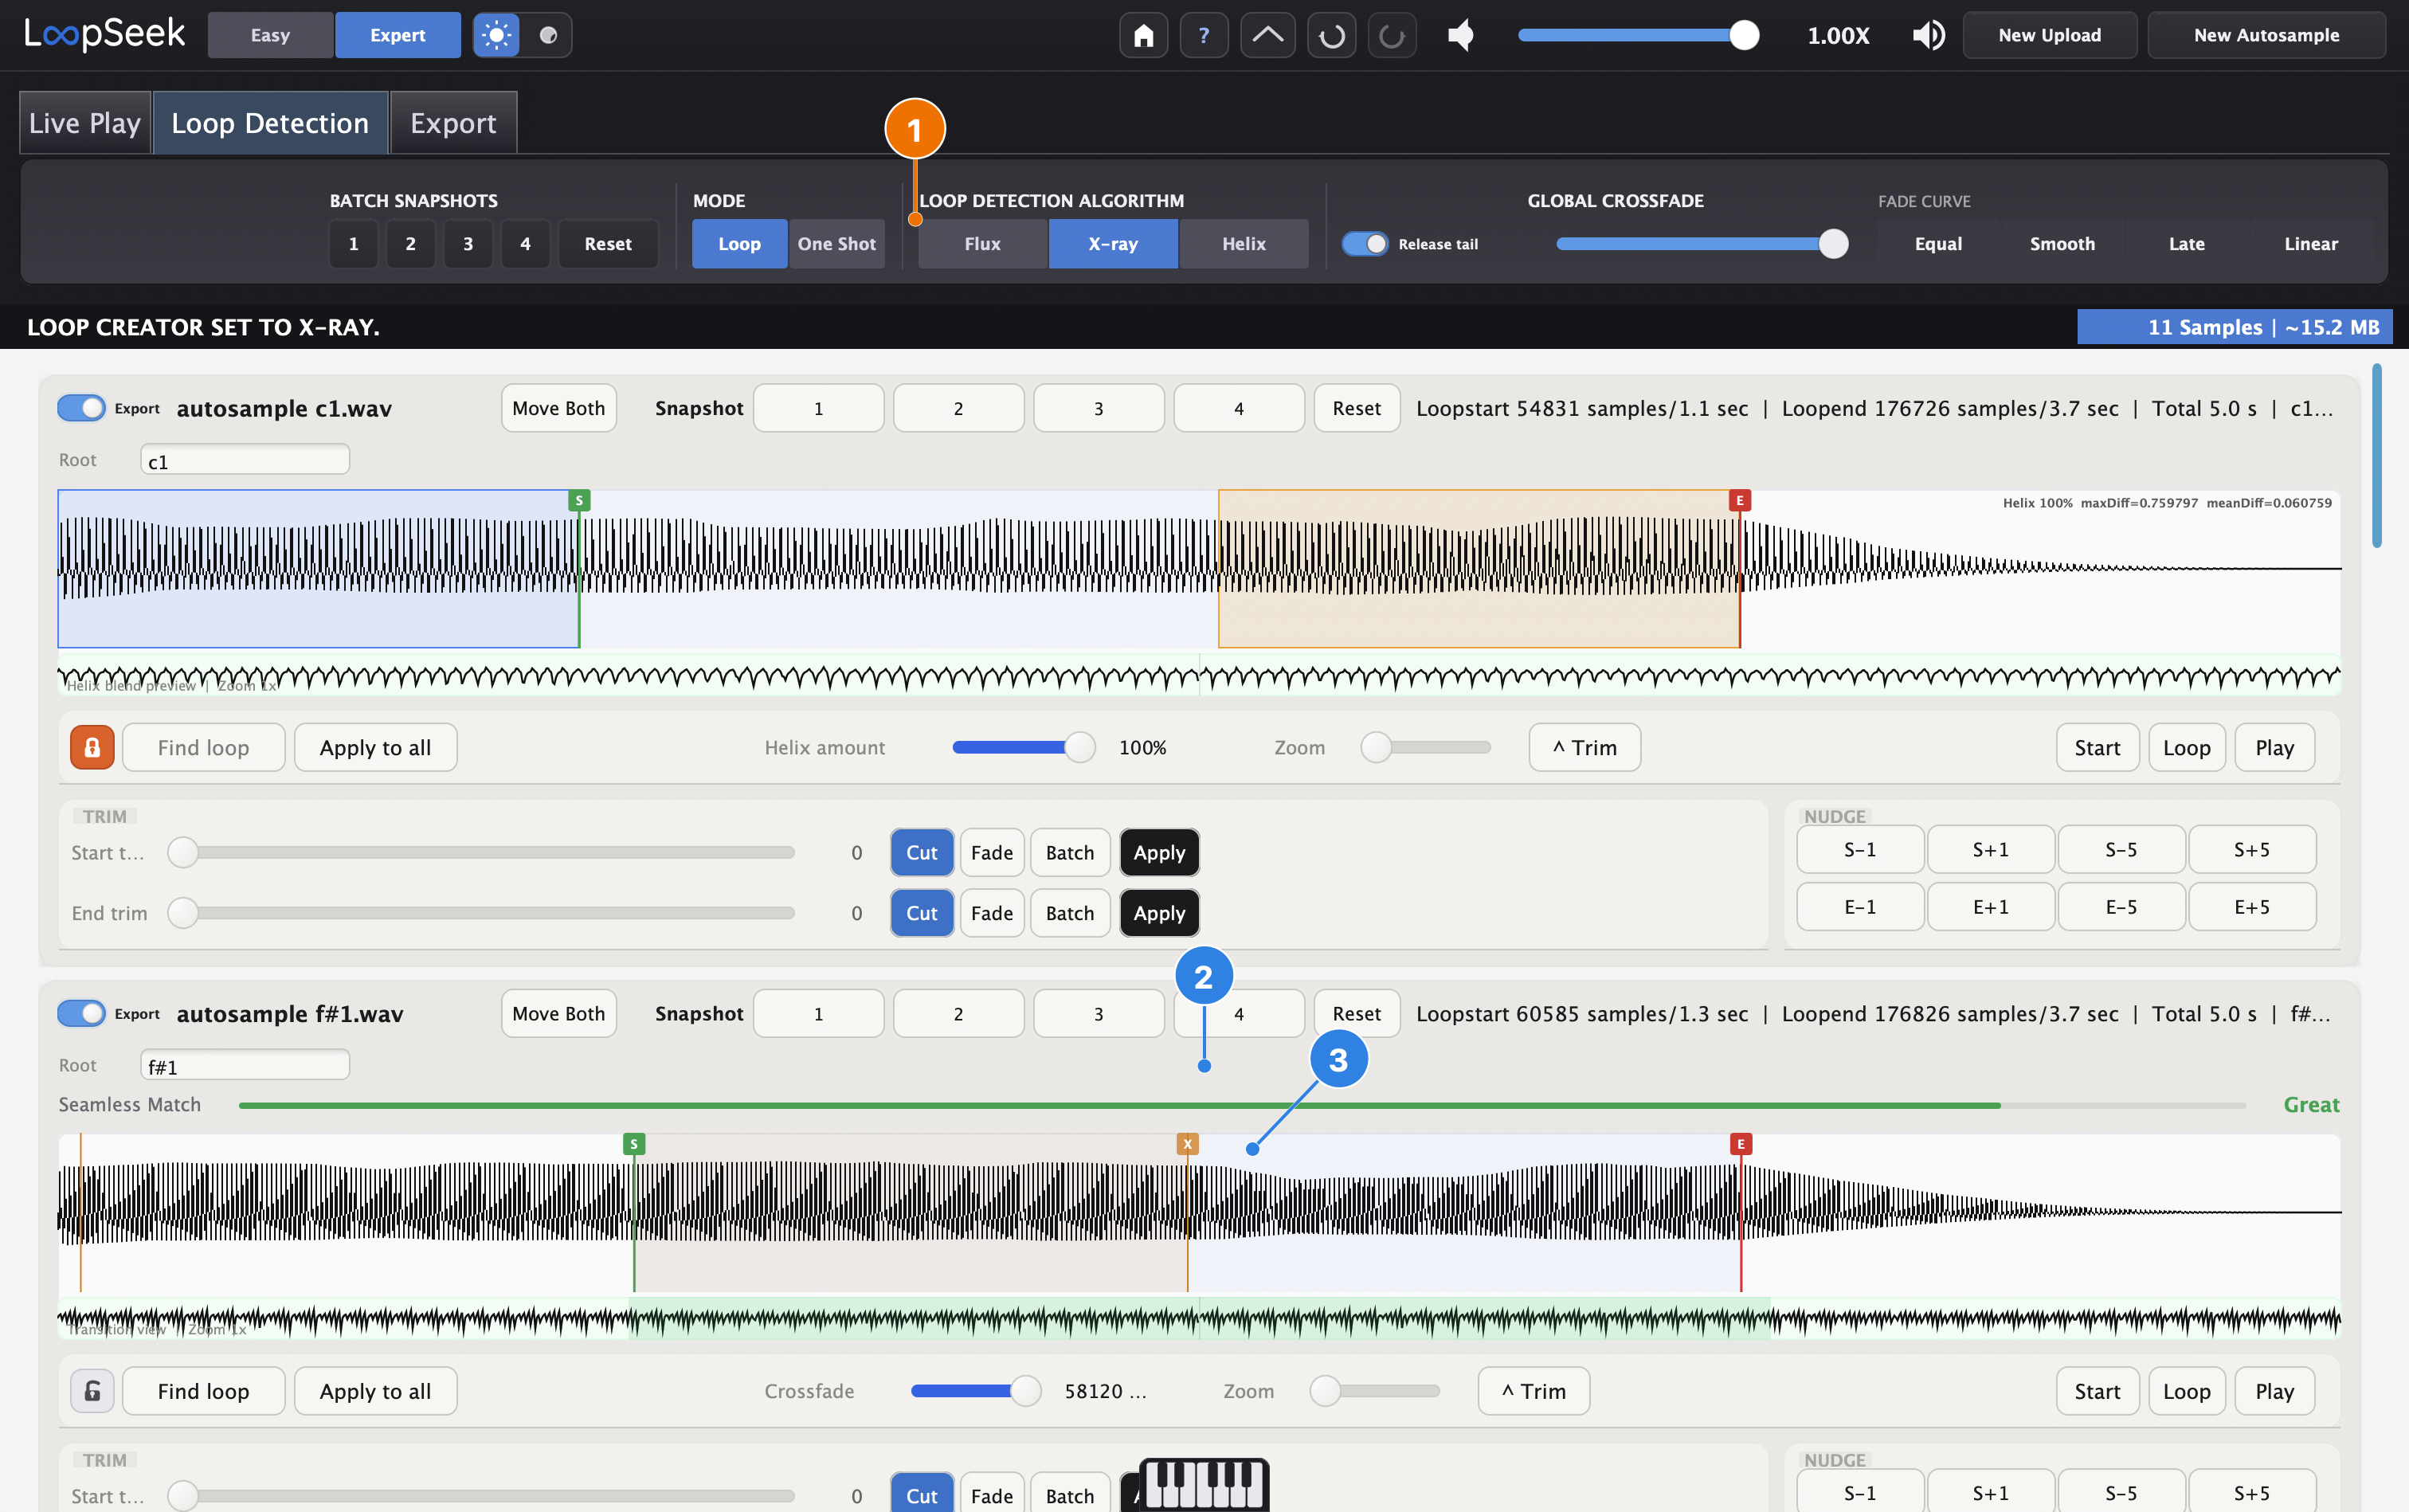
- 1X-ray selected in the algorithm strip.
- 2Seamless Match / crossfade controls (on unlocked cards).
- 3S / X / E markers — pin 3 points at f#1 (unlocked), where X-ray shows the match marker. The locked c1 card above still shows Helix (S/E only) — that is the Lock protecting it from the algorithm change.
12 Live Play tab
Preview everything that is about hearing the instrument: MIDI input, play mode, Keys highlighting, monitor Attack/Release and a simple Reverb (monitoring only — not written into the WAV).
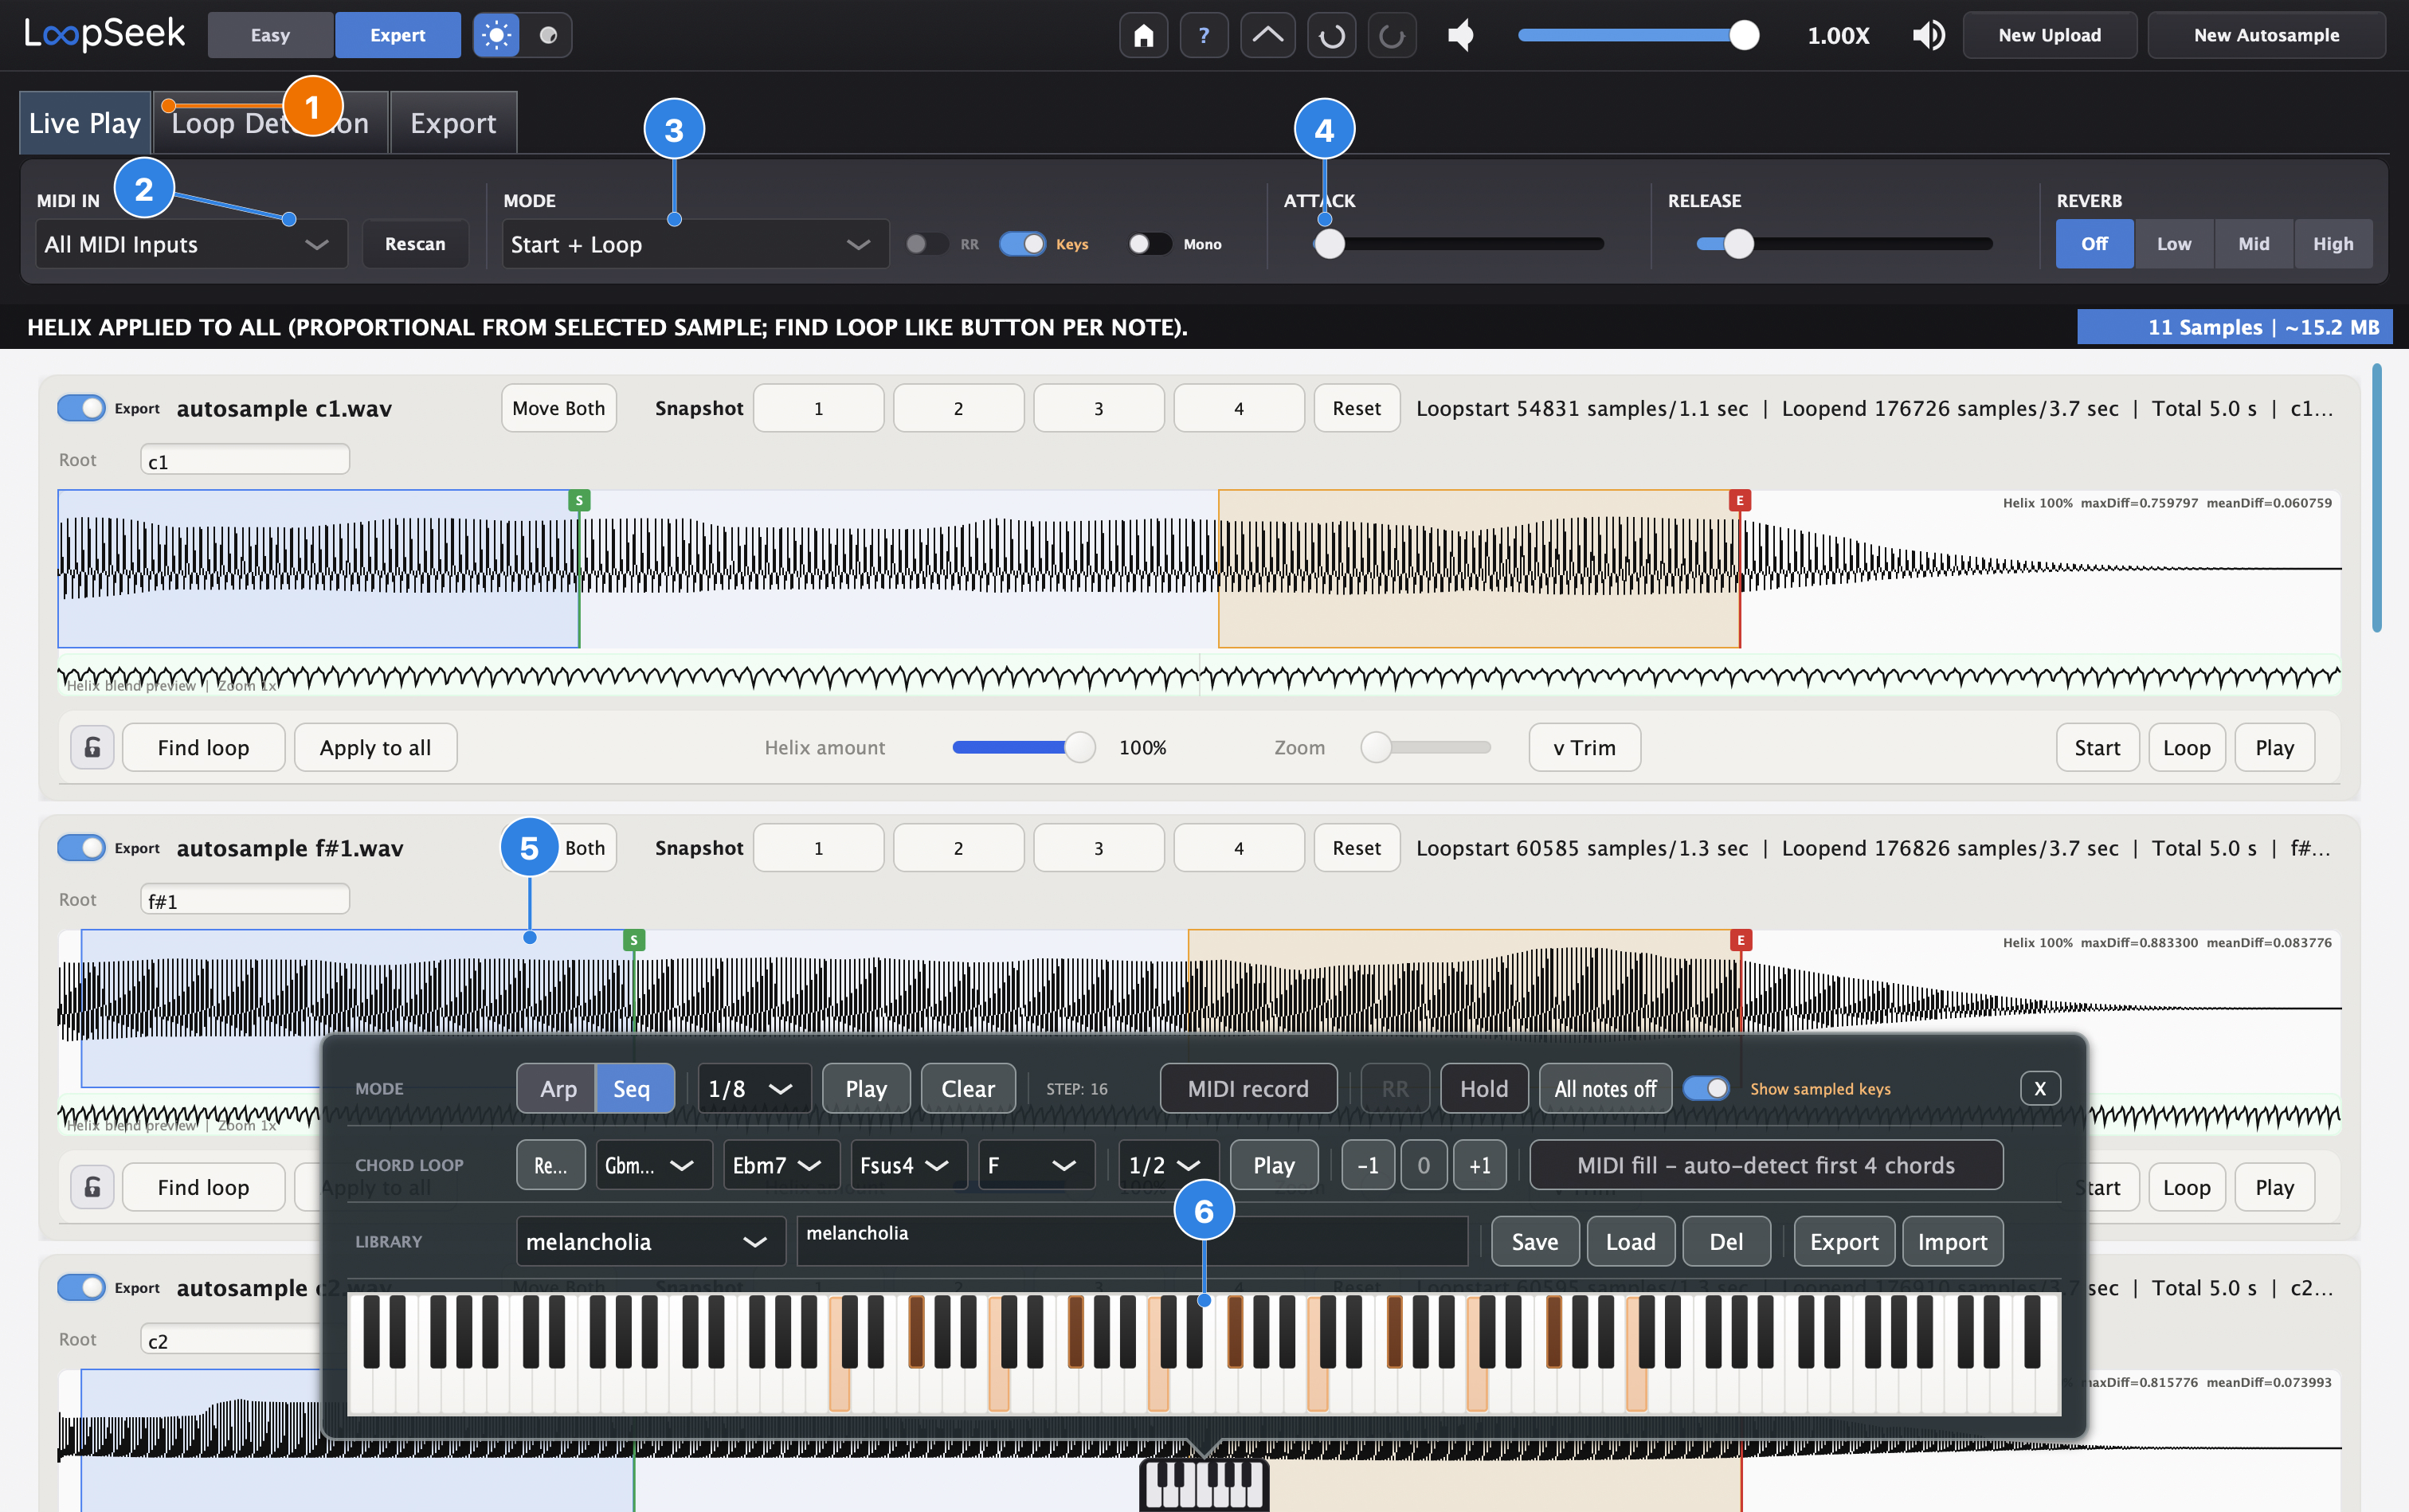
- 1Live Play tab.
- 2MIDI IN — which keyboard / MIDI port drives preview.
- 3MODE: Start + Loop, Loop only, or One shot once.
- 4Attack / Release / Reverb — listen wetter if you want; samples stay dry.
- 5Keys / Show sampled keys — sampled notes light up; focus jumps to the card you play.
- 6Keyboard — play here (or use a real MIDI keyboard).
Arp / Seq / Chord tools are optional for auditioning — leave them alone until you are comfortable.
13 Export tab
Batch renaming, target sampler format, peak/mono, then Zip or Folder — same idea as Easy. Close the virtual keyboard overlay if it covers the strip.
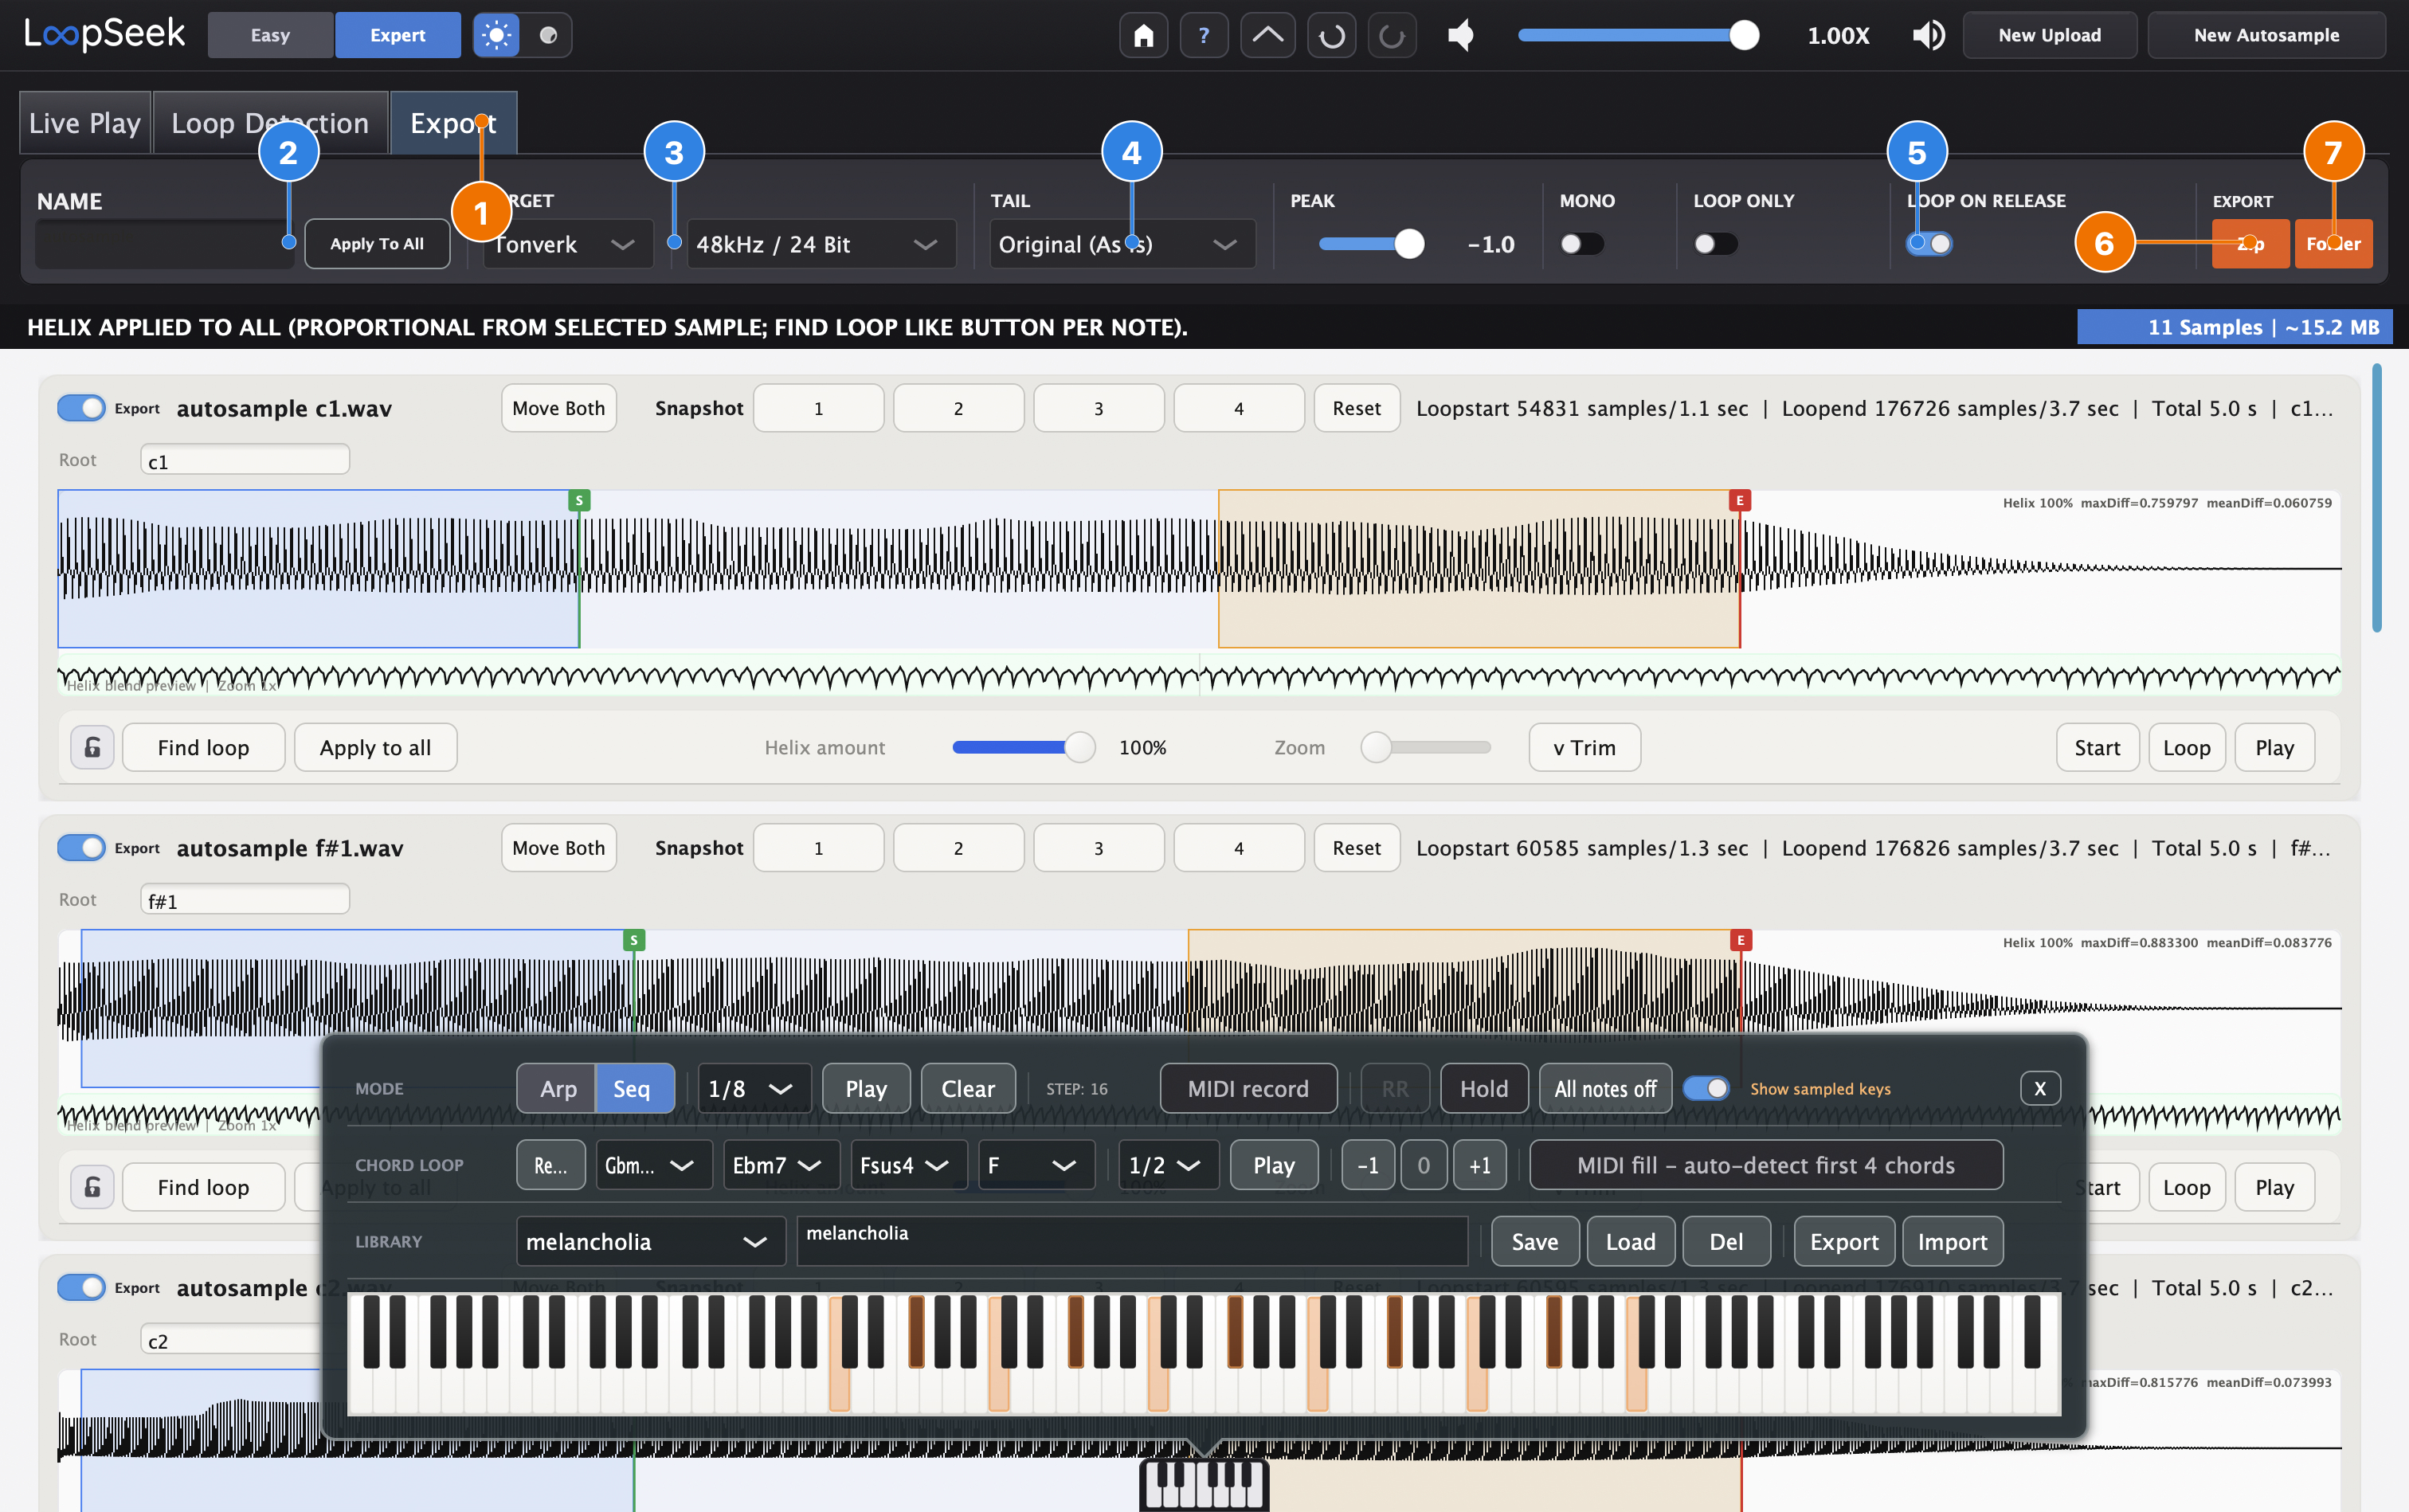
- 1Export tab.
- 2NAME + Apply To All.
- 3TARGET (Tonverk, SFZ, …) and rate/bit depth.
- 4TAIL (Cut at LoopEnd (+32) / Original) and PEAK / MONO.
- 5LOOP ONLY and LOOP ON RELEASE — loop-region-only export / keep looping until note-off when the target supports it.
- 6Zip — one archive with the device folder layout.
- 7Folder — same files written to a folder.
Split + Custom Notes
Split does not have to be two even grids. With Custom Notes you can put almost any pair on one keyboard — a General MIDI drum kit on the left, and a pad, bass, or piano multisample on the right. There are a lot of layouts like this.
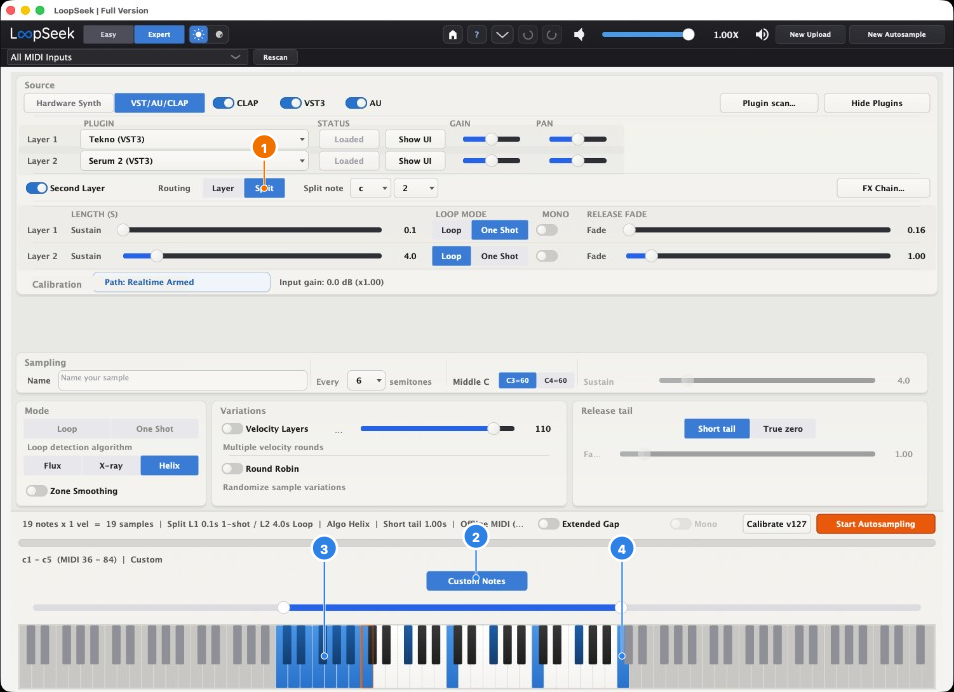
- 1Split — keys below the split note are Layer 1, keys from the split note up are Layer 2. Here Layer 1 is a drum kit (One Shot) and Layer 2 is a pad (Loop).
- 2Custom Notes — pick keys by hand (Shift+click). Blue keys are the ones that record. Left of the split the drum map is dense; right of it the multisample only hits every few semitones.
- 3Left zone — drum keys (General MIDI style), played from Layer 1.
- 4Right zone — pitched multisample (pad, bass, piano, …), played from Layer 2.
Compromise: on most hardware samplers the finished multisample shares one envelope, one filter, and the same FX. Record and balance it in LoopSeek so it already sounds the way you want to play it. A slow attack on the pad has to be in the recording — if you add Attack on the sampler later, the drums slow down too. Loudness is the same: set each layer’s Gain in LoopSeek, because one hardware level applies to both sides.
Done
You followed the Split + velocity path, autosampled, refined loops in Loop Detection, auditioned in Live Play, and exported as Zip or Folder.